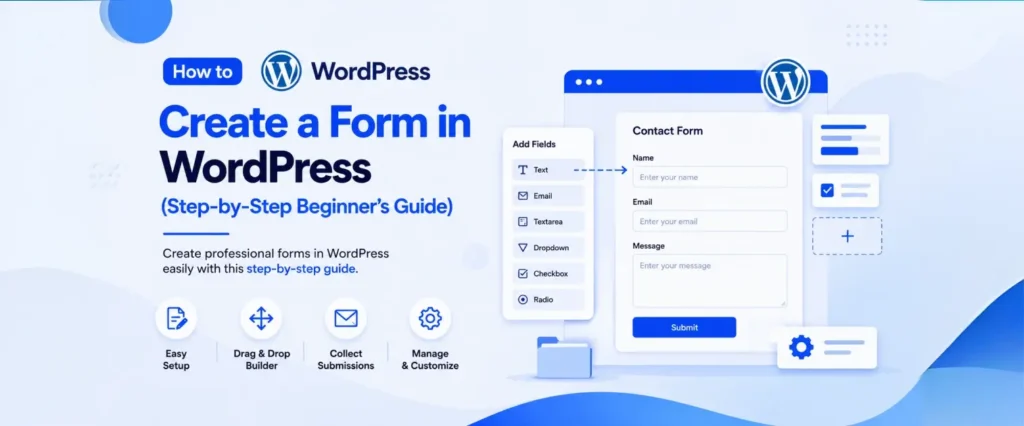
Most tutorials on building a WordPress form stop at “install a plugin, drag in some fields, hit publish.” That’s the easy part. The harder question — the one that actually decides whether people fill out your form or just leave the page — is which questions to ask, what to write on the button, and whether the form even looks right on someone’s phone.
This guide covers both. You’ll see the exact steps to build a working form using YS LeadGen, a simple, beginner-friendly plugin, and you’ll understand why each step matters, not just what to click. By the end, you’ll have a form that’s live on your site and actually built to get filled out, not just one that looks nice.
Whether you want a contact form, a form to collect quote requests, or a simple sign-up box for your newsletter, the steps are mostly the same: pick a plugin, choose a starting design, fill in your own questions, and add it to your page. No coding, no technical skills needed. This guide is written for complete beginners, so even if you’ve never touched a WordPress plugin before, you’ll be able to follow along and have a working form on your site by the time you’re done reading.
Why a Simple Form Matters More Than You’d Think
It’s easy to think of a contact form as just another page — something you add once and forget about. In reality, it’s often the single most important page on your whole website.
Someone who just found your business through a Google search usually isn’t ready to call you. They just want to ask a quick question or find out roughly what something costs, so they look for a button that says Contact Us or Get a Quote.
If filling out that form is quick and easy, most people will do it. If it asks too many questions, feels confusing, or looks broken on their phone, they’ll usually just leave and try a competitor instead.
That’s why it’s worth spending a little extra time getting your form right. Businesses often spend real money getting people to visit their website through ads and search results, only to lose a chunk of those visitors right at the final step — because the form was too long or annoying to fill out. Something as small as cutting a form from ten questions down to four or five can noticeably increase how many people actually contact you.
What Kinds of Forms Can You Add to a WordPress Site?
When most people hear “WordPress form,” they think of a basic contact page. That’s one option, but a form plugin can do a lot more than that. Here are some common examples:
- A contact form — lets people message you without seeing your actual email address
- A quote request form — collects a few project details before you talk to someone
- A newsletter sign-up form — grows your email list
- An event or webinar registration form
- A product enquiry form — useful for online stores
- A warranty registration form
- A feedback or survey form
- A booking or appointment request form
Most websites end up using a few of these over time, one for each page or purpose. Once you’ve made your first one, making the next one only takes a couple of minutes.
Do You Actually Need a Plugin?
You could technically build a form without one, but for almost everyone, it’s not worth the trouble.
Building a form from scratch means writing the code that displays it, the code that checks people filled it in correctly, the code that sends you an email when someone submits it, and code to stop spam bots from filling it with junk. Then you’d need to keep fixing that code every time WordPress updates.
A form plugin does all of that for you automatically. That’s why nearly every WordPress site — big or small — uses a plugin instead of building forms by hand. It’s faster, and far less likely to break later.
How to Pick a Good Form Plugin
There are a lot of form plugins out there, and some are built for very different jobs — surveys, payments, big marketing funnels, and so on. Instead of picking whichever one has the most features listed, look for one that covers what you need right now, with room to add more later.
A good plugin should give you:
- An easy visual editor where you drag things into place — no typing code
- Ready-made designs (templates) so you’re not starting from a blank page
- Forms that automatically look good on phones and tablets
- Built-in spam protection
- A simple way to add the form to any page (usually a short code you paste in)
- The option to grow into more advanced features later, if you need them
If a plugin checks those boxes, it’ll work fine for most websites.
Why This Guide Uses YS LeadGen
This guide uses YS LeadGen because it’s easy for a beginner to pick up, while still having room to grow. You can have a simple contact form working in a few minutes, and if you later want more advanced tools — like showing different forms to different visitors — the same plugin has that built in too, so you won’t need to switch to something else down the line.
Most of the steps below apply to other form plugins as well, even if you end up choosing a different one.
Before You Start: Decide What the Form Is For
The most important step isn’t actually inside the plugin — it happens before you even open your WordPress dashboard.
Ask yourself one simple question: What do I want someone to do after they fill this out?
- If you just want people to reach out, you probably only need their name, email, a subject, and a message.
- If you’re collecting quote requests, you might also want their phone number, company name, or a short description of what they need.
Try not to ask for everything all at once. Every extra question makes the form feel longer and more like a chore, and that’s exactly what causes people to give up halfway through — especially on a phone. You can always ask for more details later, once you’re already talking to them.
Once you know what the form is for, you’re ready to build it.
Step 1: Create a New Form
Log into your WordPress dashboard and find YS LeadGen in the menu on the left. Click it to open the plugin, then click Create New Campaign.
You might notice YS LeadGen calls each form a “campaign” instead of just a “form.” That’s because it’s tracking more than the form itself — it also keeps track of how it looks, when it shows up, who sees it, and how well it’s performing, all in one place.
Here’s why that’s useful. A lot of websites end up running several different forms at once, for example:
- A general contact form on your homepage
- A quote request form for people who click your Google ads
- A newsletter sign-up form on your blog
They all collect information, but each one has a different job and a different audience. Keeping them organized separately makes it much easier to find and update the right one later, especially once your site has grown.
Step 2: Choose “Form Campaign”
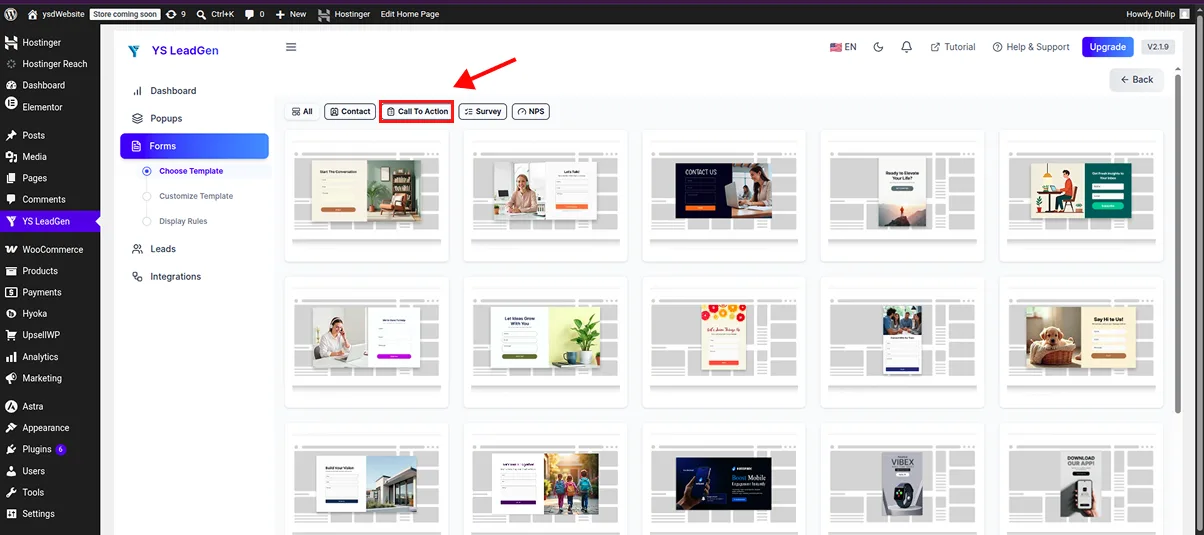
After clicking Create New Campaign, you’ll see a few different options, each built for a different goal. Since we just want a regular form, choose Form Campaign, then click Create Form.
This opens a step-by-step wizard that walks you through the setup one screen at a time, instead of throwing every option at you at once. That makes it much easier to follow if this is your first time.
Step 3: Give Your Form a Clear Name
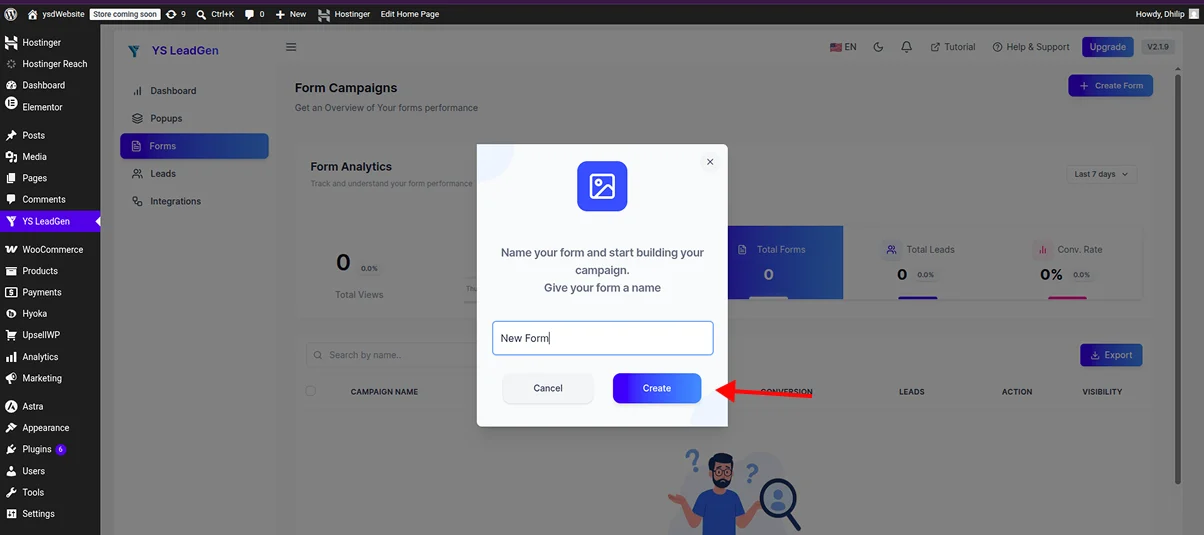
Next, you’ll be asked to name your form. It’s tempting to type something quick like “Contact Form” or “Test” and move on. Don’t — this name is just for you to recognize later; visitors will never see it, so it’s worth using a name you’ll actually understand months from now.
Instead of something generic, try to be specific, like:
- Homepage Contact Form
- Product Enquiry Form
- Quote Request — Landing Page
- Newsletter Sign-Up — Footer
- Support Request Form
A simple pattern like Page Name – What It’s For makes your list of forms much easier to scan later, especially if more than one person manages the website.
Step 4: Pick a Starting Design (Template)
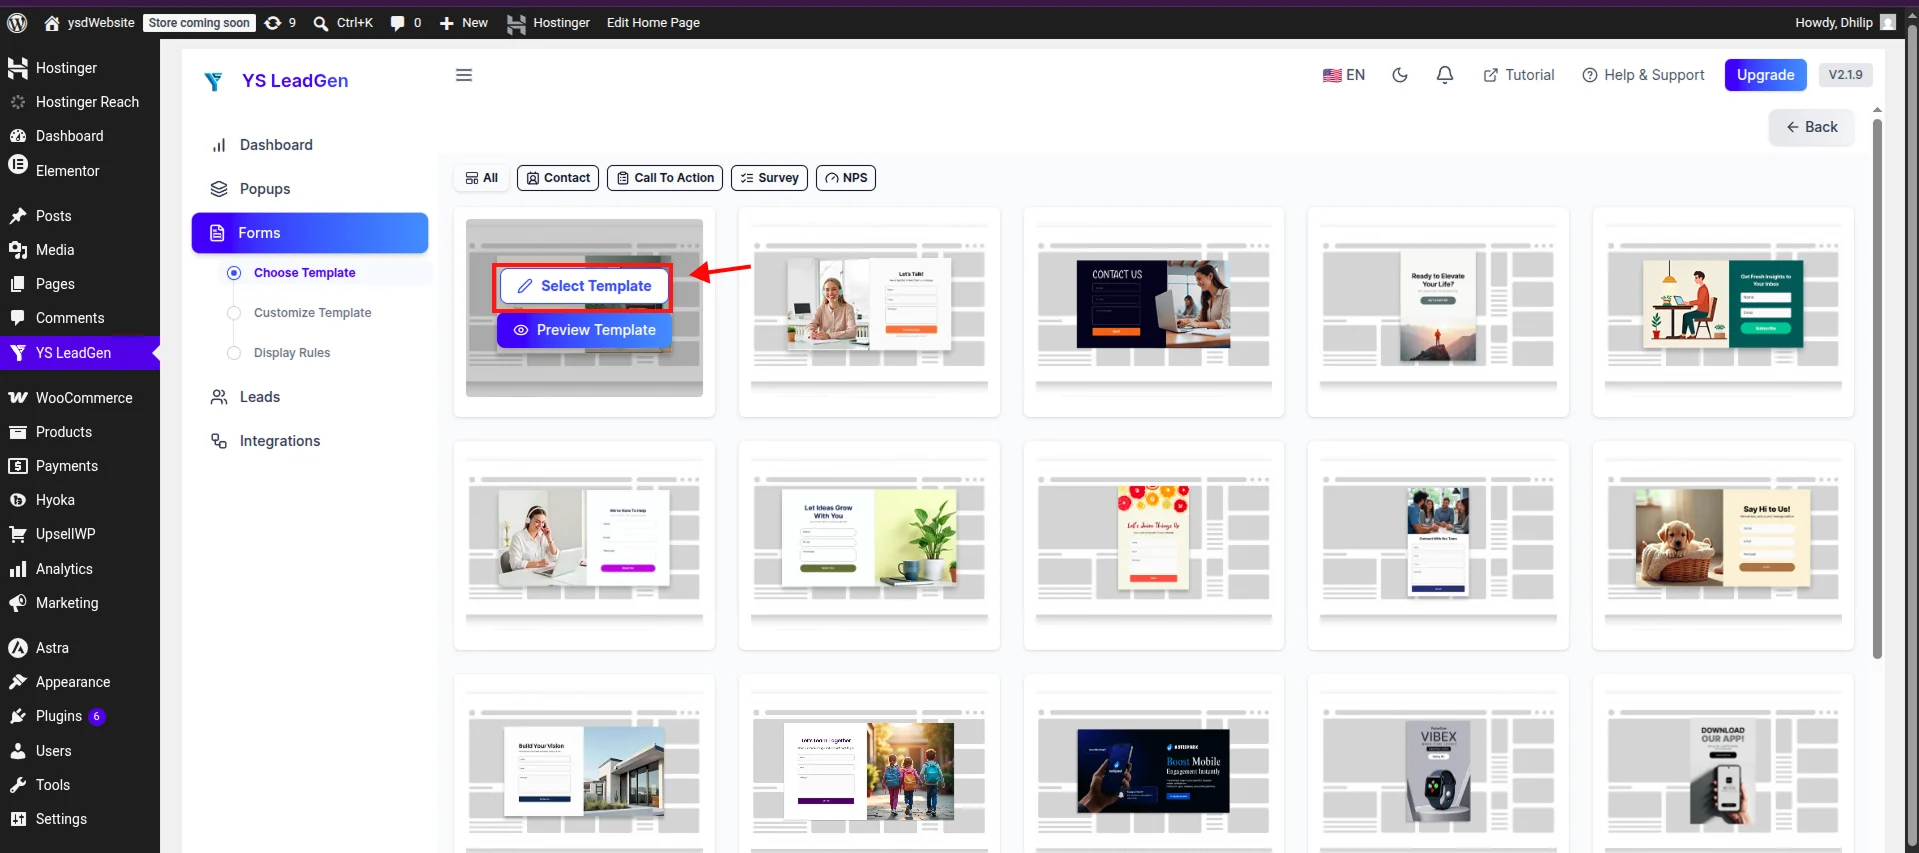
Now it’s time to choose what your form will look like. A lot of beginners assume starting with a totally blank form gives them more freedom. In practice, it just means redoing work a ready-made design has already done for you — good spacing, readable text, and a layout that already works well on phones.
YS LeadGen comes with designs built for common needs, like:
- Contact forms
- Newsletter sign-up forms
- Feedback forms
- Quote request forms
- Registration forms
- Lead forms for marketing pages
Pick whichever one is closest to what you need, then click Select Template. Don’t worry too much about finding the “perfect” one — everything on it can still be changed afterward, including the wording, colors, questions, and layout. Think of it as a starting point, not a final decision.
Step 5: Customize Your Form
Once you’ve picked a design, YS LeadGen opens its visual editor — this is where your form actually comes together. From here, you can change the heading, rewrite the description, add your logo, add or remove questions, and change the button text. Everything is done by clicking and typing; there’s no code involved. If you’ve used the regular WordPress editor or a page builder like Elementor before, it’ll feel familiar.
Think Like a Visitor, Not Like a Business Owner
It’s easy to build a form around what you want to know. It works better if you think about the person filling it out instead. Ask yourself: would this feel quick and easy to fill in, or like a chore?
Someone asking for a price usually doesn’t want to answer fifteen questions before they’ve even spoken to you. Start with just the basics — you can always ask for more once you’re already talking. Cutting out unnecessary questions is one of the easiest ways to get more people to actually finish and submit your form.
Which Questions Should You Actually Ask?
It depends on what the form is for.
A basic contact form usually only needs:
- Full Name
- Email Address
- Subject
- Message
A quote request form might also ask for:
- Phone Number
- Company Name
- What service they need
- Rough budget
- A short project description
A good rule of thumb: only ask a question if you’ll actually use the answer during your first conversation with them. Save the rest for later.
Write a Button That Says What Happens Next
The button at the bottom of your form is small, but it matters more than people expect. A plain “Submit” doesn’t tell someone what they’re actually agreeing to.
Instead, try wording that matches the action, like:
- Send Message
- Request a Quote
- Get My Free Consultation
- Book My Demo
- Join the Newsletter
It’s a small change, but it removes a little bit of hesitation right at the moment someone’s deciding whether to click.
Check How It Looks on a Phone
More than half of website visitors today are browsing on their phone, not a computer. So before you publish anything, look at your form on a smaller screen. Make sure the text is easy to read, there’s enough space around each field, and the button is easy to tap with a thumb.
A form that looks great on a laptop but feels cramped and awkward on a phone will quietly lose you inquiries — and you’ll never even know it happened.
Save Your Work Often
Get in the habit of saving as you go, just in case your browser refreshes or your internet drops. Once you’re happy with everything, click Save and Next to move on.
Step 6: Choose Who Sees Your Form (Optional)
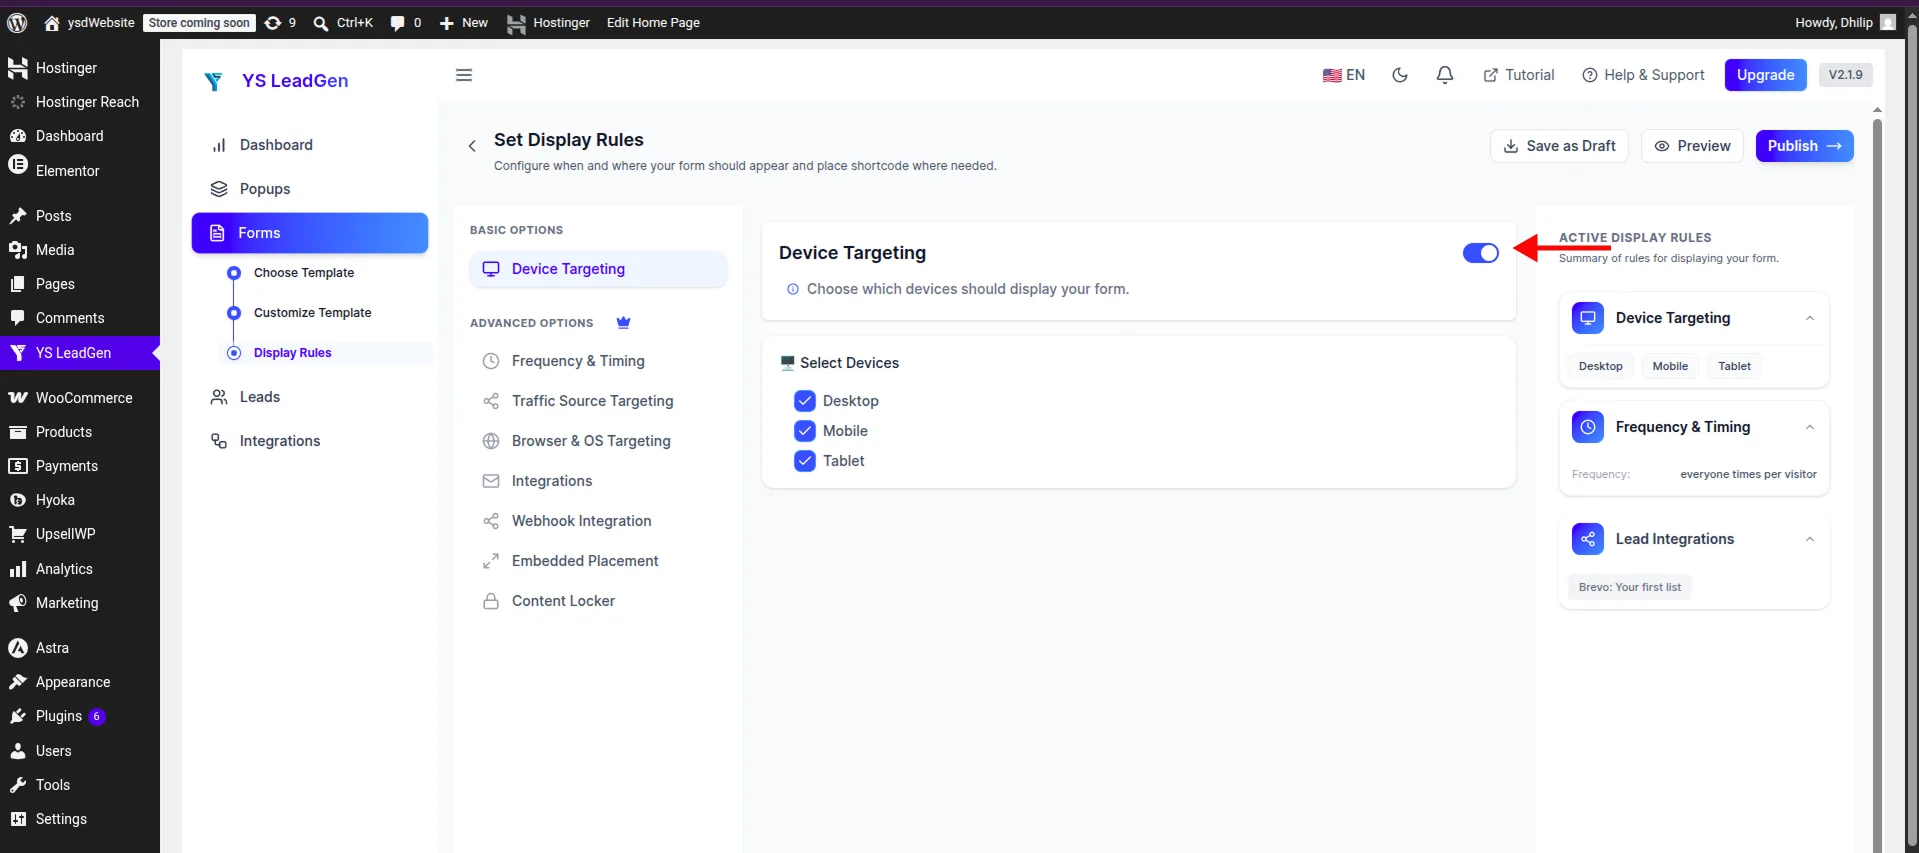
At this point, your form is basically done. If you just want a simple contact form, you can skip ahead and publish it right now — the default settings work fine. But if you’re planning to run a few different campaigns, a few extra minutes here can make a real difference.
Should Every Visitor See the Same Form?
Not necessarily. Someone who found you through a regular Google search is often still just browsing and comparing options. Someone who clicked a paid ad is usually further along and already interested. YS LeadGen lets you show a different form to each type of visitor without building separate pages for them.
Choosing Which Devices See the Form
You can choose whether your form appears on computers, phones, tablets, or all of them. For most websites, showing it on all devices is the right call. There are a few exceptions — for example, if you’re promoting an app that only phones can install, it might make sense to only show that form to mobile visitors. Unless you have a specific reason, though, avoid hiding your form from phone users, since that’s likely where most of your visitors are coming from.
Controlling How Often People See It
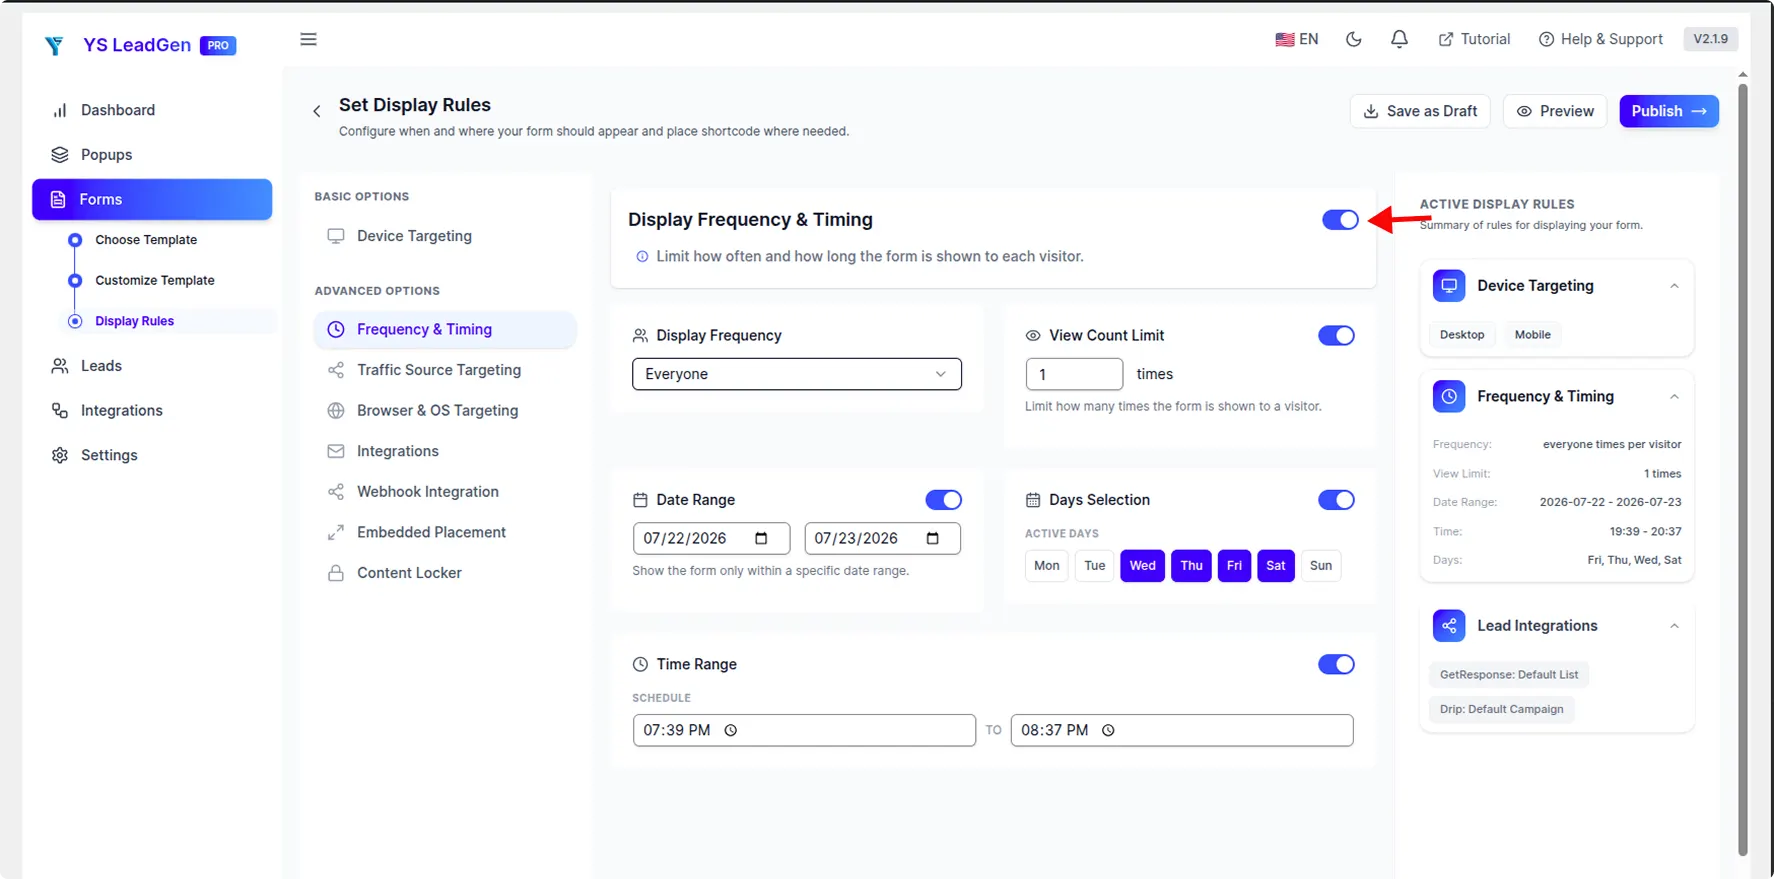
If you’re using a pop-up style form instead of one embedded directly on a page, think about how often the same visitor sees it. Nobody likes the same pop-up showing up every time they click to a new page. YS LeadGen lets you control how often a form appears, how many times each visitor sees it, and exactly which dates it should be active. This is especially handy for limited-time offers or seasonal promotions — you can set it to turn off automatically once the promotion ends, so you don’t have to remember to remove it yourself.
Showing Different Forms to Different Visitors
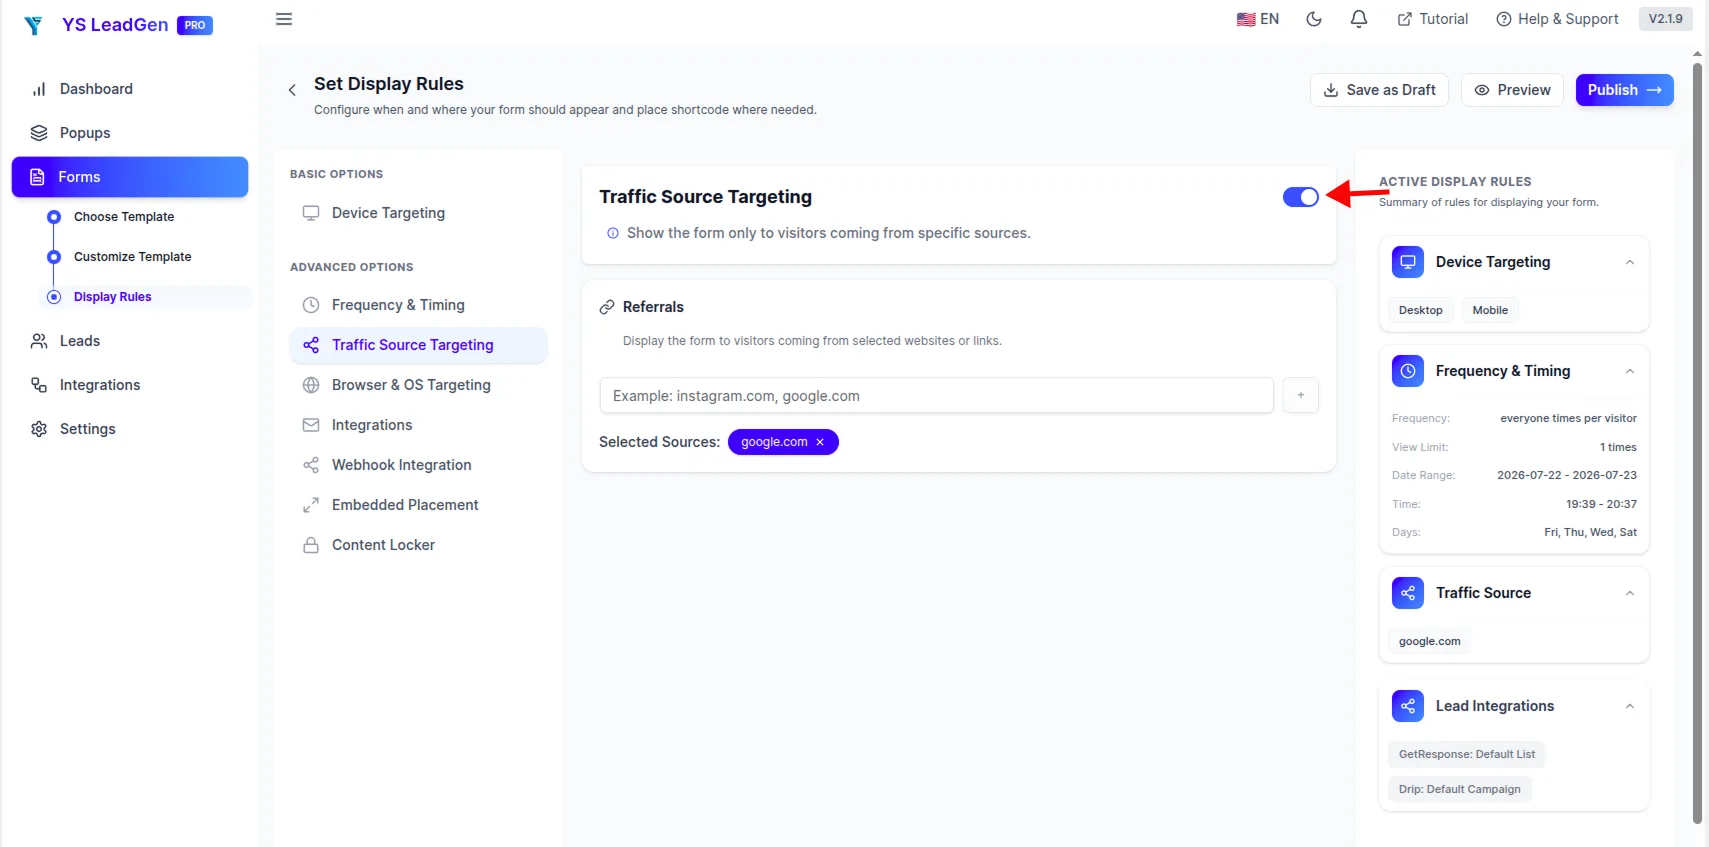
Not everyone arrives at your site the same way. Some people find you through a search engine, others click a Facebook ad, and others come from an email you sent. YS LeadGen lets you show a different form depending on where the visitor came from.
A visitor who clicks a Google ad for “roofing services” could see a detailed quote request form asking about the size of their project. A visitor who came from your monthly email newsletter might see a simpler form to sign up for a webinar instead. Same page, different form, matched to what that visitor is likely looking for — and this small adjustment often leads to more people filling it out.
Step 7: Double-Check, Then Publish
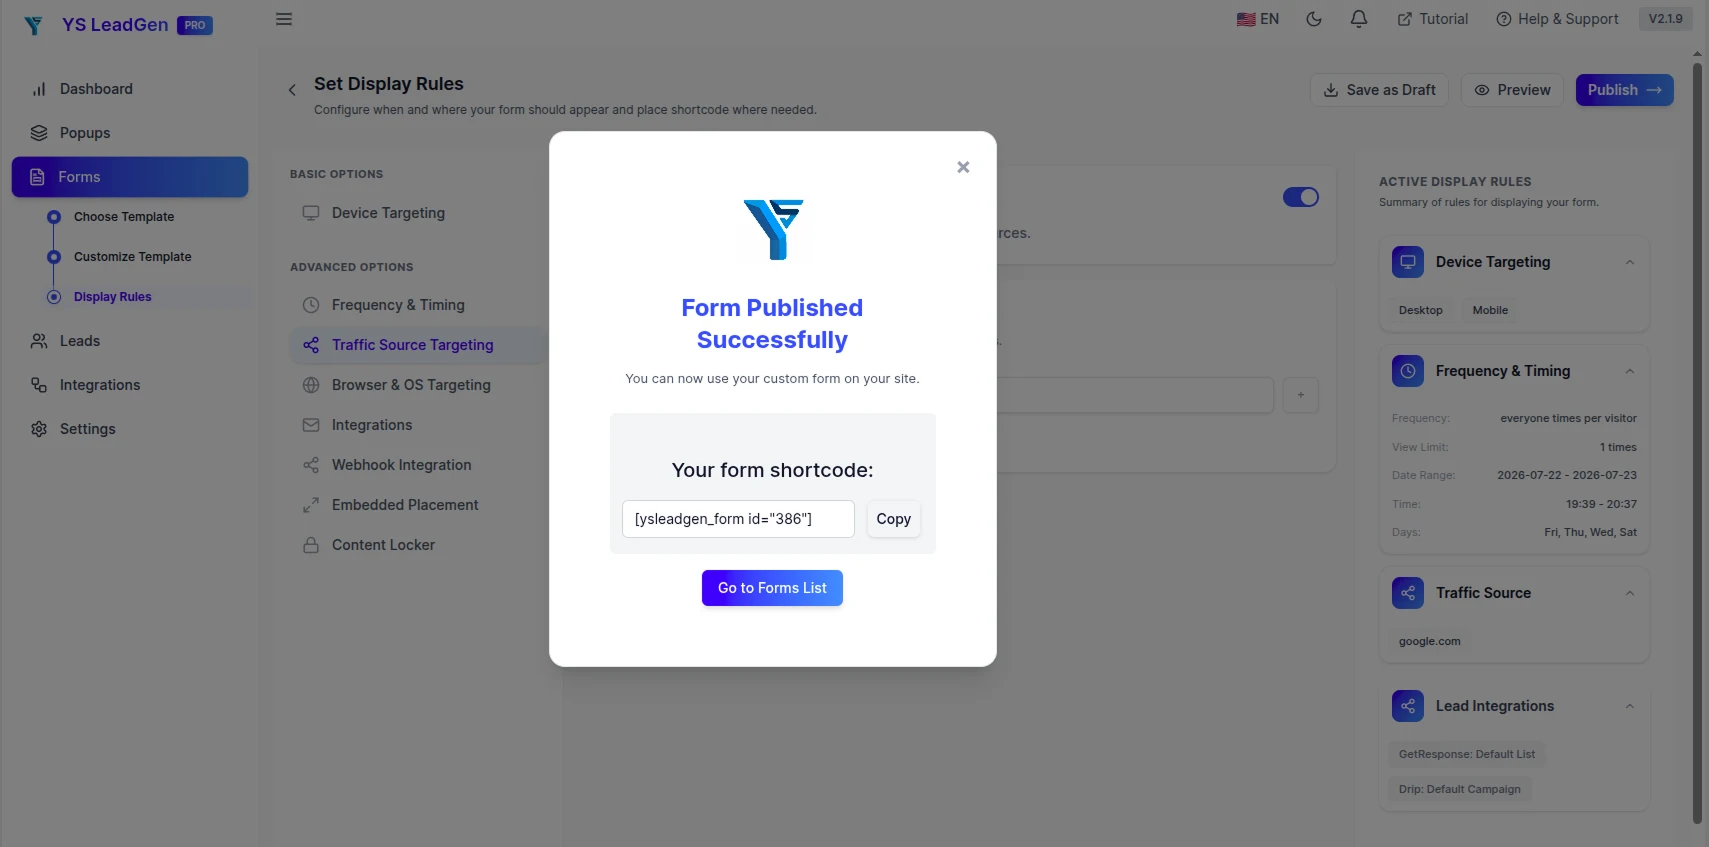
Before you make your form live, take a minute to look it over one more time. Check that:
- Every question works the way it should
- The heading is clear
- The button explains what happens when you click it
- There are no typos
- It looks right on both a computer and a phone
- You haven’t left in any questions you don’t actually need
Once it all looks good, click Publish. YS LeadGen will give you a short piece of code, called a shortcode, that you’ll use to put the form on your page.
How to Add Your Form to a Page
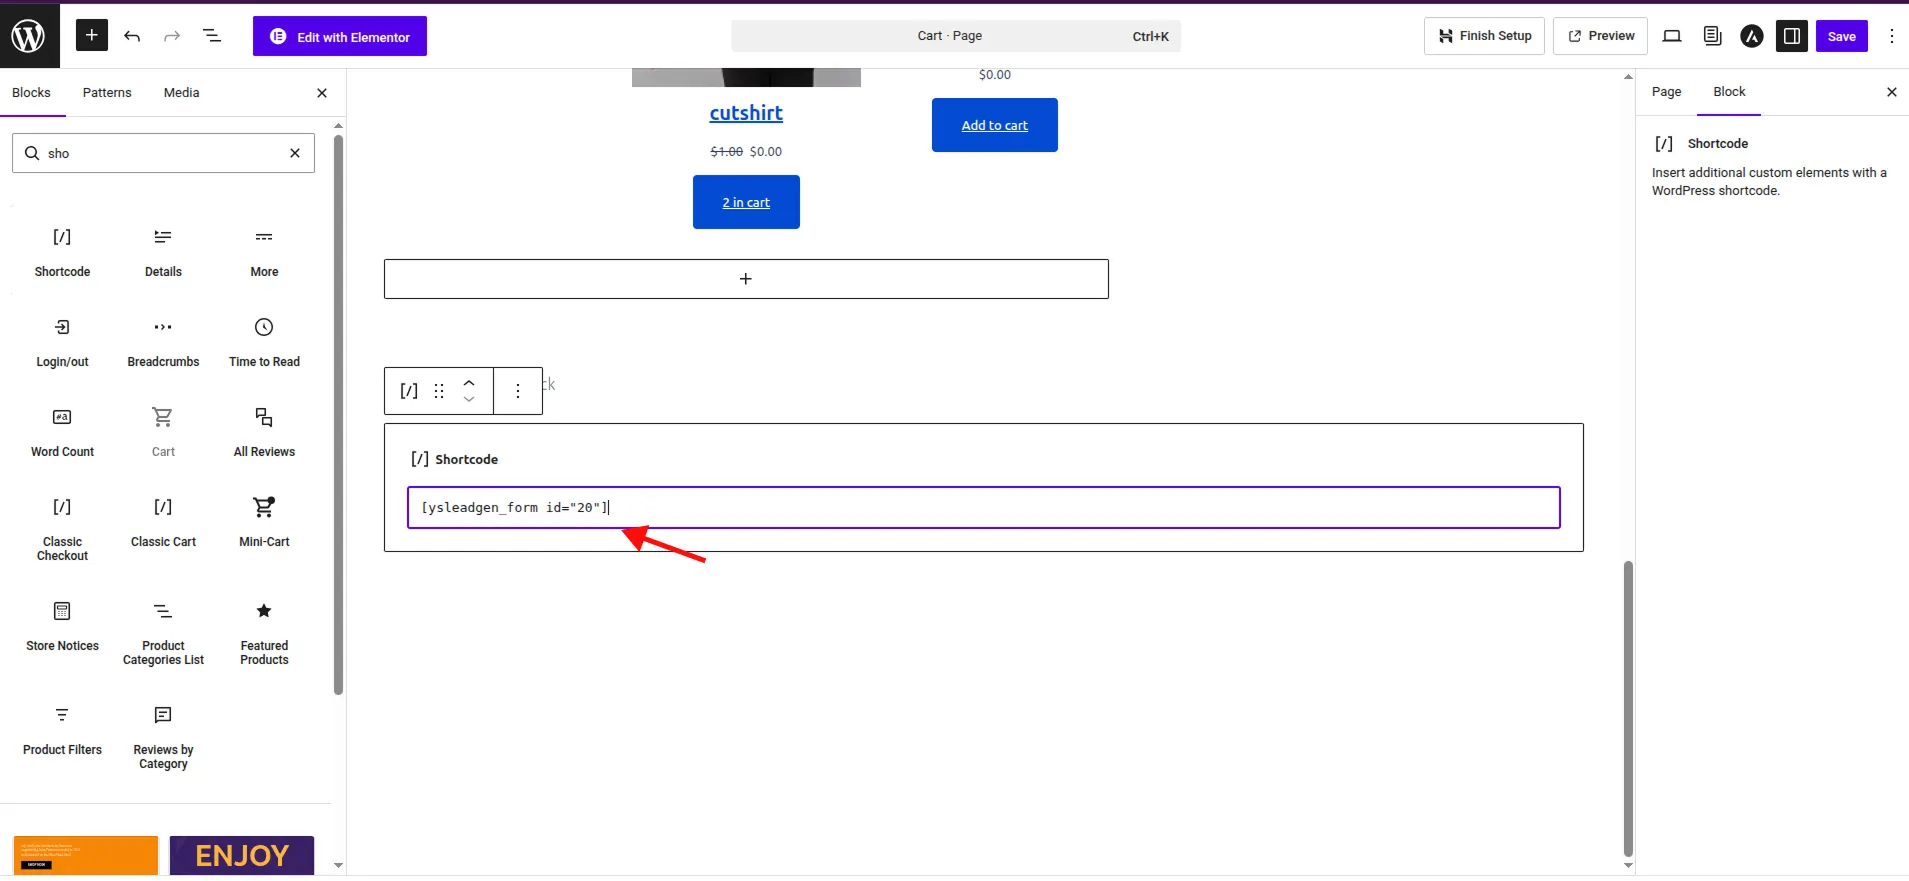
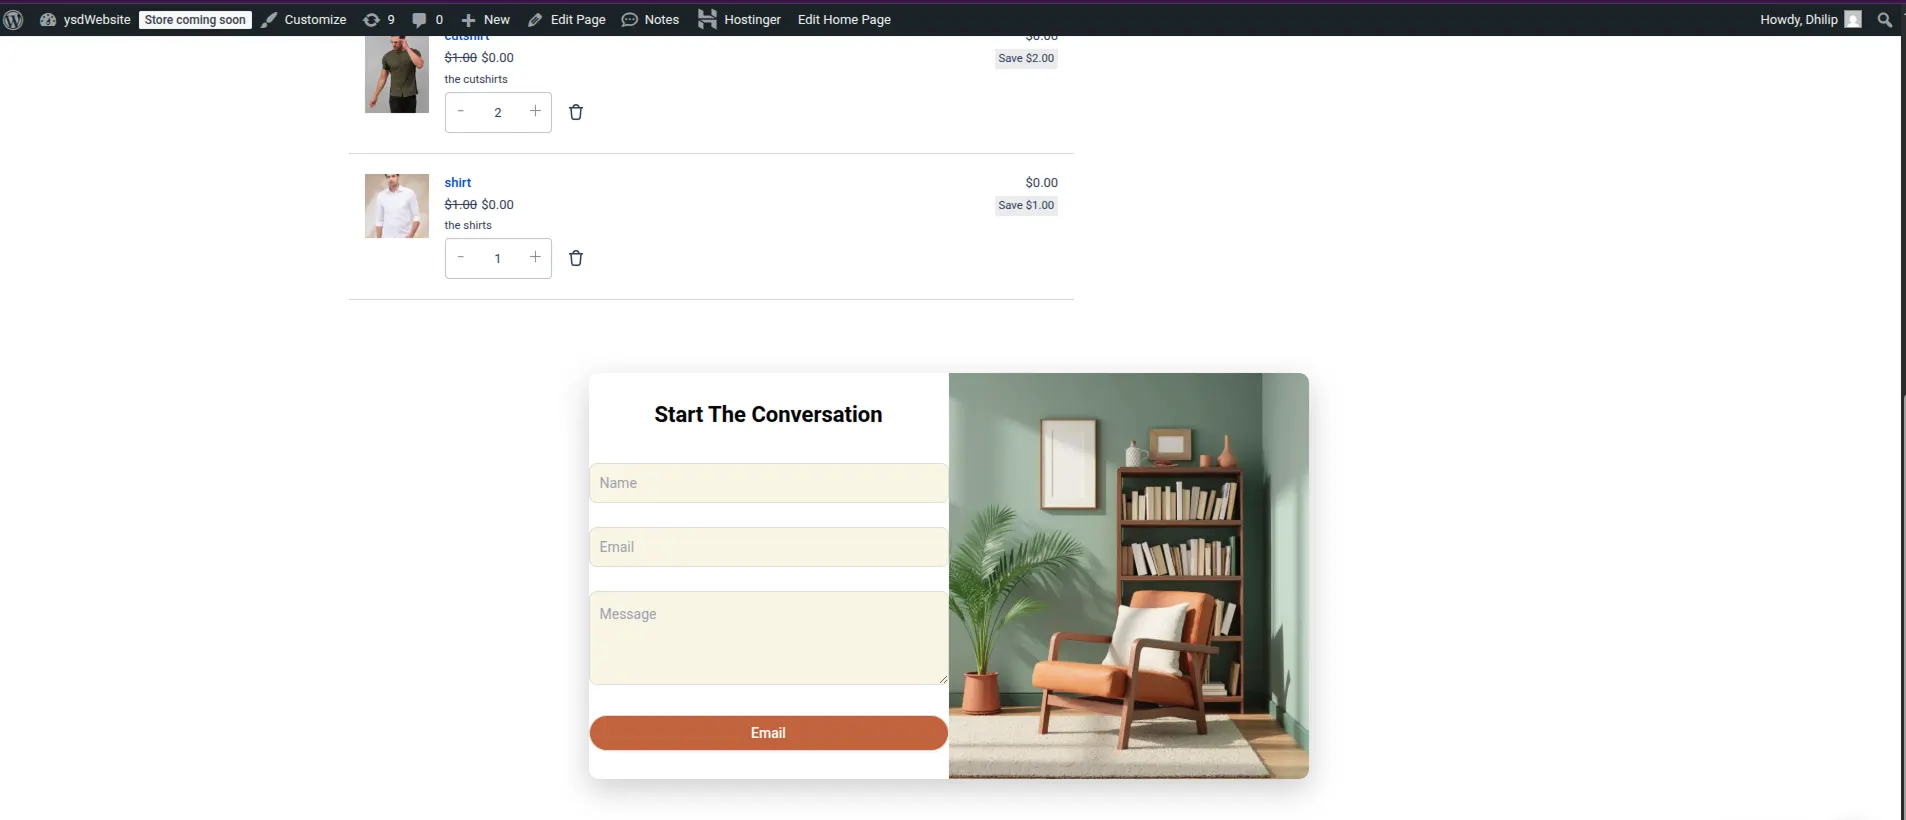
Publishing your form doesn’t automatically put it anywhere on your site — you still need to place it. That’s what the shortcode is for. Copy it, and you can paste it into:
- Your Contact page
- A service or product page
- A landing page
- A blog post
- A sidebar
- Any custom page you’ve built
Open the page where you want the form, paste the shortcode into a Shortcode block, save the page, and then visit it from your actual website to make sure it shows up correctly. If you use Elementor or a similar page builder, it works the exact same way — just look for its shortcode option.
Always Test Your Form Before Trusting It
Just because a form looks right doesn’t mean it’s actually working. After you publish it, fill it out yourself as a test and check:
- Did you get the email notification?
- Did every answer come through correctly?
- Did a “thank you” or confirmation message appear?
- Do all the buttons and links work?
- Does it still work properly on a phone?
It’s much better to catch a problem yourself than to have a real customer run into it first. Repeat this test any time you make changes to the form later.
Common Mistakes Beginners Make
| Mistake | Why It’s a Problem | Easy Fix |
|---|---|---|
| Asking too many questions | Longer forms feel like more effort, so people give up | Only ask what you’ll actually use right away |
| Using a plain “Submit” button | Doesn’t tell people what’s about to happen | Use wording like “Get My Quote” instead |
| Forgetting about phone users | A cramped layout can quietly lose you leads | Check and test on an actual phone |
| No confirmation message | Visitors aren’t sure it actually worked | Add a simple “Thanks, we got it!” message |
| Publishing without testing | Small problems can go unnoticed for weeks | Submit a real test entry every time |
Simple Ways to Get More People to Fill Out Your Form
You don’t need to redesign your whole form to get better results. Small changes often make the biggest difference:
- Keep the form as short as it can reasonably be
- Write a heading that clearly explains what the form is for
- Use specific button text instead of “Submit”
- Add a short line about privacy to build trust
- Place the form somewhere that makes sense — near the content it relates to
- Clear away anything distracting nearby
Every extra step or unnecessary question adds a little friction. The easier it is to complete, the more people will actually finish it.