How to Create a Popup in WordPress (Step-by-Step Guide for Beginners)
Ever feel like you’re throwing a party and nobody wants to dance?
You’ve poured hours into your website. You’re publishing helpful content, optimizing for SEO, running ads, and promoting on social media. But when visitors arrive, they browse for a bit and leave without taking any action.
It’s frustrating. I’ve been there.
A potential customer reads your blog post but doesn’t subscribe. A shopper adds items to their cart but abandons it at checkout. A service page visitor browses your offerings but never reaches out.
The truth is, most visitors aren’t ready to commit immediately. They need a gentle nudge, a clear opportunity, or sometimes just a well-timed reminder.
That’s where popups come in.
When done right, popups are one of the most effective tools for turning passive visitors into active subscribers, leads, and customers. And in this guide, I’ll show you exactly how to create them in WordPress—no coding skills required.
But before we dive into the technical steps, let’s understand why popups work and how to use them without annoying your visitors.
What Is a Popup in WordPress?
A popup is a small window that appears on top of your website content to capture attention and encourage specific actions.
Think of it as a polite tap on the shoulder.
Unlike static elements permanently fixed on your page, popups can appear based on visitor behavior. Someone reads 60% of your article? A popup offers a related resource. A visitor moves their mouse toward the browser’s close button? An exit-intent popup presents one last compelling offer.
This behavioral targeting is what makes modern popups so powerful. You’re not interrupting—you’re anticipating needs and offering help at exactly the right moment.
Common popup goals include:
- Growing email lists (still the most reliable marketing channel)
- Generating leads for service-based businesses
- Promoting special offers or limited-time discounts
- Reducing cart abandonment with timely incentives
- Announcing new products or important updates
Now, I know what some of you might be thinking: “But don’t people hate popups?”
Yes—but only bad ones.
The Popup Paradox: Why Some Work and Others Fail
Let me share something I’ve learned after years of building websites and running marketing campaigns.
Visitors don’t hate popups. They hate intrusive, irrelevant, and poorly timed interruptions.
Imagine walking into a store and immediately being asked for your email address before you’ve even looked around. Annoying, right?
Now imagine the same store offers you a helpful shopping guide or a discount coupon as you’re about to check out. Suddenly, the interruption feels helpful, not intrusive.
That’s the difference.
Effective popups feel like assistance. Intrusive popups feel like an ambush.
The key lies in three factors: timing, relevance, and value.
Show a generic “Subscribe to our newsletter” popup as soon as someone lands on your page, and they’ll click away. Show a targeted offer—”Get our free SEO checklist after you’ve spent 30 seconds on this guide”—and they’ll actually want to engage.
Choosing the Right Popup Plugin for WordPress
Before we start building popups, let’s address the elephant in the room.
WordPress has dozens of popup plugins. Some are bloated with features you’ll never use. Others are so simple they lack essential functionality.
After testing most of them, I recommend starting with YS LeadGen for its balance of ease of use, performance, and essential features. But I’ll also show you alternatives so you can make an informed choice.
Here’s a quick comparison of popular options:
| Plugin | Best For | Key Features | Price |
|---|---|---|---|
| YS LeadGen | Beginners and performance-focused sites | Lightweight, free exit-intent, visual builder, templates | Free / $29 lifetime |
| OptinMonster | Advanced marketers and serious list builders | Powerful targeting, analytics, A/B testing | Starts at $9/month |
| Popup Maker | Customization and developers | Extensive triggers, flexible design | Free / Premium from $47/year |
| WP Popups Lite | Simplicity and speed | Quick setup, drag-and-drop builder | Free / Pro from $39/year |
For this tutorial, I’ll walk you through YS LeadGen because it’s the most beginner-friendly option that doesn’t sacrifice power. Plus, their lifetime deal is genuinely one of the best values in the WordPress ecosystem.
But here’s the important part: the principles I’ll teach you apply to any popup plugin. Whether you choose YS LeadGen, OptinMonster, or another tool, the fundamental strategies for creating effective popups remain the same.
How to Create a Popup in WordPress: Step-by-Step Guide
Let’s build your first popup. I’ll show you the process using YS LeadGen, but the general steps apply across most plugins.
Step 1: Install and Activate Your Popup Plugin
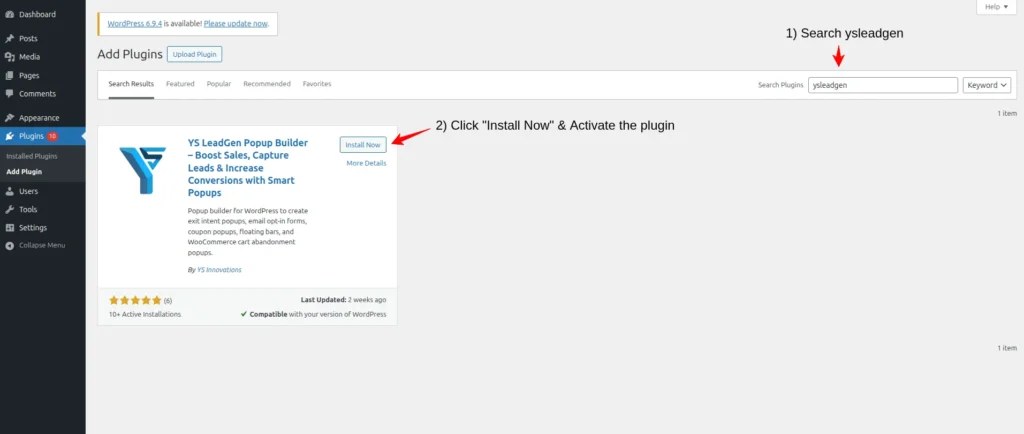
Log into your WordPress dashboard and navigate to Plugins → Add New Plugin.
Type “YS LeadGen” in the search bar. Click Install Now, then Activate.
Once activated, you’ll see a new menu item called YS LeadGen in your dashboard sidebar. This is where all the magic happens.
If you’ve installed plugins before, this takes about two minutes. New to WordPress? Don’t worry—the process is identical for almost any plugin you’ll ever install.
Step 2: Create Your First Popup Campaign
Inside the YS LeadGen dashboard, click the Create Popup button.
The plugin will ask for a campaign name. This is for your internal reference only—visitors won’t see it.
Think carefully about naming conventions. You’ll likely create multiple popups over time, so good names save headaches later.
Example campaign names:
- “Homepage Newsletter Popup”
- “Blog Post Content Upgrade”
- “Product Page Discount Offer”
- “Exit-Intent Lead Magnet”
- “Course Launch Announcement”
I personally use a naming system: [Location] - [Offer Type] - [Trigger]. It makes managing campaigns incredibly simple.

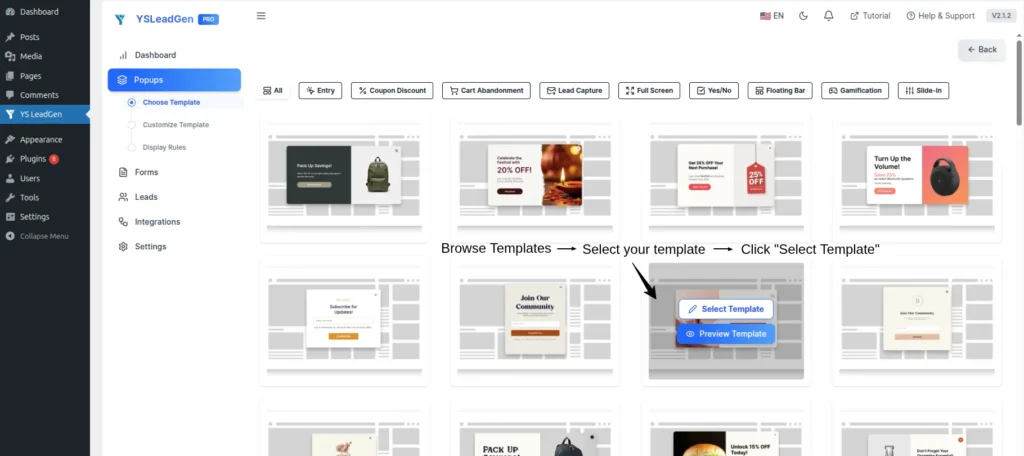
Step 3: Choose Your Popup Template
This is where you’ll make one of the most important decisions for your popup.
YS LeadGen offers templates designed for different purposes. Don’t just pick one because it looks nice—choose based on your goal.
- Email subscriptions → Choose email capture templates
- Lead generation → Select forms with contact fields
- Promotional offers → Pick templates with strong visual elements
- Announcements → Choose simple, text-focused designs
Remember: The most successful popups aren’t the most visually complex. They’re the ones that clearly communicate value and make action easy.
If you’re wondering which template type converts best for your industry, our guide to popup templates breaks down performance by use case.
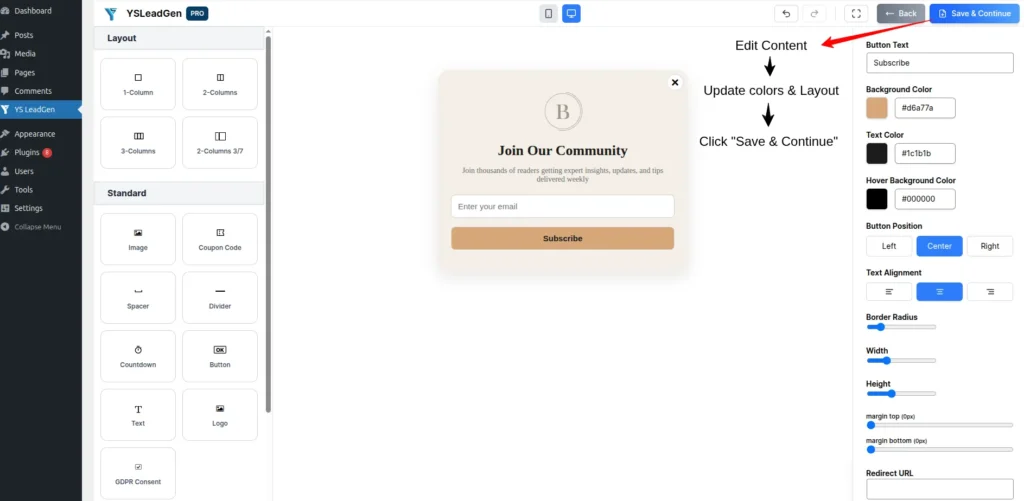
Step 4: Customize Your Popup Content
Now we get to the part that actually matters: your message.
Many beginners obsess over colors, fonts, and animations while neglecting the copy. Here’s the hard truth: visitors respond to value, not visual flair.
Start with your headline. This should immediately answer the question on every visitor’s mind: “Why should I care?”
Weak headline:
Subscribe to Our Newsletter
Good headline:
Get Weekly WordPress Growth Tips in Your Inbox
Great headline:
Join 5,000+ Website Owners Mastering WordPress Marketing
See the difference? The great headline builds social proof, clarifies the offer, and makes the benefit crystal clear.
Next, add a brief supporting message. Keep this concise—visitors should understand your offer in seconds, not minutes.
Example:
“Subscribe now and receive practical WordPress tips, marketing insights, and growth strategies every week. No spam, unsubscribe anytime.”
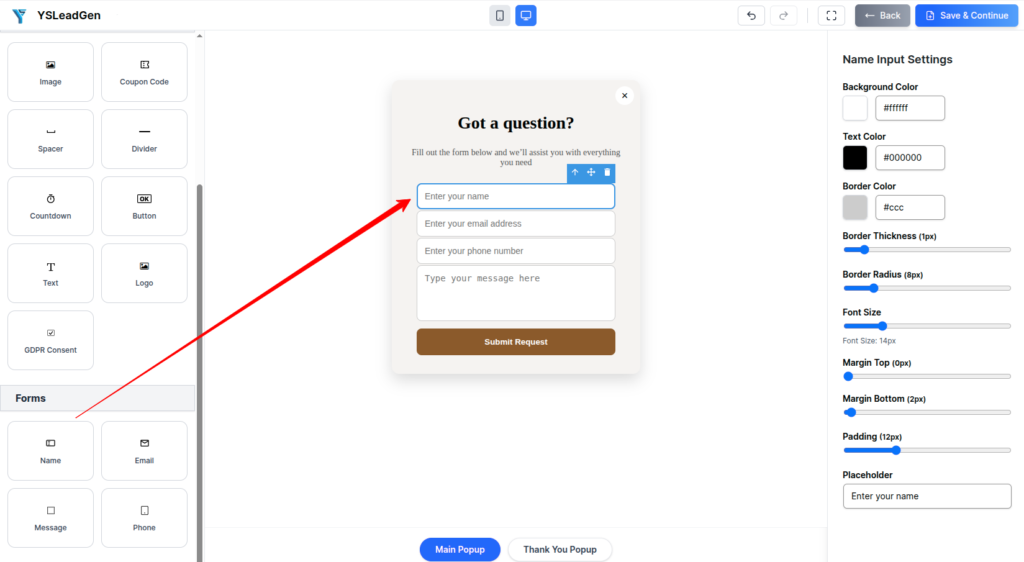
Step 5: Add Your Lead Capture Form
A popup without a form is just an announcement. If your goal is collecting leads or subscribers, you need a form.
YS LeadGen lets you add customizable form fields directly in the popup builder.
Here’s where most people make a critical mistake: asking for too much information.
I’ve seen forms asking for names, phone numbers, company names, website URLs, and industry. Each additional field creates friction. And friction kills conversions.
Rule of thumb: If you’re building an email list, ask for just the email address. You can collect names later through welcome sequences.
If you’re generating leads for a service business, consider asking for name and email only. When someone shows genuine interest, you can request more details.
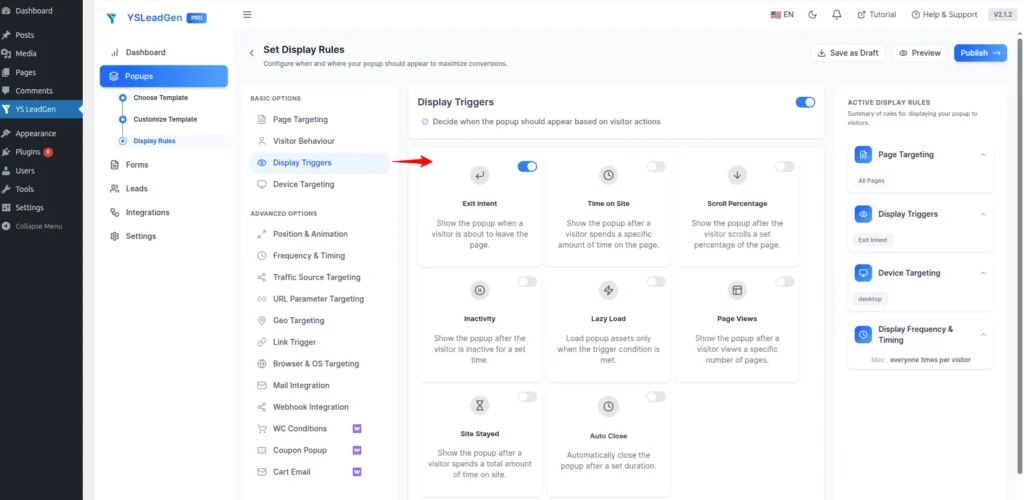
Step 6: Configure Your Popup Triggers
Timing is everything with popups. Even the best offer fails if it appears at the wrong moment.
YS LeadGen offers several trigger options. Here’s what each does and when to use them:
Time Delay → Popup appears after X seconds on the page. Best for engaging visitors who’ve had time to explore your content.
Scroll Trigger → Popup appears after visitors scroll a certain percentage. Targets engaged users deep in your content.
Exit-Intent → Popup appears when visitors move their mouse toward the browser close button. Perfect for recovering abandoning visitors with compelling offers. Learn more about exit-intent technology and how it boosts conversions.
Click Trigger → Popup appears when visitors click specific buttons or links. Ideal for contextual offers and higher-intent users.
My recommendation: Start with a combination of scroll trigger (40-60% scroll) and exit-intent. This captures engaged visitors and leaving visitors without being intrusive.
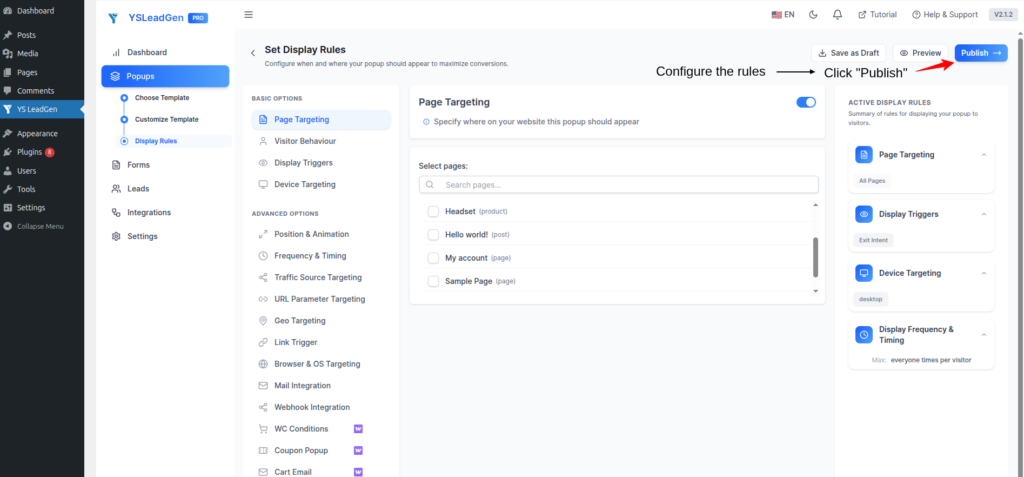
Step 7: Publish and Test Your Popup
Now comes the fun part—making your popup live.
But before you click that publish button, do yourself a favor and review everything:
- Is the headline compelling?
- Does the offer provide genuine value?
- Is the call-to-action button clear and action-oriented?
- Are form fields limited to what you truly need?
- Does the popup match the page’s context?
Once you’re satisfied, click Publish.
Now test everything.
Visit your page and verify:
- Popup appears correctly
- Trigger works as expected
- Form submits successfully
- Popup closes properly
- Mobile version looks good
I can’t stress this enough: test on mobile devices. A significant portion of your traffic comes from phones, and a poorly optimized popup on mobile will cost you leads.
Three Alternatives: Creating Popups with Other Plugins
While YS LeadGen is my top recommendation, you might prefer other options. Here’s how to create popups with two popular alternatives:
Method 1: Creating a Popup with OptinMonster
OptinMonster is the industry powerhouse for a reason—its targeting capabilities are exceptional.
- Install and activate OptinMonster from the plugin directory
- Connect your WordPress site to your OptinMonster account
- Create a new campaign and choose a template
- Use the drag-and-drop builder to customize design and content
- Set display rules (page targeting, triggers, etc.)
- Publish and test
Method 2: Creating a Popup with Popup Maker
Popup Maker offers more control for users comfortable with WordPress blocks.
- Install and activate Popup Maker (free version available)
- Go to Popup Maker → Add New Popup
- Add a title and use the block editor to design your popup
- Configure triggers (time, scroll, click, etc.)
- Set targeting rules for specific pages or posts
- Publish and test
Method 3: Creating a Popup with WP Popups Lite
WP Popups Lite focuses on simplicity and speed.
- Install and activate WP Popups Lite
- Create a new popup and choose a template
- Customize content using the visual editor
- Select triggers (page load, exit, scroll, etc.)
- Choose display rules for page targeting
- Publish and test
Recommended Popup Settings for Better Results
After running countless popup campaigns, I’ve identified patterns that consistently drive higher conversions:
1. Don’t show popups immediately
Wait 10-20 seconds or until visitors scroll 40-60% of the page. Give them time to engage before interrupting.
2. Focus on one goal per popup
A popup trying to collect emails, promote a product, and announce a webinar at the same time fails at everything. One goal, one message, one action.
3. Keep forms as short as possible
Every additional form field reduces conversions. For email lists, just ask for the email address.
4. Use compelling value propositions
Visitors need a reason to engage. Offer something genuinely useful:
- Discount codes (great for eCommerce)
- Free guides and checklists
- Templates and resources
- Exclusive content access
- Early product access
5. Create urgency (appropriately)
Limited-time offers and scarcity can boost conversions, but avoid fake urgency. Visitors can smell dishonesty.
Common Popup Mistakes That Kill Conversions
Let’s be honest—most popups fail because website owners make basic mistakes. Here’s what to avoid:
Mistake #1: Showing Popups Too Early
Visitors haven’t even seen your content yet, and you’re already asking for their email. This is the fastest way to create a negative experience.
Mistake #2: Generic, Blah Messaging
“Subscribe to our newsletter” is the digital equivalent of “Please buy my product.” Zero value communicated, zero results achieved.
Mistake #3: Asking for Too Much Information
Would you fill out a 5-field form on a first visit? Neither will your visitors.
Mistake #4: Ignoring Mobile Users
Over 60% of web traffic comes from mobile devices. If your popup works great on desktop but breaks on phones, you’re losing leads.
Mistake #5: Showing the Same Popup Everywhere
Different visitors have different intentions. Blog readers respond to content upgrades. Product browsers respond to discounts. Target accordingly.
Mistake #6: Using Confusing Close Buttons
If visitors can’t easily close your popup, they won’t come back to your site. Period.
Do Popups Affect SEO? The Honest Truth
This question comes up constantly in my conversations with website owners.
Short answer: No, popups don’t automatically hurt SEO.
Google understands that popups are widely used for lead generation. The problem isn’t popups themselves—it’s poor user experience.
What Google cares about:
- Full-screen popups that appear immediately on page load
- Popups that block access to content
- Popups that are impossible to close on mobile
- Repetitive popups that show multiple times
Best practices for SEO-friendly popups:
- Don’t show popups immediately (wait at least 5 seconds)
- Ensure easy dismissal (clear close button)
- Use responsive designs for mobile
- Limit to one popup per visit
- Focus on providing value, not annoying visitors
When implemented correctly, popups can actually improve engagement metrics that indirectly benefit SEO—lower bounce rates, longer time on page, and more repeat visits.
Advanced Popup Strategies for Serious Growth
Once you’ve mastered the basics, consider these advanced tactics:
1. Segmentation and Personalization
Show different popups based on visitor behavior. First-time visitors see a welcome offer. Returning visitors see loyalty discounts.
2. A/B Testing
Test different headlines, colors, triggers, and offers. Small changes often produce surprising improvements.
3. Behavior-Based Triggers
Beyond basic triggers, consider:
- Time spent on page
- Number of pages visited
- Device type
- Geotargeting
4. Multi-Step Popups
Instead of asking for email and name simultaneously, collect email first, then follow up with name later. Reduces friction.
5. Contextual Popups
Show popups that directly relate to page content. A blogging guide should offer a content checklist, not a generic newsletter subscription.
Real-World Popup Examples That Work
Here are three popup strategies I’ve seen deliver outstanding results:
Strategy 1: The Content Upgrade
Visitors read a comprehensive guide about email marketing. When they reach 60% scroll, a popup offers a free email marketing checklist as a PDF download. Conversion rates consistently exceed 15%.
Strategy 2: The Exit-Intent Offer
A WooCommerce store visitor adds products to cart but moves toward closing the browser. An exit-intent popup offers 10% off if they complete checkout. Cart recovery improves by 25%.
Strategy 3: The Timed Welcome
A B2B SaaS company shows a welcome popup 20 seconds after page load, offering a free consultation call. High-intent visitors convert at 8%.
Final Thoughts: Turning Visitors Into Action-Takers
Creating a popup in WordPress is technically simple. Creating a popup that visitors actually want to engage with—that’s the real challenge.
The difference comes down to philosophy: are you interrupting visitors or helping them?
An interrupting popup:
- Appears immediately
- Lacks a clear value proposition
- Asks for too much information
- Shows the same message to everyone
- Is difficult to close
A helpful popup:
- Appears at the right moment
- Communicates clear, compelling value
- Keeps forms minimal
- Targets based on behavior and context
- Respects the visitor’s experience
Start simple. Install a plugin (YS LeadGen is my recommendation for beginners). Create your first popup. Test it thoroughly. Track the results. Then refine based on what you learn.
Remember: The best popup isn’t the one with the fanciest animations or the most advanced targeting. It’s the one that provides real value to your visitors at exactly the right moment.
That’s when magic happens—when your business goals align with what your visitors actually want.
Frequently Asked Questions (FAQs)
Do I need coding knowledge to create a popup in WordPress?
No. Modern popup plugins allow you to build popups using visual editors and ready-made templates, eliminating the need for coding.
What is the best popup trigger?
The best trigger depends on your goal. Scroll triggers, time-delay triggers, and exit-intent triggers are among the most commonly used options because they align with visitor behavior.
How many fields should a popup form contain?
In most cases, fewer fields result in higher conversion rates. For email list building, requesting only an email address is often sufficient.
Can I show different popups on different pages?
Yes. Most popup plugins, including YS LeadGen, allow you to target specific pages, posts, categories, or visitor segments.
Are popups mobile-friendly?
Yes, provided they are designed responsively and tested across different devices.
About the author
YSLeadGen Pro - Lifetime Deal
Access to unlimited popups, advanced targeting, event triggers, and premium templates.
14-Days Risk Free Money Back Guarantee