How to Create a Sticky Floating Bar in WordPress (Without Coding)

A sticky floating bar is one of the simplest ways to keep important messages visible while visitors browse your website.
Instead of showing a promotion once and letting it disappear after scrolling, a sticky bar stays fixed at the top or bottom of the screen throughout the browsing session. This allows websites to continuously display:
- announcements
- discount offers
- free shipping promotions
- newsletter signup CTAs
- webinar registrations
- coupon codes
- limited-time sales
without interrupting the user experience.
That’s exactly why sticky floating bars are now widely used across:
- WooCommerce stores
- blogs
- SaaS websites
- agency websites
- online course platforms
- lead generation landing pages
especially on mobile-first websites where users scroll quickly and rarely return to the top of the page.
Unlike aggressive popups that block content immediately, sticky bars remain visible without forcing interaction. Visitors can continue browsing normally while still seeing the offer or call-to-action throughout the session.
This creates continuous visibility with very little friction.
And when implemented correctly, sticky floating bars can significantly improve:
- click-through rates
- email signups
- WooCommerce conversions
- promotion visibility
- seasonal campaign engagement
In this tutorial, you’ll learn:
- how to create a sticky floating bar in WordPress
- how to customize the design
- how to display targeted offers
- how to optimize sticky bars for mobile users
- common mistakes to avoid
- best practices for improving conversions
without writing custom CSS or editing theme files.
What Is a Sticky Floating Bar in WordPress?
A sticky floating bar is a fixed notification bar that stays visible while visitors scroll through a webpage.
Unlike normal announcement banners that disappear after scrolling, sticky bars remain attached to the screen so important messages stay continuously visible.
Most websites use sticky bars for:
- free shipping announcements
- flash sale promotions
- email signup campaigns
- coupon offers
- product launches
- event registrations
- countdown campaigns
- important website notifications
For WooCommerce stores, sticky floating bars are especially effective because they keep promotional offers visible while customers browse products and categories.
For example, a bar displaying:
“FREE Shipping on Orders Over $50”
continues reinforcing the offer while shoppers move across:
- product pages
- collections
- category pages
- cart pages
This repeated visibility often improves conversions because the promotion stays psychologically active throughout the browsing experience.
Sticky bars also perform well on blogs and SaaS websites because they allow businesses to promote lead magnets, webinars, newsletter subscriptions, and announcements without disrupting content consumption.
Why Sticky Floating Bars Work So Well
The biggest reason sticky bars work is simple:
visitors rarely take action immediately.
Most users need repeated exposure before they:
- subscribe
- click
- purchase
- register
- engage
Traditional banners usually disappear after the first scroll.
Sticky floating bars solve that problem by keeping the CTA visible throughout the session without interrupting browsing behavior.
This creates a much smoother experience compared to popups because users can:
- continue reading
- browse products
- compare pricing
- navigate pages
while the message remains quietly visible.
Sticky bars work particularly well for:
- free shipping campaigns
- seasonal sales
- limited-time offers
- newsletter CTAs
- webinar reminders
- coupon promotions
because the message stays visible exactly when visitor intent increases.
For example, a shopper may ignore a discount initially but decide to use it later after viewing several products. Since the sticky bar remains visible, the CTA is still accessible without requiring the visitor to scroll back up or reopen a popup.
That continuous visibility is one of the main reasons sticky bars continue performing so effectively in modern WordPress websites.
Best Ways to Use Sticky Floating Bars in WordPress
Not every sticky bar serves the same purpose.
The highest-converting sticky bars are usually the ones aligned closely with visitor intent.
For example, WooCommerce stores often use sticky bars for:
- free shipping offers
- coupon reminders
- seasonal discounts
- flash sales
- cart promotions
Blogs and content websites commonly use them for:
- newsletter signup CTAs
- lead magnets
- webinar registrations
- ebook downloads
- affiliate promotions
SaaS websites frequently use sticky floating bars to promote:
- free trials
- feature launches
- demo bookings
- onboarding offers
- product announcements
The most important thing is relevance.
A sticky bar performs best when the offer feels naturally connected to what the visitor is already doing on the website.
How to Create a Sticky Floating Bar in WordPress.
The easiest way to create a sticky floating bar in WordPress is by using a popup and lead generation plugin that supports floating bars, targeting, and responsive layouts.
For this tutorial, we’ll use YS LeadGen because it allows you to create:
- sticky announcement bars
- floating notification bars
- popup campaigns
- countdown bars
- lead generation forms
from a visual drag-and-drop builder.
This makes the setup process beginner-friendly without requiring custom CSS or JavaScript.
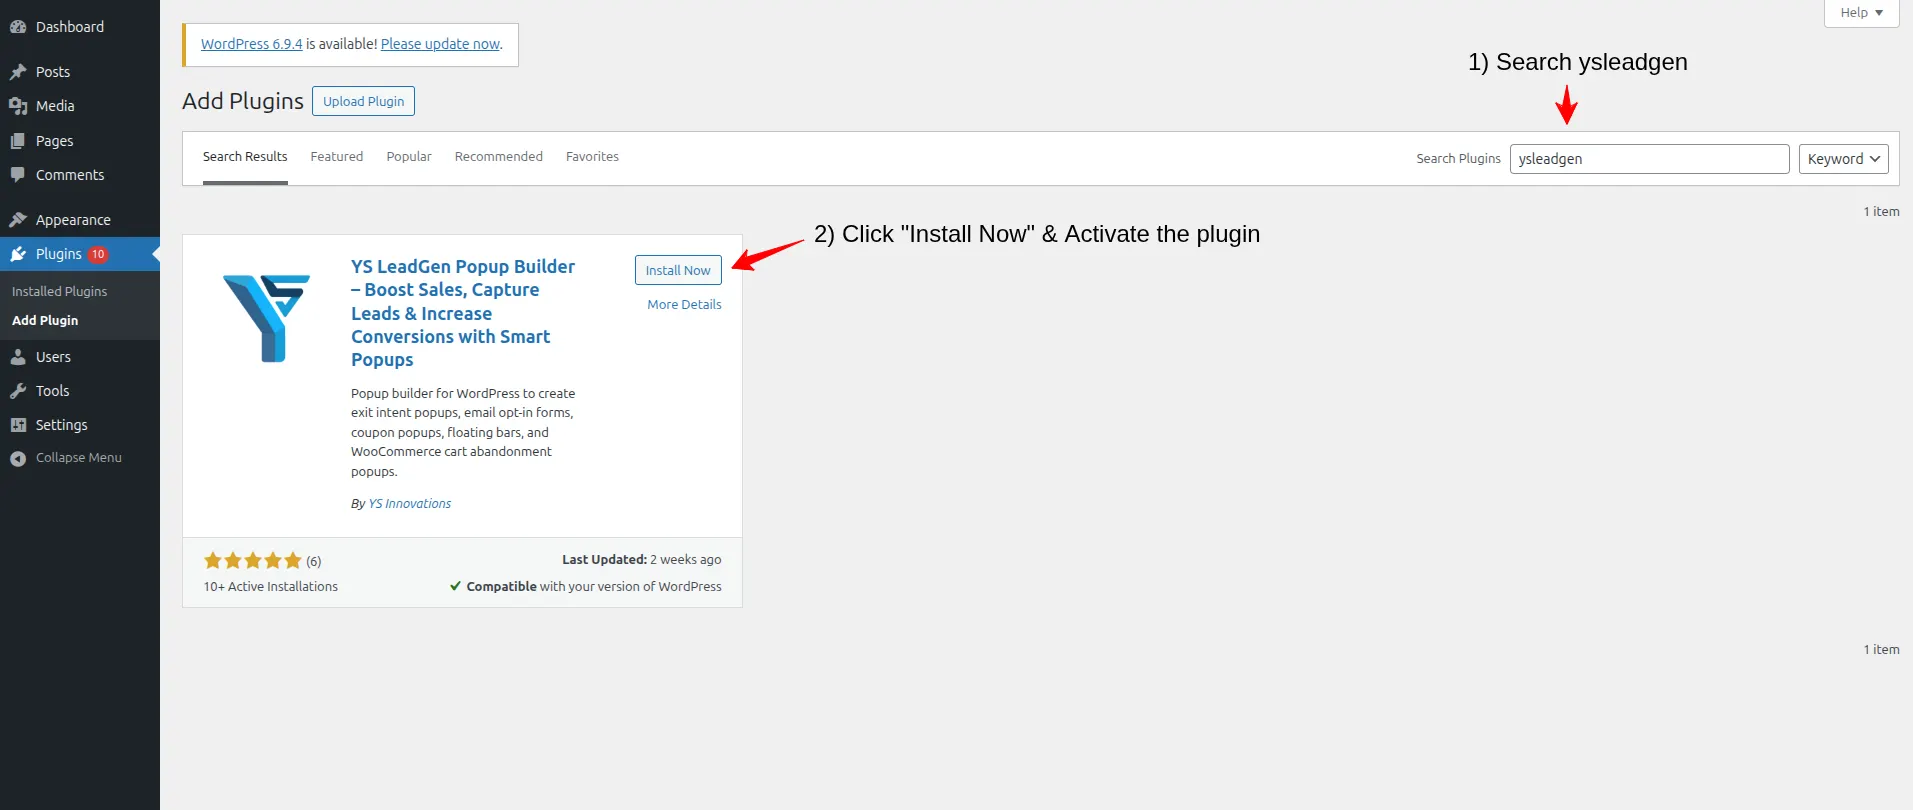
Step 1: Install and Activate YS LeadGen
Inside your WordPress dashboard:
- Go to Plugins → Add New
- Search for “YS LeadGen”
- Install and activate the plugin
After activation, you’ll see a dedicated dashboard where you can create:
- popup campaigns
- sticky bars
- floating forms
- announcement campaigns
- targeted lead generation campaigns
from one interface.
One advantage of using a unified plugin is that it reduces the need for:
- separate popup plugins
- extra notification bar plugins
- additional targeting tools
which helps keep workflows cleaner and reduces unnecessary frontend bloat.
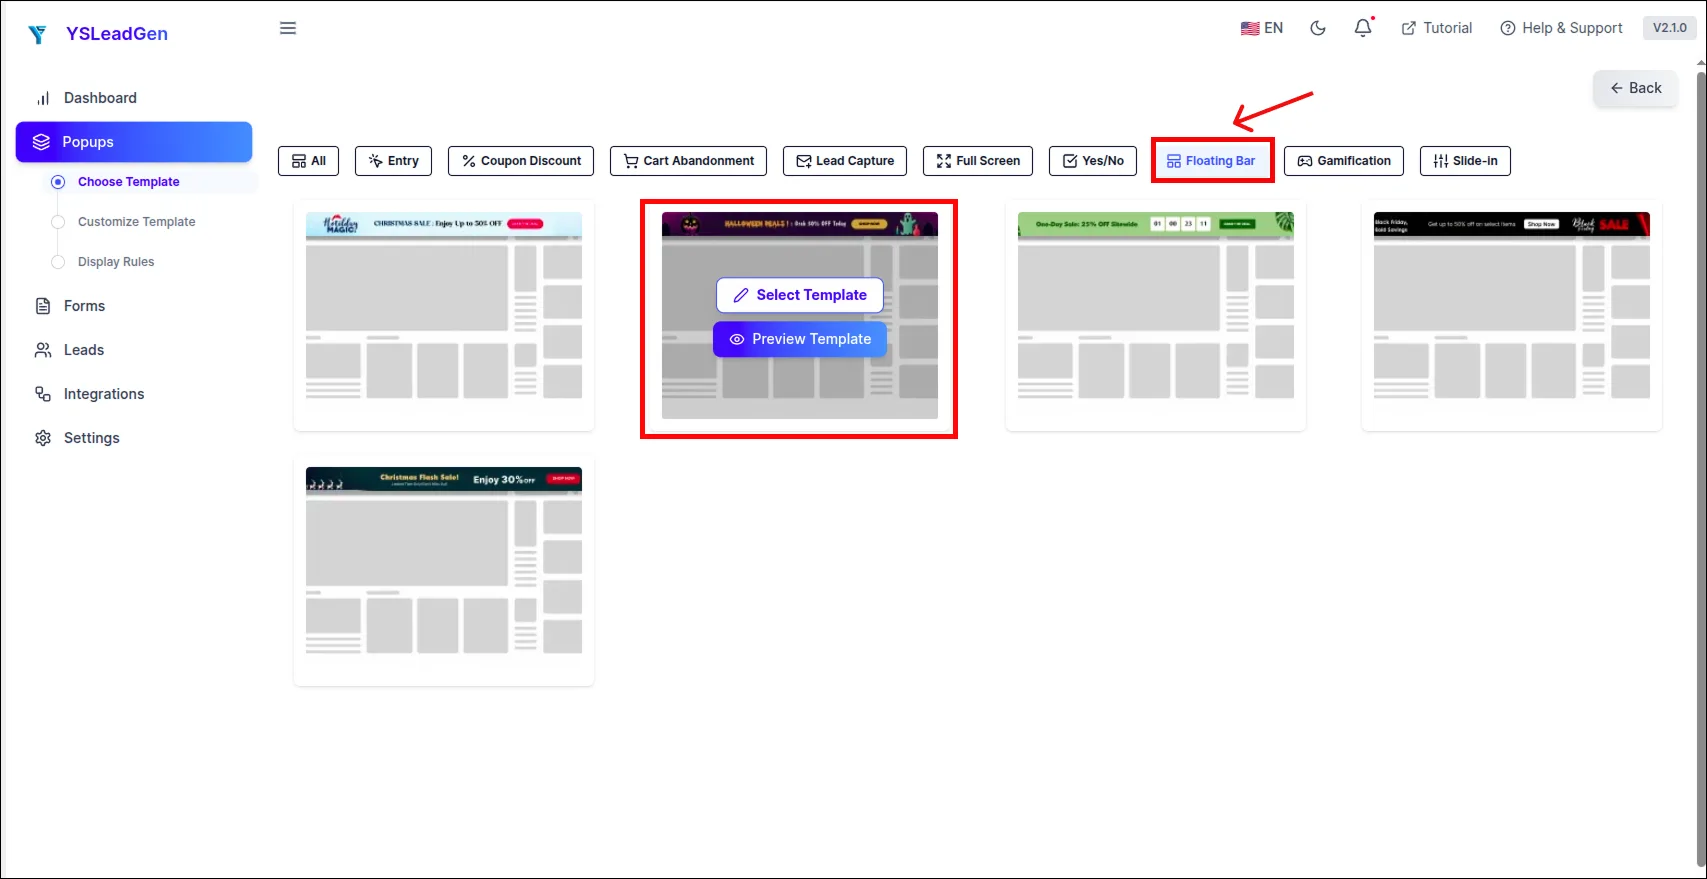
Step 2: Create a New Floating Bar Campaign
Once the plugin is activated:
- Open YS LeadGen
- Click “Create Campaign”
- Select “Floating Bar” or “Sticky Bar”
You’ll now see multiple templates designed for:
- promotions
- newsletter signups
- WooCommerce offers
- countdown campaigns
- announcement banners
Choose a layout that matches your campaign goal.
At this stage, focus more on: message clarity than design complexity.
The highest-converting sticky bars are usually simple, easy to scan, and immediately understandable.
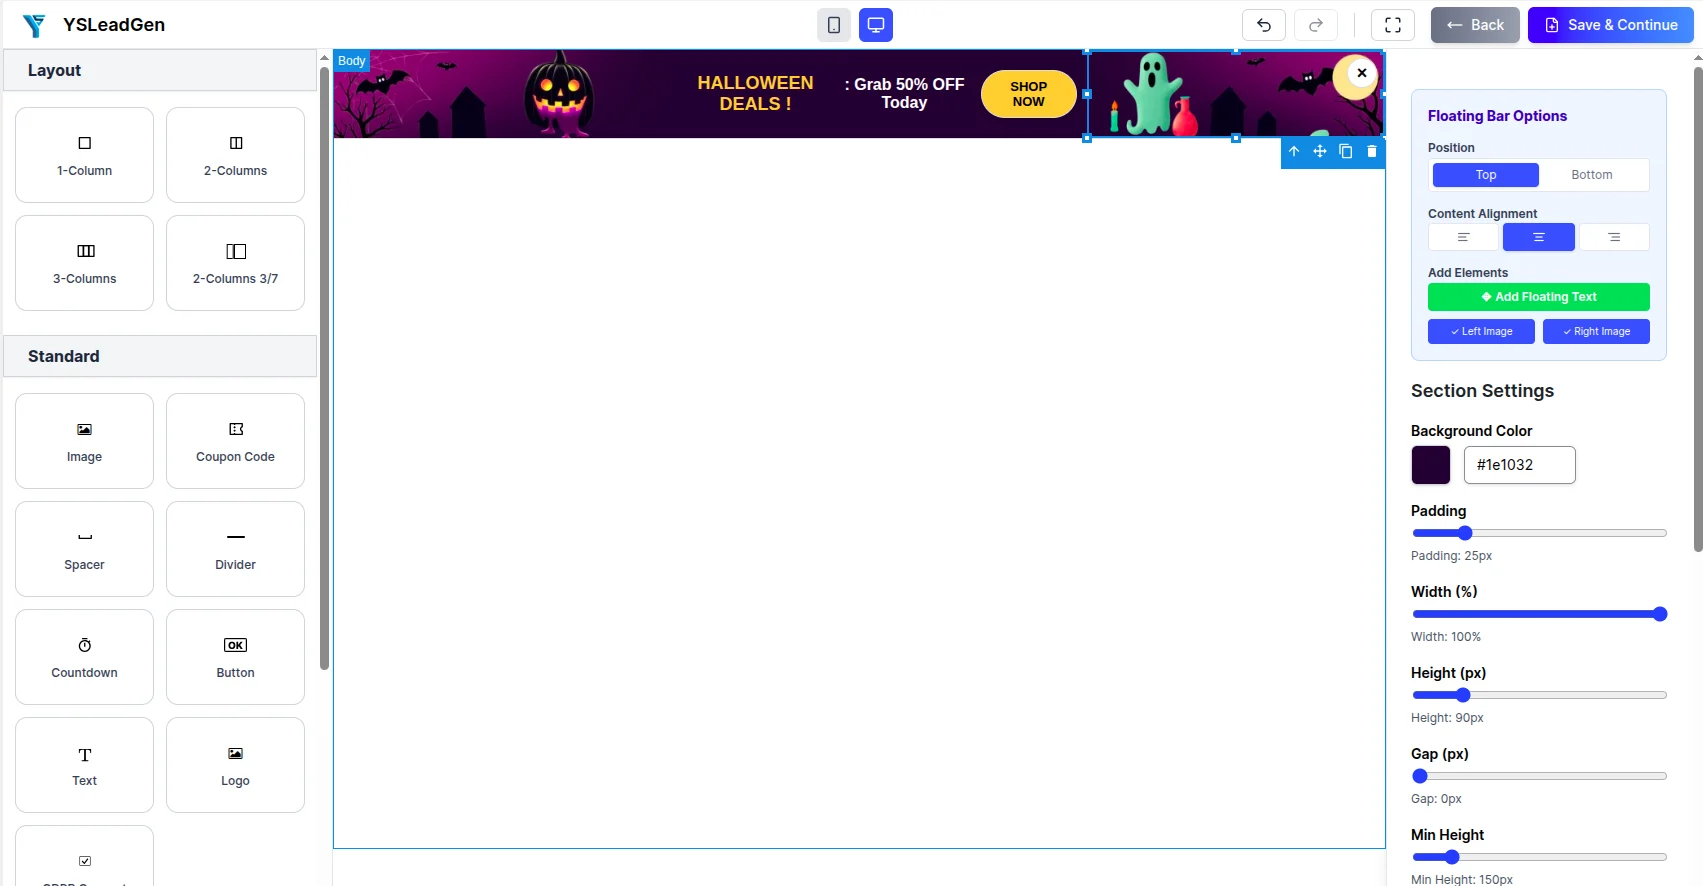
Step 3: Customize the Sticky Floating Bar Design
After selecting a template, you can customize the floating bar directly from the visual editor.
This is where many WordPress websites either create a clean conversion-focused sticky bar — or accidentally design something visitors immediately ignore.
One of the biggest mistakes is overcomplicating the design.
A sticky floating bar should not feel like a second website header. It should function more like a lightweight attention layer that keeps the offer visible without distracting users from the page itself.
In most cases, simple sticky bars perform better than heavily designed ones.
For example:
- short headlines usually outperform long descriptions
- strong color contrast improves visibility
- a single CTA performs better than multiple competing buttons
- cleaner spacing improves readability on mobile devices
When customizing your sticky bar, focus on:
- readability
- visual contrast
- CTA clarity
- mobile responsiveness
instead of adding too many design elements.
Recommended Sticky Bar Design Tips
For better visibility and conversions:
- Use a background color that contrasts with your website header
- Keep text concise and easy to scan
- Use only one primary CTA button
- Make buttons large enough for mobile tapping
- Avoid overcrowding the bar with icons or links
- Use urgency only when it’s genuine
For WooCommerce websites, sticky bars often perform best when they highlight:
- free shipping
- limited-time discounts
- coupon reminders
- low-stock urgency
- seasonal promotions
because these offers directly support shopping intent.
Step 4: Add a High-Converting CTA
The CTA is the most important part of your sticky floating bar.
Unfortunately, many websites waste valuable visibility using generic button text like:
- Learn More
- Click Here
- Explore
- Read More
These CTAs are vague and rarely create urgency.
Strong sticky bar CTAs usually communicate:
- value
- action
- relevance
- urgency
within just a few words.
For example:
Instead of: “Subscribe”
a better CTA would be: “Get Weekly WordPress Tips”
Instead of: “View Offer”
use: “Claim 20% Discount”
The second examples work better because visitors instantly understand:
- what they’ll get
- why it matters
- what happens next
Specificity improves conversions significantly.
Examples of Sticky Bar CTAs That Work Well
For WooCommerce:
- Get Free Shipping
- Claim Discount
- Shop Flash Sale
- Unlock Coupon
For blogs:
- Join Free Newsletter
- Download Free Guide
- Get Weekly Tips
For SaaS websites:
- Start Free Trial
- Book Demo
- Try New Features
The clearer the CTA feels, the easier it becomes for visitors to act without hesitation.
Step 5: Add a Countdown Timer (Optional)
Countdown timers are one of the most effective ways to increase urgency inside sticky floating bars.
When used correctly, they continuously reinforce:
- scarcity
- deadlines
- urgency
- promotional timing
while visitors browse the website.
This works especially well for:
- flash sales
- Black Friday campaigns
- webinar registrations
- limited-time discounts
- product launches
because the timer remains visible throughout the browsing session.
However, countdown timers should be used carefully.
Fake urgency usually damages trust long-term.
If every campaign claims:
“Ends Tonight”
visitors eventually stop believing the promotion completely.
The best countdown campaigns are:
- real
- time-sensitive
- contextually relevant
For example, countdown bars perform particularly well during:
- holiday sales
- seasonal launches
- product releases
- cart recovery campaigns
where visitors already expect limited-time promotions.
Inside YS LeadGen, you can easily add:
- countdown timers
- dynamic expiration dates
- recurring campaigns
- scheduled promotions
directly from the campaign builder.
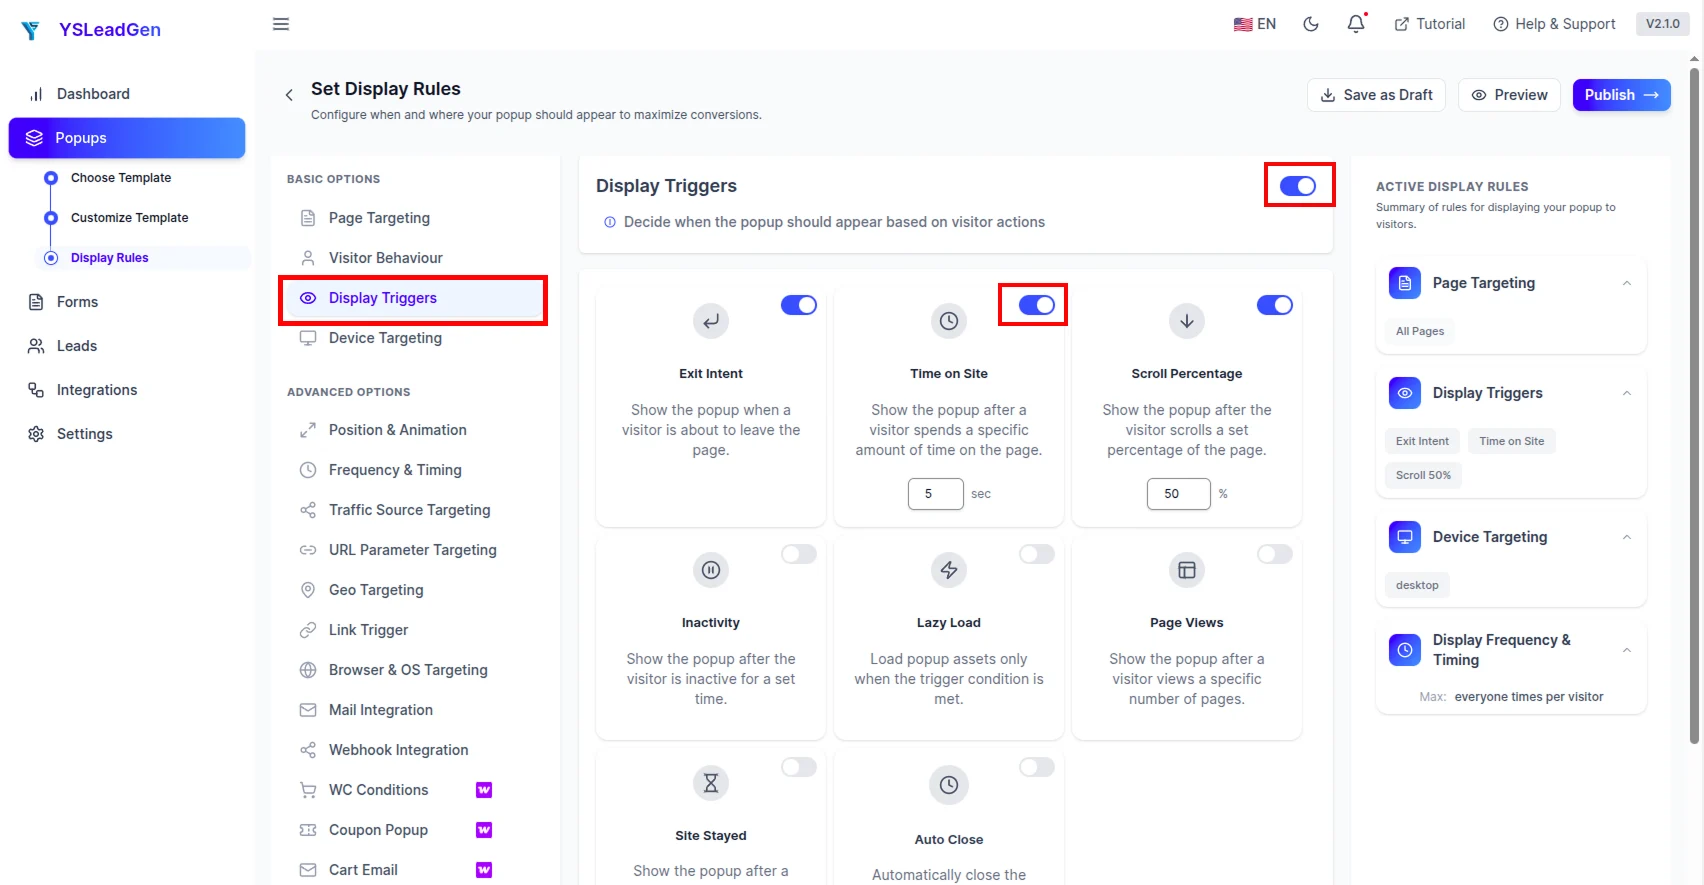
Step 6: Configure Sticky Bar Display Rules
One reason many sticky floating bars fail is because they appear everywhere regardless of context.
Relevance matters enormously.
For example:
- free shipping bars perform best on product and cart pages
- newsletter signup bars perform better on blog content
- webinar promotions work better on educational pages
- sales campaigns perform well across WooCommerce category pages
Showing the wrong message at the wrong time reduces engagement significantly.
Modern WordPress popup and floating bar plugins now allow advanced targeting based on:
- pages
- categories
- WooCommerce products
- devices
- user behavior
- scroll depth
- referral source
- session timing
This creates a much more personalized browsing experience.
Instead of showing generic promotions sitewide, you can display:
- product-specific offers
- category-based promotions
- mobile-only sticky bars
- campaign-specific announcements
depending on visitor intent.
This level of targeting often improves conversions much more than changing the design itself.
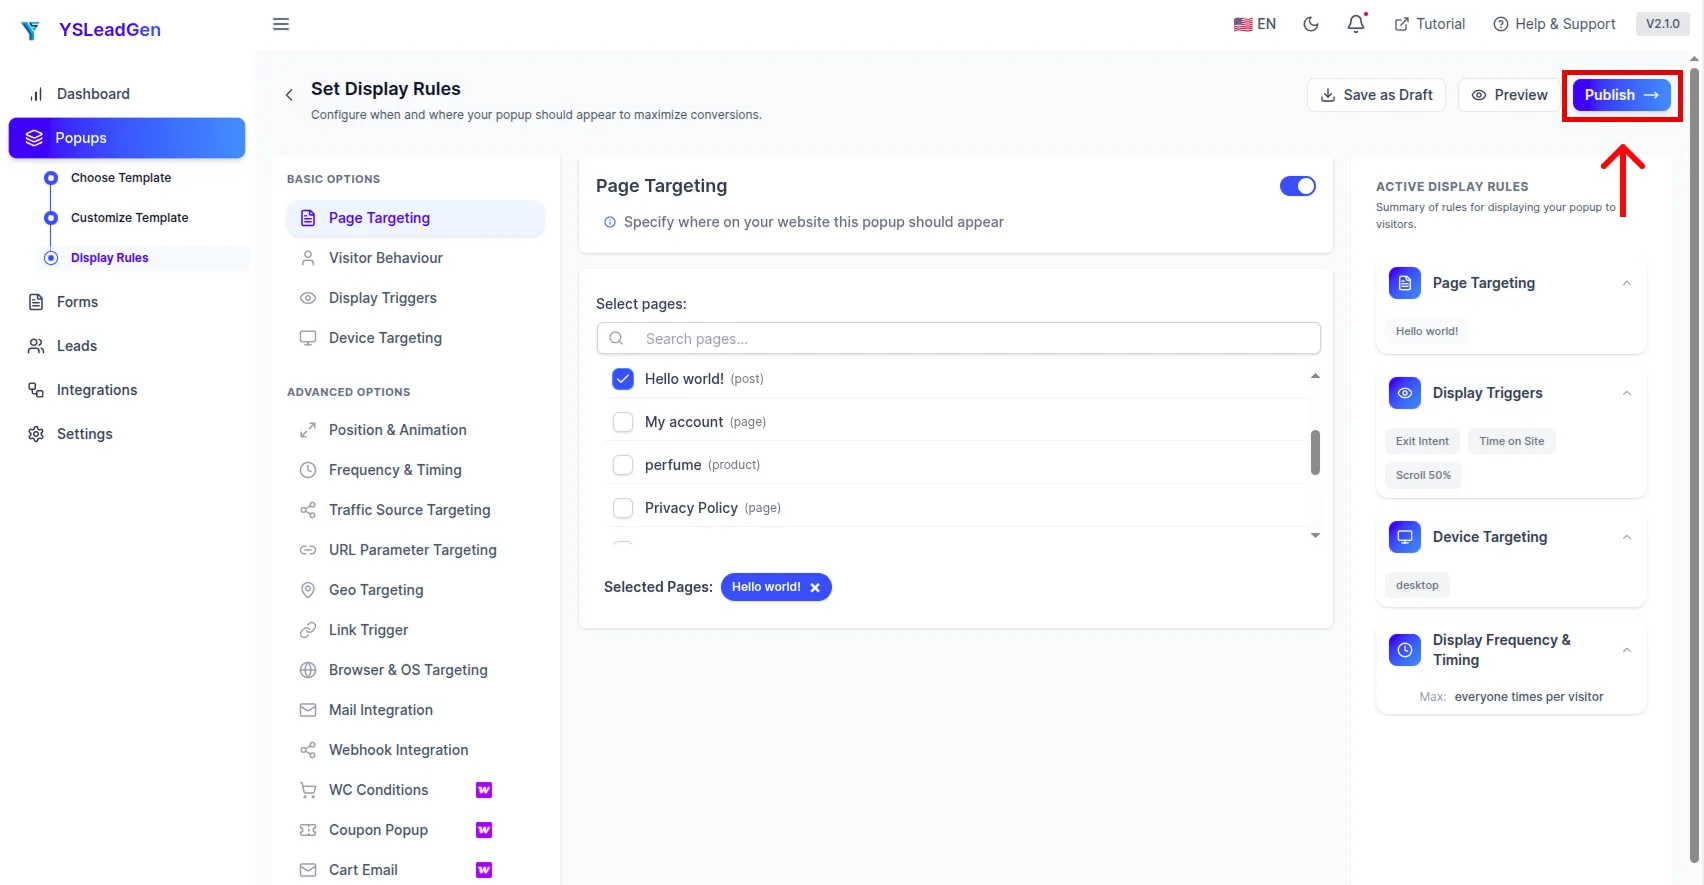
Step 7: Publish Your Sticky Floating Bar
Once your sticky floating bar design, CTA, targeting rules, and display settings are ready, the final step is publishing the campaign on your WordPress website.
Before publishing, take a few minutes to review:
- mobile responsiveness
- CTA visibility
- text readability
- spacing
- button placement
- targeting conditions
This is important because even small layout issues can affect conversions significantly, especially on mobile devices.
For example:
- buttons placed too close to the screen edge may become difficult to tap
- long text can wrap awkwardly on smaller screens
- oversized sticky bars may reduce usable viewport space
Testing before publishing helps avoid these issues.
Preview the Sticky Floating Bar
Inside YS LeadGen, use the preview option to check how the sticky bar appears across:
- desktop screens
- tablets
- mobile devices
Pay close attention to:
- scrolling behavior
- close button visibility
- CTA readability
- mobile spacing
- loading speed
A sticky bar should feel lightweight and smooth while browsing — not distracting or intrusive.
Publish the Campaign
Once everything looks good:
- Click “Publish”
- Enable the campaign
- Save your display settings
Your sticky floating bar will now appear on the selected pages based on your targeting rules.
Depending on your configuration, the bar can display:
- sitewide
- only on WooCommerce pages
- specific blog posts
- landing pages
- mobile devices only
- selected categories
This flexibility allows you to create highly targeted campaigns instead of generic announcements shown to every visitor.
Monitor Performance & Optimize Over Time
Publishing the sticky bar is only the beginning.
The highest-converting websites continuously test:
- CTA text
- colors
- offers
- timing
- targeting
- urgency messaging
to improve engagement over time.
For example:
- a shorter CTA may improve mobile clicks
- stronger urgency may increase conversions during sales campaigns
- simplified layouts may reduce banner blindness
Small optimizations often create noticeable improvements in:
- click-through rates
- email signups
- WooCommerce conversions
- campaign engagement
The best-performing sticky floating bars are usually refined gradually based on real visitor behavior rather than published once and forgotten.
How to Optimize Sticky Floating Bars for Mobile Users
Many sticky floating bars look perfectly fine on desktop but become frustrating on mobile devices.
This is one of the most common UX problems on WordPress websites.
Mobile sticky bars should remain:
- compact
- readable
- easy to dismiss
- lightweight
- touch-friendly
without blocking too much screen space.
A surprising number of websites accidentally create sticky bars that:
- cover content
- overlap mobile browser UI
- use tiny close buttons
- wrap text awkwardly
- feel intrusive while scrolling
This becomes especially problematic on smaller smartphones where screen space is extremely limited.
Mobile Sticky Bar Best Practices
For better mobile usability:
- Keep bar height minimal
- Use short CTA text
- Avoid multiple buttons
- Use large tap targets
- Test on real devices
- Avoid fullscreen-width clutter
On mobile devices, sticky bars should feel helpful — not obstructive.
One useful strategy is displaying simplified versions of the sticky bar specifically for smaller screens.
For example:
- shorter headlines
- compact buttons
- reduced text
- simplified layouts
often perform much better on smartphones than desktop-style designs compressed into small spaces.
Common Sticky Floating Bar Mistakes to Avoid
Even well-designed sticky bars can fail if the strategy behind them is weak.
After reviewing hundreds of WooCommerce stores and lead-generation websites, several problems appear repeatedly.
Using Too Much Text
Sticky bars are not landing pages.
The message should be understandable within seconds.
Visitors usually scan sticky bars quickly while browsing, so long descriptions often reduce engagement instead of improving it.
Shorter messages usually perform better.
Weak Color Contrast
If the sticky bar visually blends into the website header, users stop noticing it almost immediately.
High-performing sticky bars usually use:
- contrasting background colors
- strong CTA visibility
- clear spacing
without becoming visually aggressive.
Showing the Same Offer Everywhere
Not every visitor has the same intent.
For example:
- shoppers browsing WooCommerce products
- blog readers
- returning visitors
- mobile users
all behave differently.
Contextual targeting almost always outperforms generic sitewide promotions.
Overusing Urgency
Urgency works only when it feels believable.
If every sticky bar claims:
“Limited Time Offer”
visitors eventually ignore the messaging completely.
Use urgency strategically rather than constantly.
Forgetting Mobile Optimization
This is one of the biggest mistakes WordPress websites still make.
A sticky floating bar that looks clean on desktop may become frustrating on mobile devices if:
- the bar becomes too tall
- buttons become difficult to tap
- text wraps awkwardly
- the close button is too small
Always test sticky bars across:
- iPhones
- Android devices
- tablets
- smaller screens
before launching campaigns publicly.
Best Sticky Floating Bar Ideas for WordPress Websites
If you’re unsure what type of sticky floating bar to create, here are some high-performing ideas commonly used across WordPress websites.
WooCommerce Sticky Bar Ideas
- Free shipping offers
- Coupon reminders
- Flash sale countdowns
- Cart discount promotions
- New arrival announcements
- Seasonal sale banners
Blog Sticky Bar Ideas
- Newsletter signup CTAs
- Ebook promotions
- Webinar registrations
- Affiliate offers
- Content upgrade downloads
SaaS Sticky Bar Ideas
- Free trial promotions
- Demo booking CTAs
- Product launch announcements
- Feature release updates
- Onboarding campaigns
The highest-performing sticky bars are usually:
- highly relevant
- visually simple
- easy to scan
- contextually aligned with visitor intent
rather than overloaded with too many promotional elements.
Final Thoughts
Sticky floating bars remain one of the simplest and most effective ways to improve visibility for important offers, announcements, and CTAs inside WordPress.
But the websites seeing the best results are not necessarily using the most aggressive designs.
They’re usually the ones creating sticky bars that:
- feel relevant
- stay lightweight
- respect the browsing experience
- remain mobile-friendly
- communicate value instantly
When implemented properly, sticky floating bars create continuous visibility without interrupting users — and that balance is exactly why they continue performing so well across:
- WooCommerce stores
- blogs
- SaaS websites
- agency websites
- lead generation landing pages
Instead of treating sticky bars like simple notification banners, think of them as persistent conversion touchpoints that stay available while visitors naturally browse your website.
That mindset alone often leads to significantly better engagement and conversion performance.
Frequently Asked Questions (FAQs)
Can I create a sticky floating bar in WordPress without coding?
Yes.
Plugins like YS LeadGen allow you to create sticky floating bars visually without editing theme files, CSS, or JavaScript.
Do sticky floating bars improve conversions?
Yes, when implemented correctly.
Sticky bars improve visibility for:
- offers
- promotions
- CTAs
- announcements
while allowing visitors to continue browsing normally.
Are sticky bars mobile-friendly?
They can be, but mobile optimization is extremely important.
Sticky bars should remain:
- compact
- touch-friendly
- easy to dismiss
- visually clean
on smaller screens.
What is the best plugin to create sticky floating bars in WordPress?
YS LeadGen is a strong option because it supports:
- sticky floating bars
- popup campaigns
- targeting rules
- countdown timers
- WooCommerce promotions
- lead generation forms
inside one visual builder.
About the author
YSLeadGen Pro - Lifetime Deal
Access to unlimited popups, advanced targeting, event triggers, and premium templates.
14-Days Risk Free Money Back Guarantee