- Why Creating a Form Is More Important Than Most Website Owners Realize
- What Can You Create With a WordPress Form?
- Do You Really Need a Plugin?
- Choosing the Right Form Builder
- Why We’re Using YS LeadGen in This Tutorial
- Before You Create Your First Form
- Creating Your First Form in WordPress
- Creating Your First Form Campaign
- Why Organization Matters More Than You Think
- Selecting a Form Campaign
- Naming Your Form
- A Simple Naming Convention We Recommend
- Choosing the Right Template
- Don’t Worry About Finding the “Perfect” Template
- Customizing Your Form
- Start With Your Visitor, Not Your Business
- Which Fields Should You Include?
- Writing Better Button Text
- Design for Mobile First
- Save Your Progress
- Publishing Your Form, Optimizing It for Better Results, and What to Do Next
- Should You Show the Same Form to Every Visitor?
- Showing Forms on the Right Devices
- Controlling How Often Visitors See Your Form
- Reaching Visitors From Specific Traffic Sources
- Review Your Form Before Publishing
- Embedding Your Form Anywhere on Your Website
- Don’t Skip Testing
- Common Mistakes Beginners Make
- Simple Tips to Increase Form Conversions
- Final Thoughts
- Frequently Asked Questions
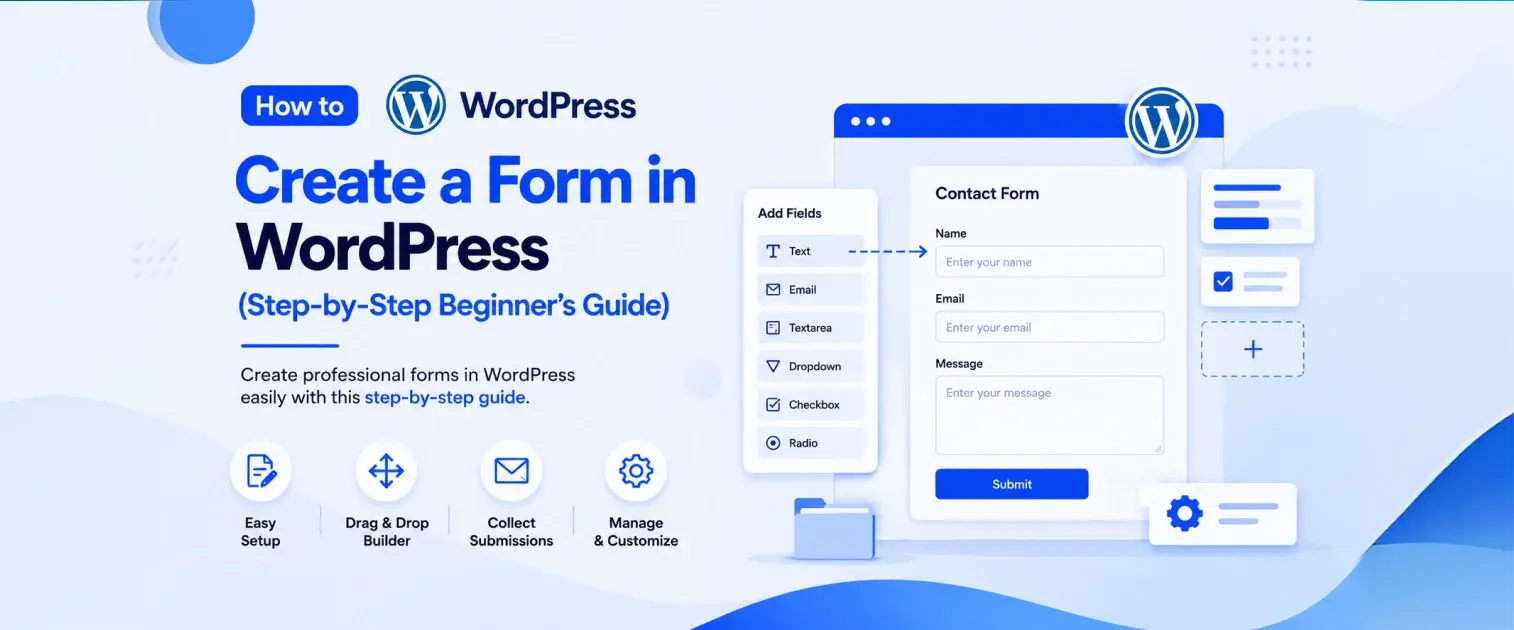
How to Create a Form in WordPress (Step-by-Step Beginner’s Guide)

- Why Creating a Form Is More Important Than Most Website Owners Realize
- What Can You Create With a WordPress Form?
- Do You Really Need a Plugin?
- Choosing the Right Form Builder
- Why We’re Using YS LeadGen in This Tutorial
- Before You Create Your First Form
- Creating Your First Form in WordPress
- Creating Your First Form Campaign
- Why Organization Matters More Than You Think
- Selecting a Form Campaign
- Naming Your Form
- A Simple Naming Convention We Recommend
- Choosing the Right Template
- Don’t Worry About Finding the “Perfect” Template
- Customizing Your Form
- Start With Your Visitor, Not Your Business
- Which Fields Should You Include?
- Writing Better Button Text
- Design for Mobile First
- Save Your Progress
- Publishing Your Form, Optimizing It for Better Results, and What to Do Next
- Should You Show the Same Form to Every Visitor?
- Showing Forms on the Right Devices
- Controlling How Often Visitors See Your Form
- Reaching Visitors From Specific Traffic Sources
- Review Your Form Before Publishing
- Embedding Your Form Anywhere on Your Website
- Don’t Skip Testing
- Common Mistakes Beginners Make
- Simple Tips to Increase Form Conversions
- Final Thoughts
- Frequently Asked Questions
If you’re building a WordPress website, adding a form is one of the first things you should do.
Whether you want visitors to contact you, request a quote, subscribe to your newsletter, book an appointment, or send feedback, a form makes that interaction simple. Instead of asking people to copy your email address or call your office, you give them a quick, convenient way to reach you without ever leaving your website.
The good news is that creating a form in WordPress is much easier than it used to be.
Years ago, building a contact form meant writing HTML, styling it with CSS, handling validation with JavaScript, and adding server-side code to process submissions securely. Unless you were a developer, it wasn’t something you could do in an afternoon.
Today, that’s no longer the case.
Modern WordPress form builders allow you to create professional forms using a visual editor. You can choose a ready-made template, customize it to match your website, and publish it in just a few minutes—all without writing a single line of code.
In this guide, I’ll show you exactly how to create a form in WordPress using YS LeadGen. More importantly, I’ll explain the decisions behind each step, so you’re not just following instructions—you’ll understand how to build forms that are easy to use and more likely to convert visitors into customers.
Whether this is your first WordPress website or you’re looking for a better way to collect leads, this tutorial will walk you through the entire process from start to finish.
Quick Answer
If you’re in a hurry, here’s the short version.
To create a form in WordPress, you’ll need to install a form builder plugin like YS LeadGen. After installing the plugin, create a new form, choose a template, customize the fields and design, publish the form, and embed it on any page using the generated shortcode.
That’s really all there is to it.
If you’ve never created a WordPress form before, don’t worry. The rest of this guide explains every step in detail, along with a few best practices that can help you avoid common beginner mistakes.
Why Creating a Form Is More Important Than Most Website Owners Realize
Many people think of a contact form as just another page on their website.
In reality, it’s often one of the most valuable pages you have.
Think about the last time you visited a company’s website because you were interested in a product or service. Chances are you didn’t want to make a phone call immediately. You probably had a question, wanted a price estimate, or simply wanted to know whether the business could help with your specific requirement.
What did you look for?
Most people click Contact Us, Get a Quote, or Request a Callback.
If the process is quick and straightforward, they’ll usually send a message. If it’s confusing, asks for too much information, or doesn’t work properly on mobile devices, they’ll often leave and continue searching.
That small interaction can determine whether you gain a new customer or lose one to a competitor.
We’ve seen businesses invest heavily in SEO and paid advertising to bring visitors to their websites, only to lose potential leads because their contact form was too complicated. Sometimes, reducing a form from ten fields to five is enough to noticeably improve the number of inquiries a business receives.
A form may look like a small feature, but it often plays a much bigger role in your website’s success than most people expect.
What Can You Create With a WordPress Form?
When people hear the phrase “WordPress form,” they usually think of a simple contact page.
That’s certainly one use case, but modern form builders can do much more.
For example, you can create a contact form that allows customers to ask questions without exposing your email address publicly. If you’re a service-based business, you can build a quote request form that collects important project details before your first conversation.
Running an online store? You might use forms to collect wholesale inquiries, product customization requests, or warranty registrations. Bloggers and content creators often use newsletter signup forms to grow their email lists, while educational websites rely on registration forms for workshops, webinars, and online courses.
As your website grows, you’ll probably create several forms for different purposes. The good news is that once you understand the basics, creating a new form usually takes only a few minutes.
Do You Really Need a Plugin?
This is one of the most common questions beginners ask, and it’s a fair one.
Technically, you can create a form without installing a plugin.
However, doing so means writing the HTML structure yourself, styling it with CSS, validating user input, processing submissions securely, protecting the form against spam, and configuring email notifications. You’ll also need to maintain that code whenever your website changes.
For most website owners, that’s unnecessary complexity.
A good form builder handles all of those technical tasks behind the scenes, allowing you to focus on what actually matters—collecting information from your visitors.
That’s why almost every professional WordPress website uses a dedicated form plugin. It’s faster, easier to maintain, and far less likely to break after future updates.
Choosing the Right Form Builder
If you’ve searched for WordPress form plugins before, you’ve probably noticed there are plenty of options available.
Some plugins are designed for simple contact forms. Others focus on surveys, payment forms, or advanced workflow automation.
So, how do you choose the right one?
Rather than looking for the plugin with the longest feature list, focus on one that matches your needs today while giving you room to grow later.
Here are a few features worth looking for:
- A visual drag-and-drop editor that’s easy for beginners.
- Professionally designed templates to save time.
- Mobile-responsive forms that work on every device.
- Spam protection and form validation.
- Flexible embedding options, such as shortcodes.
- The ability to customize fields without writing code.
- Features that support lead generation as your business grows.
If a plugin checks those boxes, you’re already off to a good start.
Why We’re Using YS LeadGen in This Tutorial
For this guide, we’ll use YS LeadGen.
Not because it’s the only plugin capable of creating WordPress forms, but because it strikes a good balance between simplicity and flexibility.
If all you need is a basic contact form, you can have one up and running in just a few minutes. As your website grows, the same plugin also gives you access to features like targeting options, campaign scheduling, lead generation tools, and conversion-focused templates. That means you won’t need to switch to another plugin as your marketing needs become more advanced.
Throughout this tutorial, we’ll focus on the fundamentals first. Once your form is working, you can always explore the additional features later.
Before You Create Your First Form
Before opening your WordPress dashboard, spend a few minutes thinking about the purpose of your form.
This step is often overlooked, but it can save you from making unnecessary changes later.
Ask yourself a simple question:
What action do I want visitors to take?
If your goal is to let people contact you, a name, email address, subject, and message field may be all you need.
If you’re collecting quote requests, you might also ask for a phone number, company name, or a brief description of the project.
Try to resist the temptation to ask for every possible detail.
Every additional field creates a little more work for your visitors. Sometimes that’s necessary, but in many cases it simply adds friction. A shorter, focused form is usually easier to complete, especially on mobile devices.
You can always gather more information later once the conversation has started.
With that in mind, we’re ready to move on.
In the next section, we’ll open YS LeadGen, create a new form campaign, choose a template, and start building your first WordPress form from scratch.
Creating Your First Form in WordPress
In the previous section, we looked at why every WordPress website should have a form, how forms work, and why using a dedicated form builder saves time compared to creating one from scratch.
Now it’s time to build your first form.
Don’t worry if you’ve never used a form plugin before. YS LeadGen is designed to be beginner-friendly, and the entire process is visual. You’ll be choosing options, customizing content, and arranging fields using an intuitive interface—no coding required.
By the end of this section, you’ll have a fully designed form that’s ready to publish on your website.
Creating Your First Form Campaign
After logging in to your WordPress dashboard, look for YS LeadGen in the left-hand navigation menu.
Click it to open the plugin dashboard.
If this is your first time using YS LeadGen, you’ll see an option to create a new campaign.
Click Create New Campaign.
At first glance, you might wonder why YS LeadGen refers to forms as campaigns instead of simply calling them forms.
It’s actually a thoughtful approach.
A campaign is more than just the form itself. It includes everything related to how that form behaves—its design, display settings, targeting rules, scheduling, analytics, and conversion tracking.
Think of it this way.
Imagine you’re running three different marketing campaigns:
- A contact form for your website.
- A quote request form for Google Ads visitors.
- A newsletter signup form for your blog.
Although all three collect information, they serve different purposes and are shown to different audiences.
Keeping them organized as campaigns makes managing your website much easier as it grows.
This is especially helpful for agencies, freelancers, and businesses that manage multiple websites or seasonal promotions.
Screenshot: YS LeadGen Dashboard → Create New Campaign
Why Organization Matters More Than You Think
When you’re building your very first form, organization probably isn’t something you’re thinking about.
After all, it’s only one form.
However, websites rarely stay that simple.
A few months from now, you might have:
- A Contact Us form
- A Careers form
- A Dealer Enquiry form
- A Product Registration form
- A Support Request form
- A Newsletter Signup form
Without proper organization, finding and updating the correct form becomes frustrating.
That’s why YS LeadGen starts by asking you to create a campaign first.
It’s a small decision today that saves time later.
Selecting a Form Campaign
After clicking Create New Campaign, you’ll see different campaign types available.
Each campaign is designed for a different marketing objective.
Since we’re creating a standard WordPress form, choose:
Form Campaign
Then click:
Create Form
This opens the Form Creation Wizard.
From here, YS LeadGen guides you through each stage of the process, making it easy even if you’ve never created a form before.
Instead of overwhelming you with dozens of settings on one screen, the wizard walks you through one decision at a time.
For beginners, this makes the learning curve much smoother.
Screenshot: Campaign Type Selection
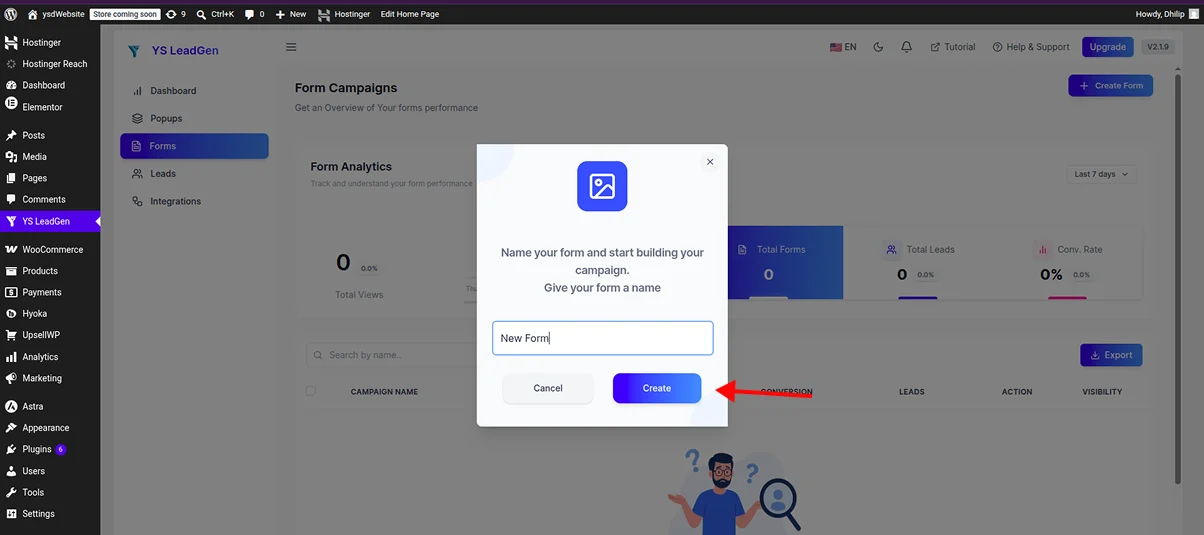
Naming Your Form
The next step is surprisingly simple.
You’ll be asked to enter a name for your form.
Many beginners rush through this screen and type something like:
- Contact Form
- Form 1
- Test
- New Form
While there’s nothing technically wrong with those names, they’re not very helpful in the long run.
Remember, this name is only visible inside your WordPress dashboard.
Your visitors will never see it.
That means you should use it to keep your projects organized.
For example, instead of naming your form Contact Form, you could use something more descriptive, such as:
- Website Contact Form
- Homepage Lead Form
- Product Enquiry Form
- Request a Quote
- Franchise Enquiry
- Support Request Form
Now imagine revisiting your website six months later.
Would you rather scroll through a list of forms named Form 1, Form 2, and Test, or immediately recognize the exact form you need?
Clear naming conventions save time—especially as your website grows.
A Simple Naming Convention We Recommend
If you expect to create multiple forms, adopting a naming pattern from the beginning is a good habit.
For example:
Page Name – Form Purpose
Examples include:
- Homepage – Quote Request
- Contact Page – General Enquiry
- Footer – Newsletter Signup
- Landing Page – Free Consultation
This makes your dashboard much easier to navigate, particularly if several people manage the website.
It’s a small detail, but one you’ll appreciate later.
Choosing the Right Template
After naming your form, it’s time to decide how it should look.
This is where many beginners make things harder than they need to be.
Some people assume they should start with a completely blank form because they want something unique.
In reality, starting from scratch rarely provides any advantage.
Professional templates already follow many of the design principles that improve usability.
They have logical spacing, well-positioned labels, readable typography, and layouts that work across desktop and mobile devices.
Instead of reinventing the wheel, it’s usually better to begin with a template and customize it.
You’ll save time while still creating a form that reflects your own brand.
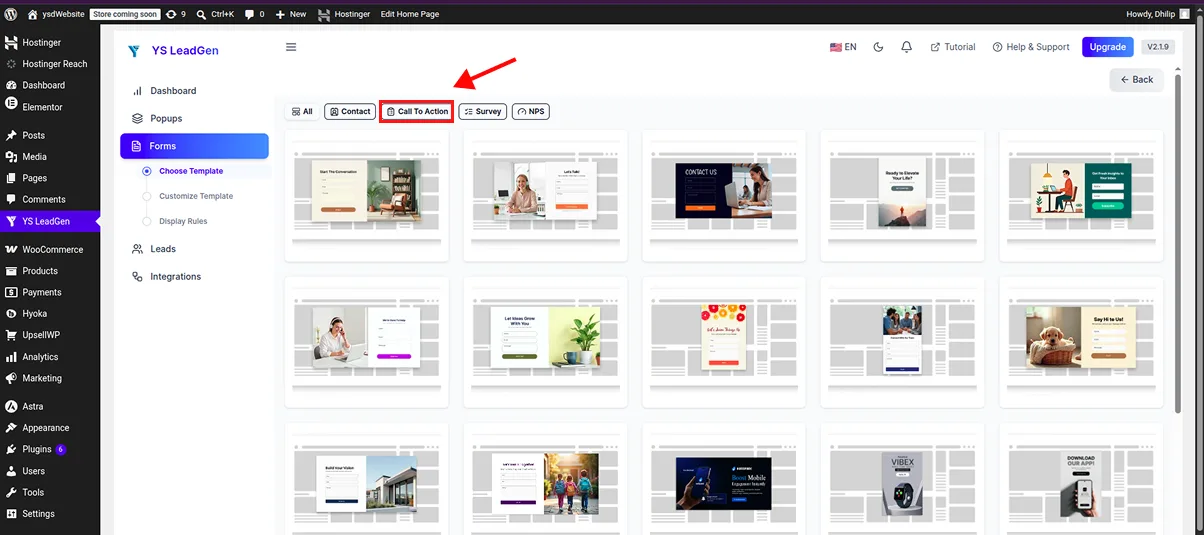
YS LeadGen includes templates for a variety of common use cases, including:
- Contact Forms
- Newsletter Signup Forms
- Feedback Forms
- Quote Request Forms
- Registration Forms
- Lead Capture Forms
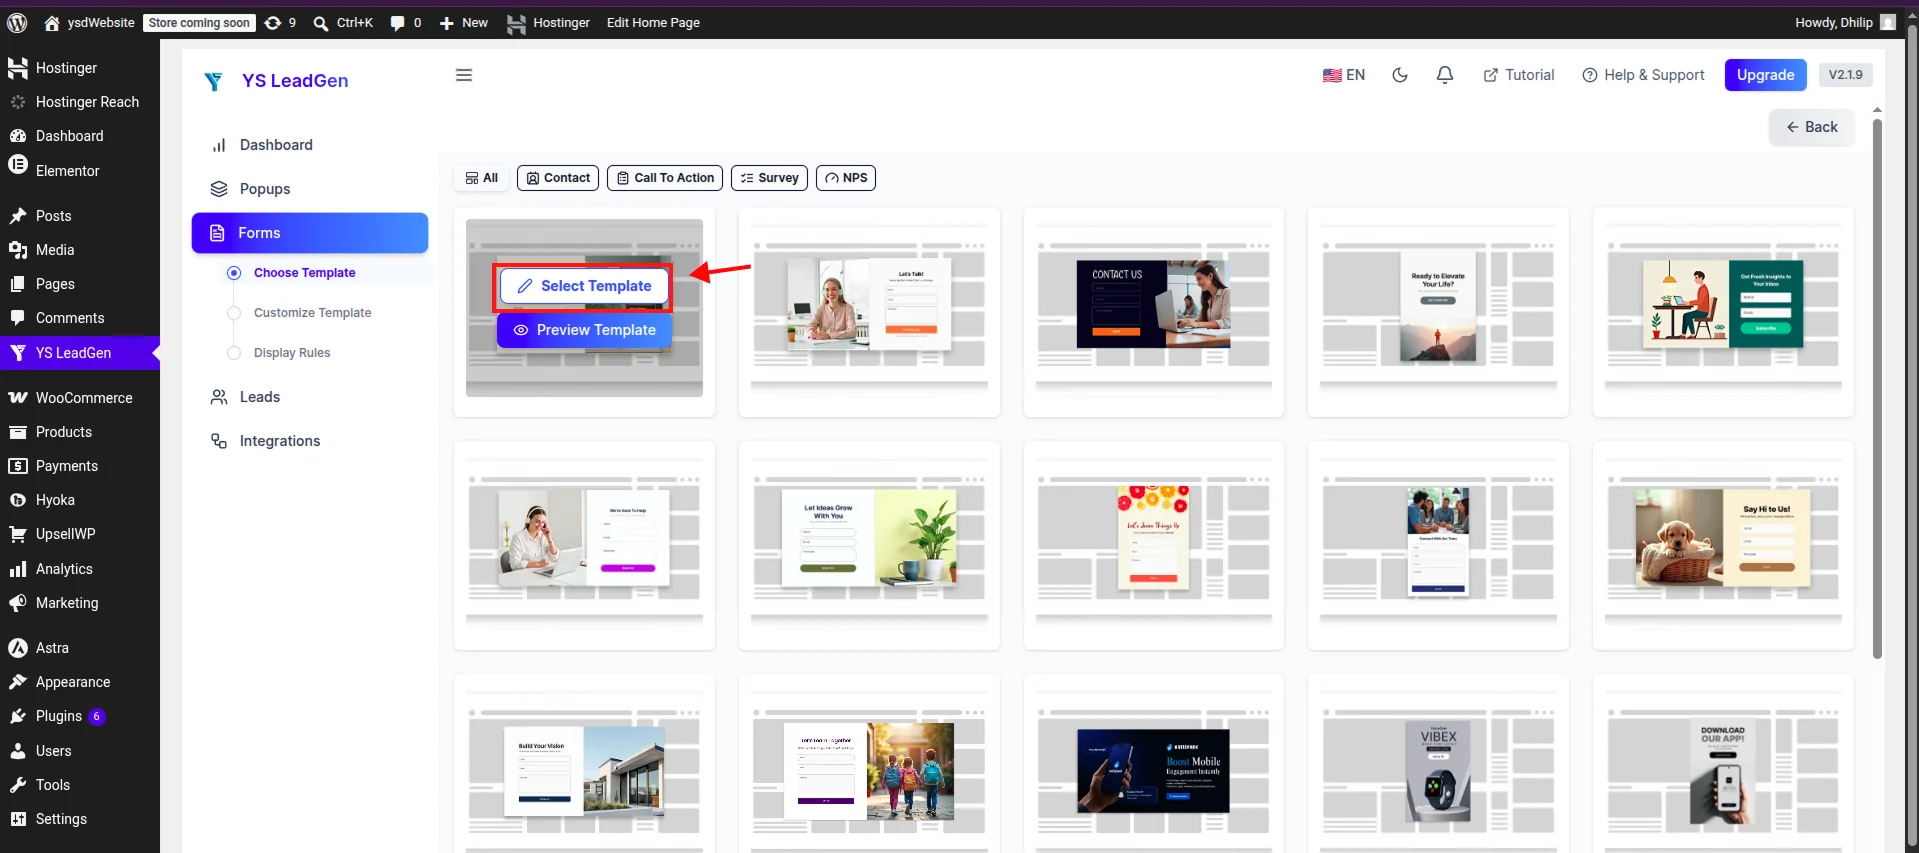
Choose the template that best matches your objective, then click Select Template.
Screenshot: Form Template Library
Don’t Worry About Finding the “Perfect” Template
One question we often hear is:
“What if I choose the wrong template?”
Fortunately, there’s no permanent decision here.
Templates are simply starting points.
Once the editor opens, you can change the heading, description, colors, fields, images, and layout.
Think of a template like the foundation of a house.
You’re free to redesign almost everything that sits on top of it.
Because of that flexibility, it’s usually better to choose the template that’s closest to your goal rather than spending time searching for a perfect match.
Customizing Your Form
With your template selected, YS LeadGen opens the visual editor.
This is where your form begins to take shape.
Everything you see can be customized.
You can replace placeholder content with your own branding, edit headings and descriptions, upload a logo, rearrange sections, add new fields, remove unnecessary ones, and update the call-to-action button.
The best part is that every change happens visually.
There’s no need to edit code or worry about accidentally breaking your layout.
If you’ve ever used WordPress’s block editor or a page builder like Elementor, the experience will feel familiar.
Start With Your Visitor, Not Your Business
When customizing a form, it’s easy to think only about the information you want to collect.
Instead, think about the person filling it out.
Ask yourself:
“If I landed on this page for the first time, would this form feel quick and easy to complete?”
That simple mindset changes how you design forms.
For example, if someone wants a price quotation, they probably don’t want to answer fifteen detailed questions before they’ve even spoken to you.
Start with the essentials.
Once you’ve made contact, you can always gather more information later.
One of the easiest ways to improve form completion rates is simply removing unnecessary fields.
Less friction usually leads to more submissions.
Which Fields Should You Include?
The answer depends entirely on your goal.
A basic contact form usually needs only four fields:
- Full Name
- Email Address
- Subject
- Message
A quote request form might also include:
- Phone Number
- Company Name
- Service Required
- Budget Range
- Project Details
Rather than asking for every possible detail, focus on collecting only the information you’ll actually use during the first conversation.
Every additional field asks visitors to invest more time.
Make sure each one earns its place.
Writing Better Button Text
One of the smallest elements on your form can have a surprisingly big impact.
The submit button.
Many websites still use the default button label:
Submit
Technically, there’s nothing wrong with it.
But it doesn’t tell visitors what happens next.
Instead, try using button text that matches the action you’re asking users to take.
For example:
- Send Message
- Request a Quote
- Get My Free Consultation
- Download Now
- Join the Newsletter
- Book My Demo
These buttons feel more specific and reassure visitors that they’re taking the right action.
It’s a small change, but one that often improves clarity.
Design for Mobile First
More than half of website visitors now browse from mobile devices.
That means there’s a good chance someone will complete your form using a smartphone rather than a desktop computer.
Before publishing, preview your form on different screen sizes.
Make sure text is readable, fields have enough spacing, and buttons are easy to tap with a thumb.
A form that looks great on a laptop but feels cramped on a phone can quietly reduce the number of inquiries your website receives.
Responsive design isn’t just about appearance—it’s about making it easy for people to complete your form wherever they are.
Save Your Progress
As you customize your form, remember to save your changes regularly.
Even though YS LeadGen makes editing simple, developing the habit of saving your work protects you from losing progress if your browser refreshes unexpectedly or your internet connection drops.
Once you’re satisfied with the design, click Save and Next to continue.
In the next section, we’ll look at the optional display settings that let you control when, where, and to whom your form is shown. While these settings aren’t required for every website, they become incredibly useful as your marketing campaigns become more targeted.
Publishing Your Form, Optimizing It for Better Results, and What to Do Next
At this point, your form is essentially complete.
You’ve created a campaign, selected a template, customized the design, and added the fields your visitors need.
Now comes the final stage—deciding when, where, and to whom your form should appear before making it live on your website.
If you’re creating a simple contact form, you can publish it immediately.
However, if you’re using forms to generate leads, run marketing campaigns, or promote seasonal offers, spending a few extra minutes configuring the display settings can make a noticeable difference.
Let’s look at those options one by one.
Should You Show the Same Form to Every Visitor?
Not necessarily.
Different visitors often have different intentions.
Someone arriving from a Google search may be researching your services for the first time, while someone clicking a Facebook advertisement may already be interested in a specific offer.
Showing both visitors the exact same form isn’t always the best experience.
That’s why YS LeadGen includes optional targeting settings.
These features allow you to decide who should see a particular form without creating multiple versions of the same page.
The important word here is optional.
If you’re creating your very first form, you don’t need to configure any of these settings. Your form will work perfectly with the default configuration.
As your website grows, though, these controls become increasingly valuable.
Showing Forms on the Right Devices
Every website receives visitors from different devices.
Some businesses see most of their traffic coming from desktop computers during office hours. Others receive the majority of their visitors from smartphones throughout the day.
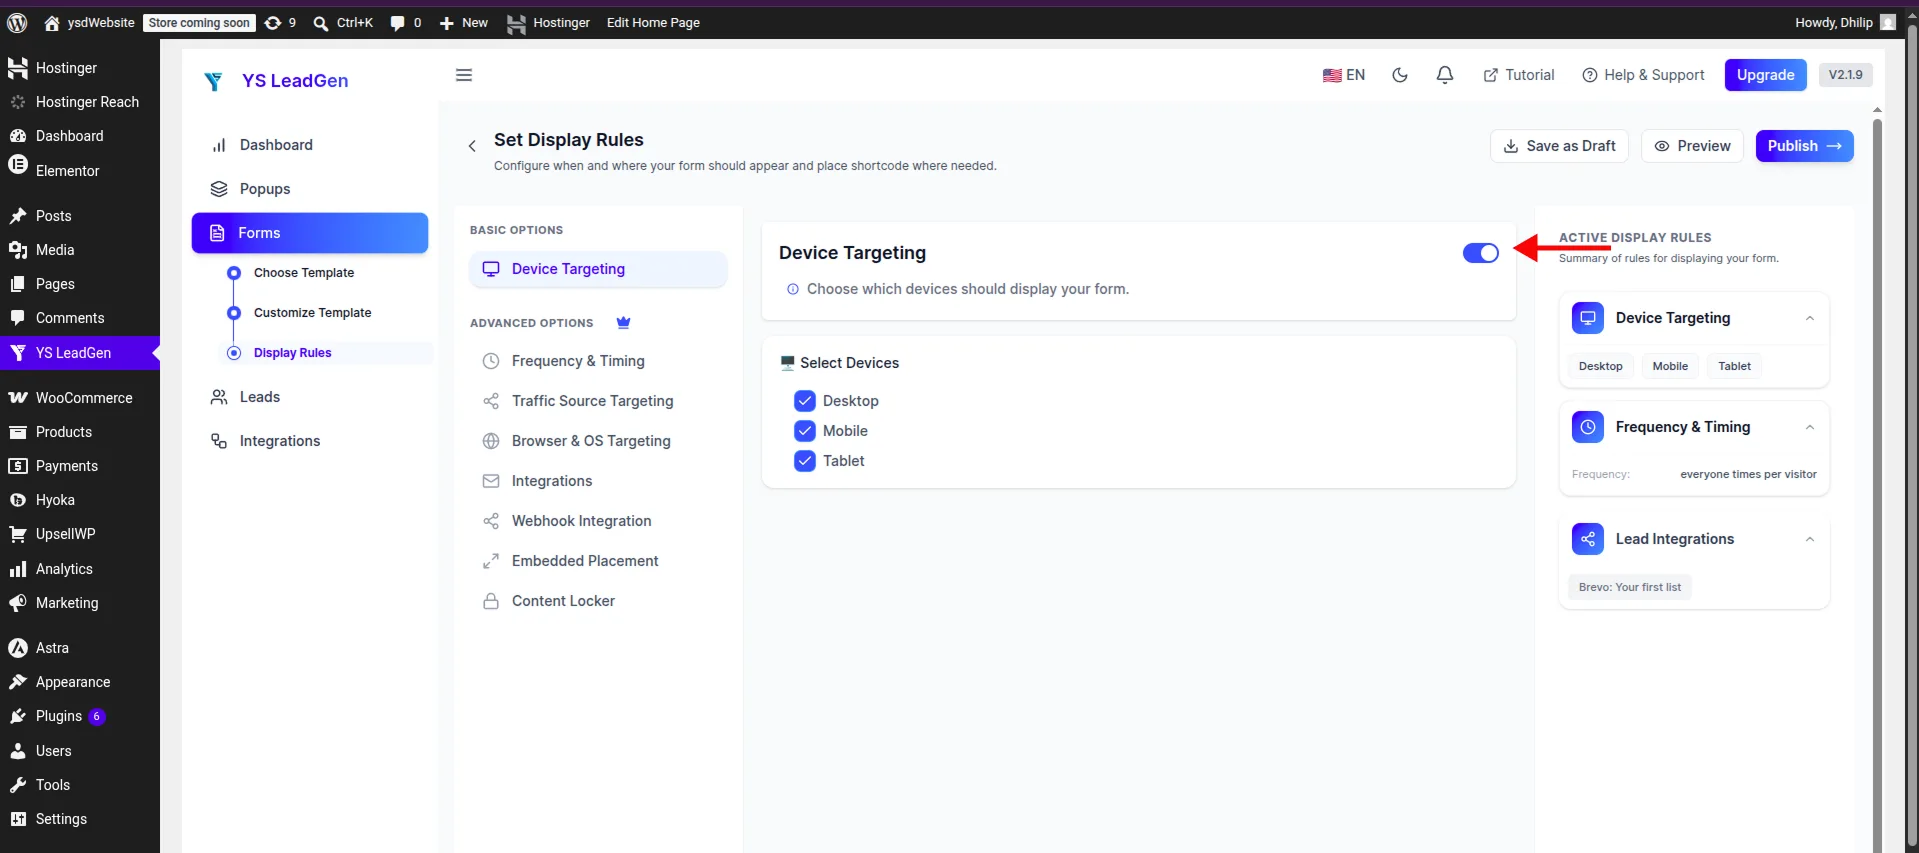
YS LeadGen lets you decide whether your form should appear on:
- Desktop
- Mobile
- Tablet
- All Devices
For most websites, All Devices is the right choice.
However, there are situations where device targeting makes sense.
Imagine you’re promoting a mobile app.
Visitors using smartphones are already on the right device to install it, while desktop users may not be able to download it immediately.
Similarly, if you’re running a campaign that requires users to upload files from a desktop computer, you might choose to display that form only on larger screens.
The key is to match the experience to the visitor’s situation.
Expert Tip: Don’t hide forms from mobile users unless there’s a genuine reason. Mobile traffic now represents a significant share of website visits, and limiting access can reduce valuable inquiries.
Screenshot: Device Targeting Settings
Controlling How Often Visitors See Your Form
Have you ever visited a website where the same popup appears every time you click a new page?
It’s frustrating.
While your current tutorial focuses on embedded forms, the same principle applies to campaigns that use popups or slide-ins.
Visitors shouldn’t feel interrupted repeatedly.
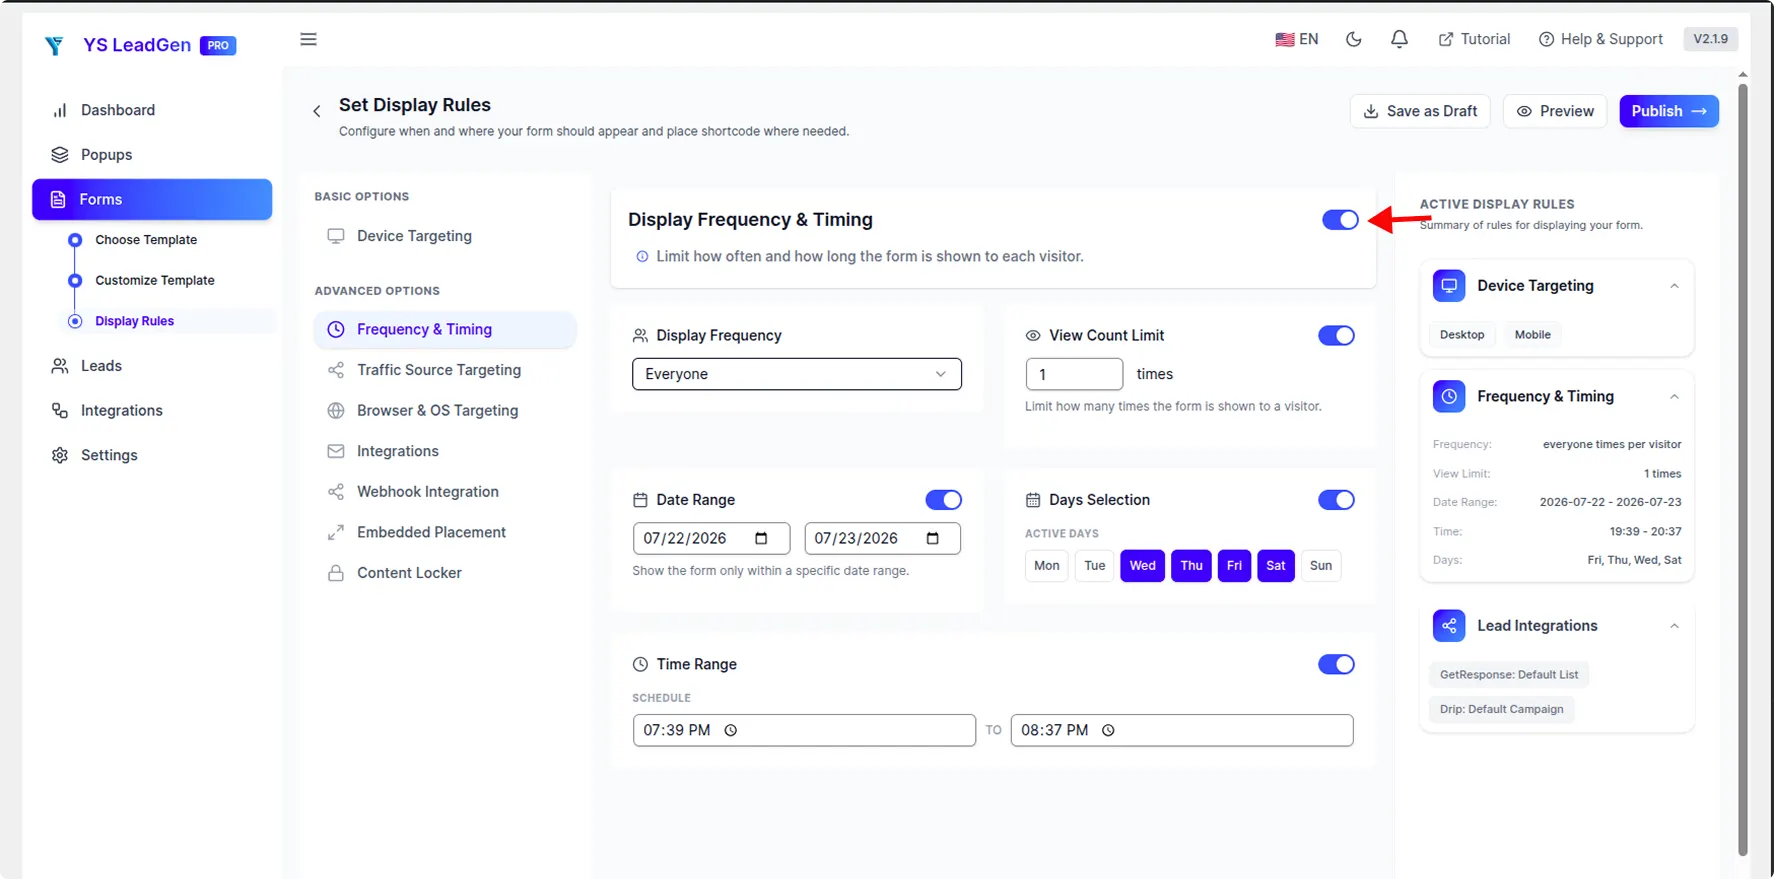
YS LeadGen allows you to control:
- How often a campaign appears.
- The maximum number of views per visitor.
- The days or dates when the campaign is active.
- Specific start and end times.
These controls are particularly useful for limited-time promotions, holiday campaigns, product launches, or event registrations.
For example, if you’re running a “Free Consultation” campaign for one month, you can schedule it to start and stop automatically without returning to your dashboard later.
Automation like this saves time and reduces the chances of outdated campaigns remaining visible after they’ve expired.
Screenshot: Display Frequency & Scheduling
Reaching Visitors From Specific Traffic Sources
Not every visitor arrives at your website in the same way.
Some discover your business through Google Search.
Others click a Facebook advertisement.
Some come from an email campaign, while others follow a link shared on another website.
If you’re investing in digital marketing, it often makes sense to tailor your forms to these different audiences.
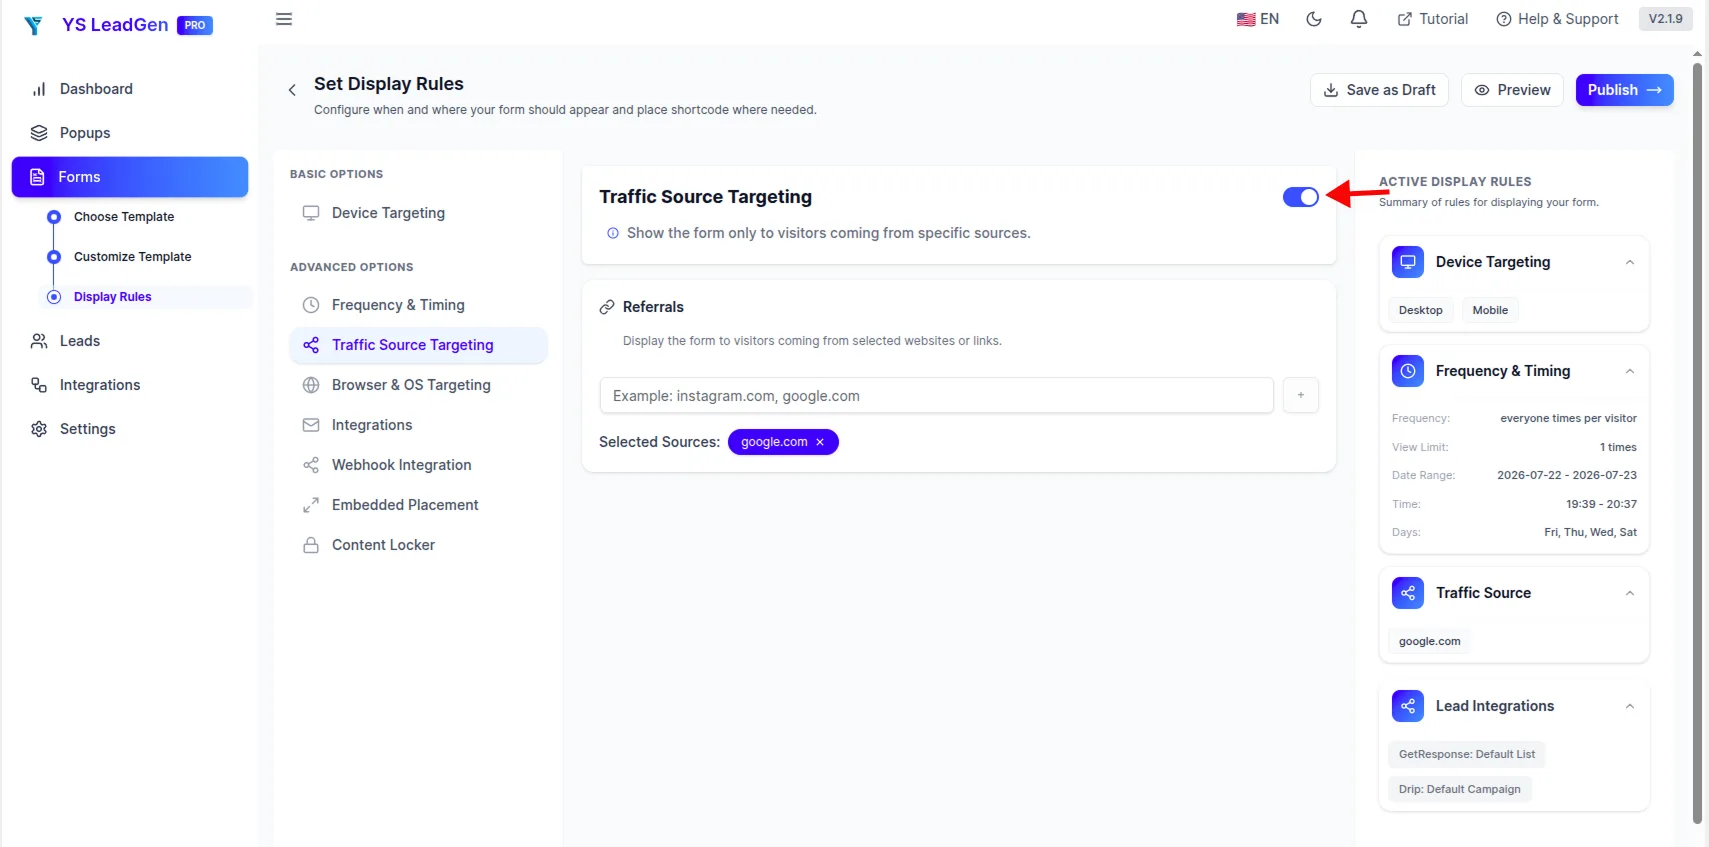
YS LeadGen allows you to display forms based on traffic sources such as:
- UTM Campaigns
- Referral URLs
Here’s a practical example.
Suppose you’re running Google Ads for “Industrial Roofing Services.”
Instead of showing a general contact form, you could display a dedicated quote request form asking for project size, location, and preferred installation date.
Now imagine someone arriving through your monthly newsletter.
Rather than asking for a quotation, you might encourage them to register for an upcoming webinar or download a product catalogue.
The page may remain the same, but the form becomes more relevant to the visitor.
That small improvement often leads to better engagement.
Screenshot: Traffic Source Targeting
Review Your Form Before Publishing
Before making your form live, spend a few minutes reviewing everything one last time.
This simple habit can prevent small mistakes from reaching your visitors.
Check the following:
- Are all required fields working correctly?
- Is the heading clear and easy to understand?
- Does the button text explain the action?
- Are there any spelling or grammar mistakes?
- Does the form look good on desktop and mobile?
- Have you removed fields that aren’t necessary?
It’s surprising how often a quick review catches something that was easy to overlook while editing.
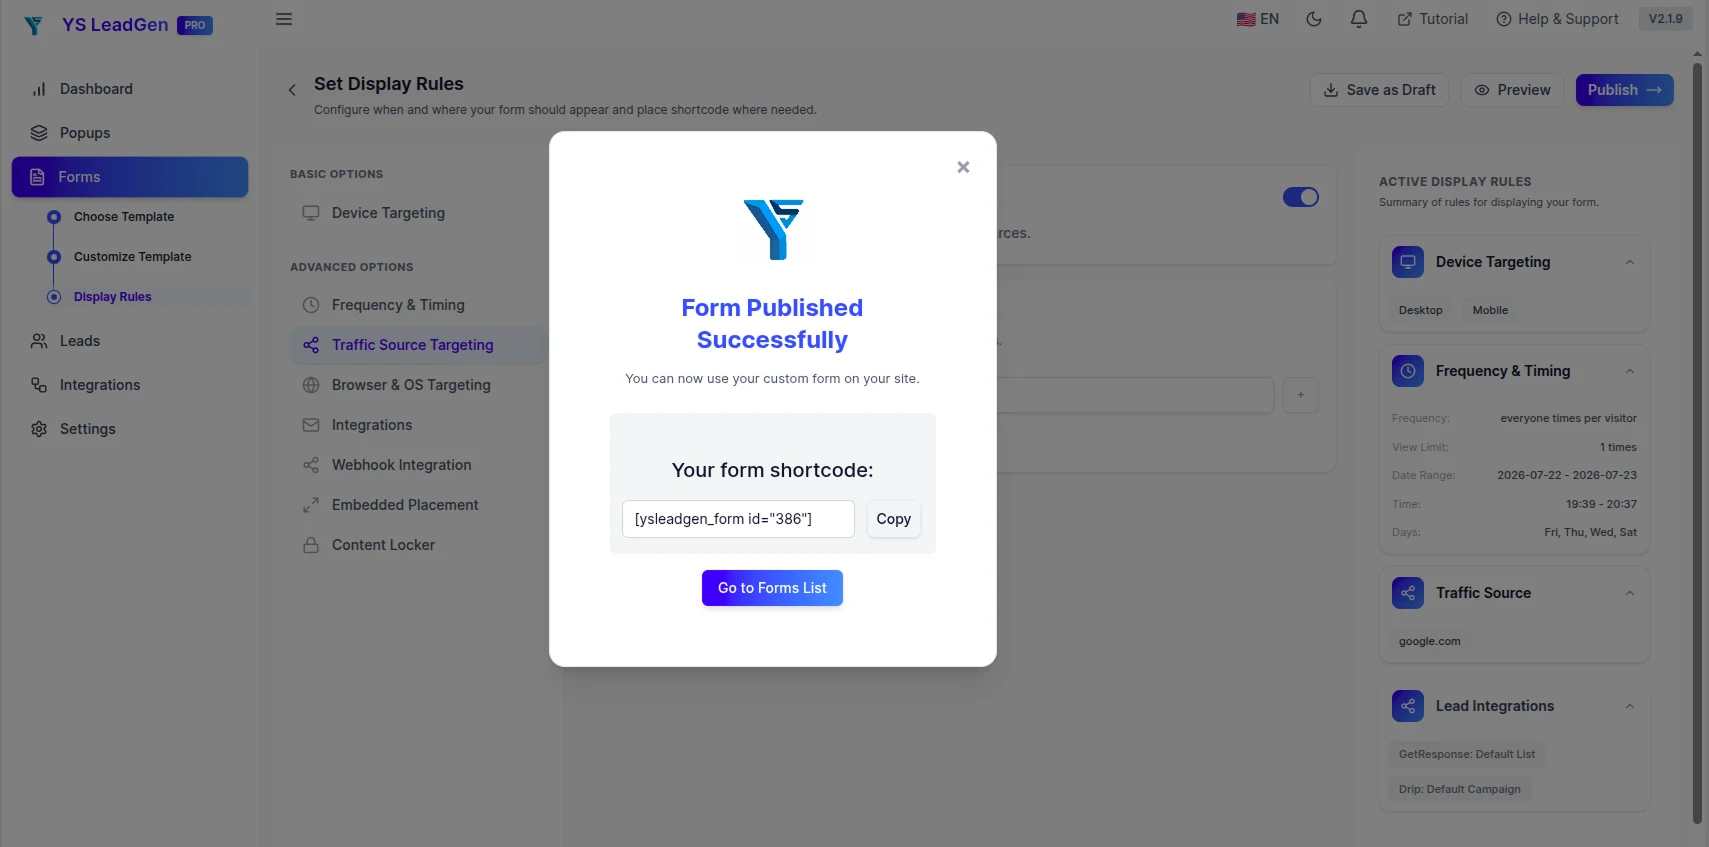
Once you’re satisfied, click Publish.
YS LeadGen will automatically generate a shortcode for your form.
Screenshot: Publish Screen with Generated Shortcode
Embedding Your Form Anywhere on Your Website
Publishing your form doesn’t automatically display it on your website.
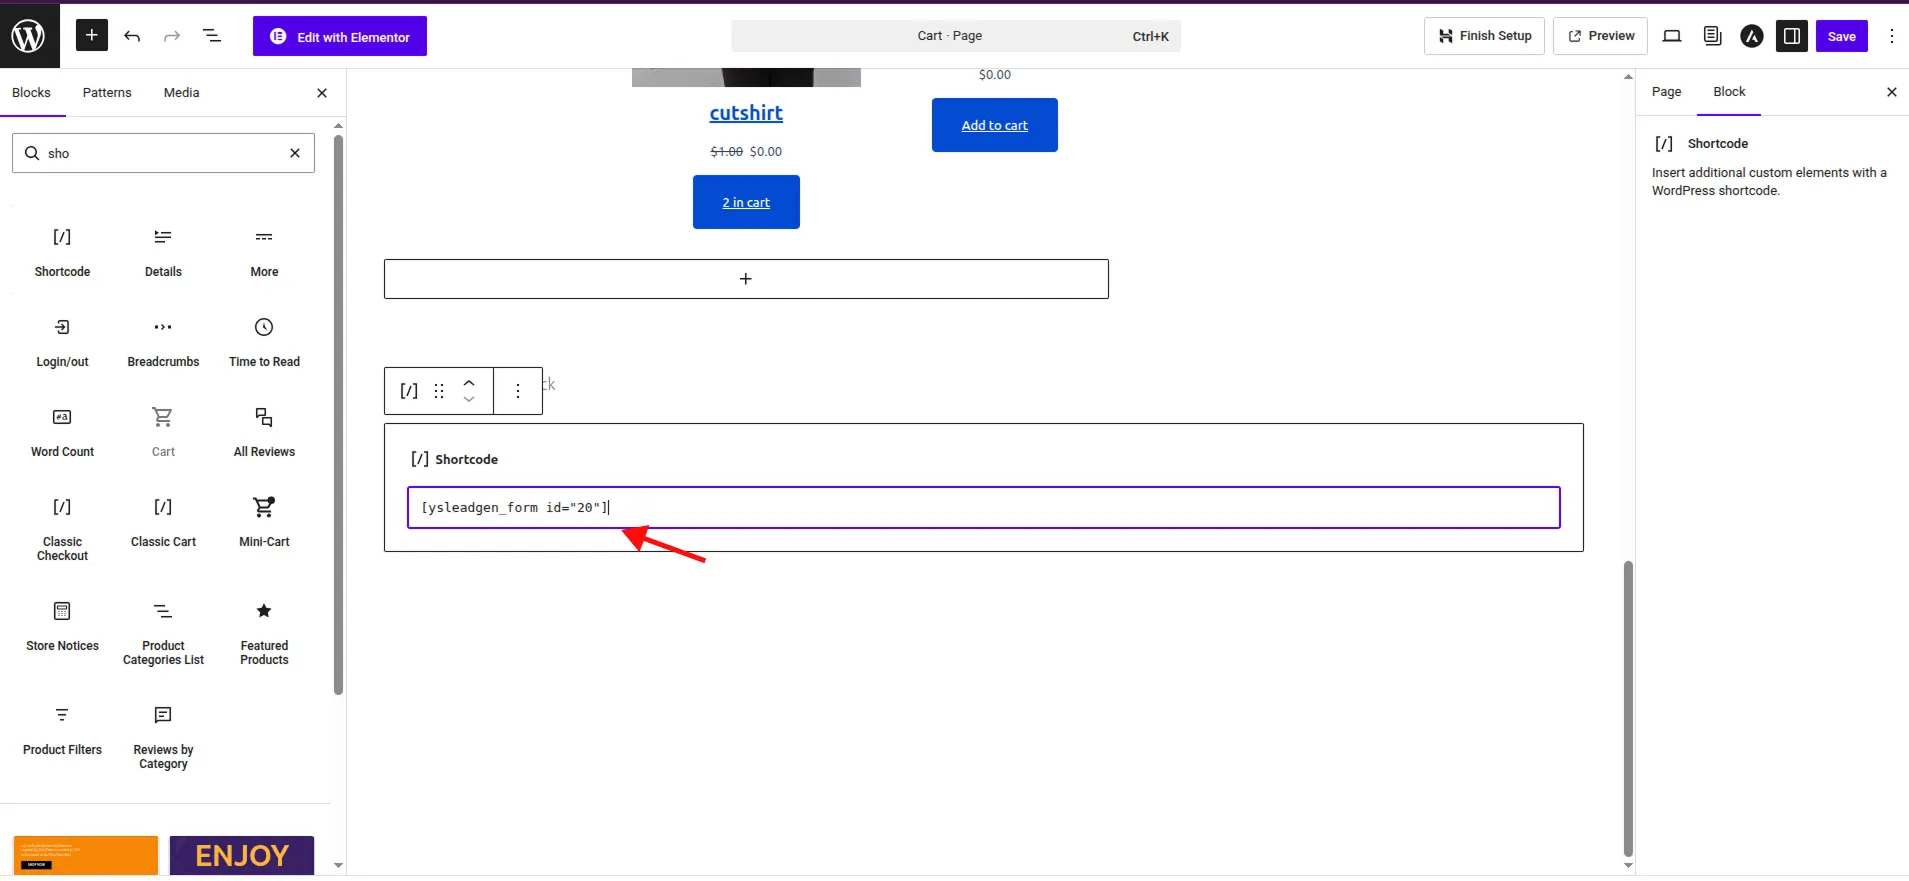
Instead, YS LeadGen generates a shortcode that you can place wherever you’d like the form to appear.
This gives you complete flexibility.
For example, you can embed your form on:
- Your Contact page.
- A service page.
- A landing page.
- A product page.
- A blog post.
- A sidebar or widget area.
- A custom template built with a page builder.
Simply copy the generated shortcode, open the page where you want the form to appear, and paste it into the Shortcode block in the WordPress editor.
If you’re using Elementor or another page builder, you can use its Shortcode widget in exactly the same way.
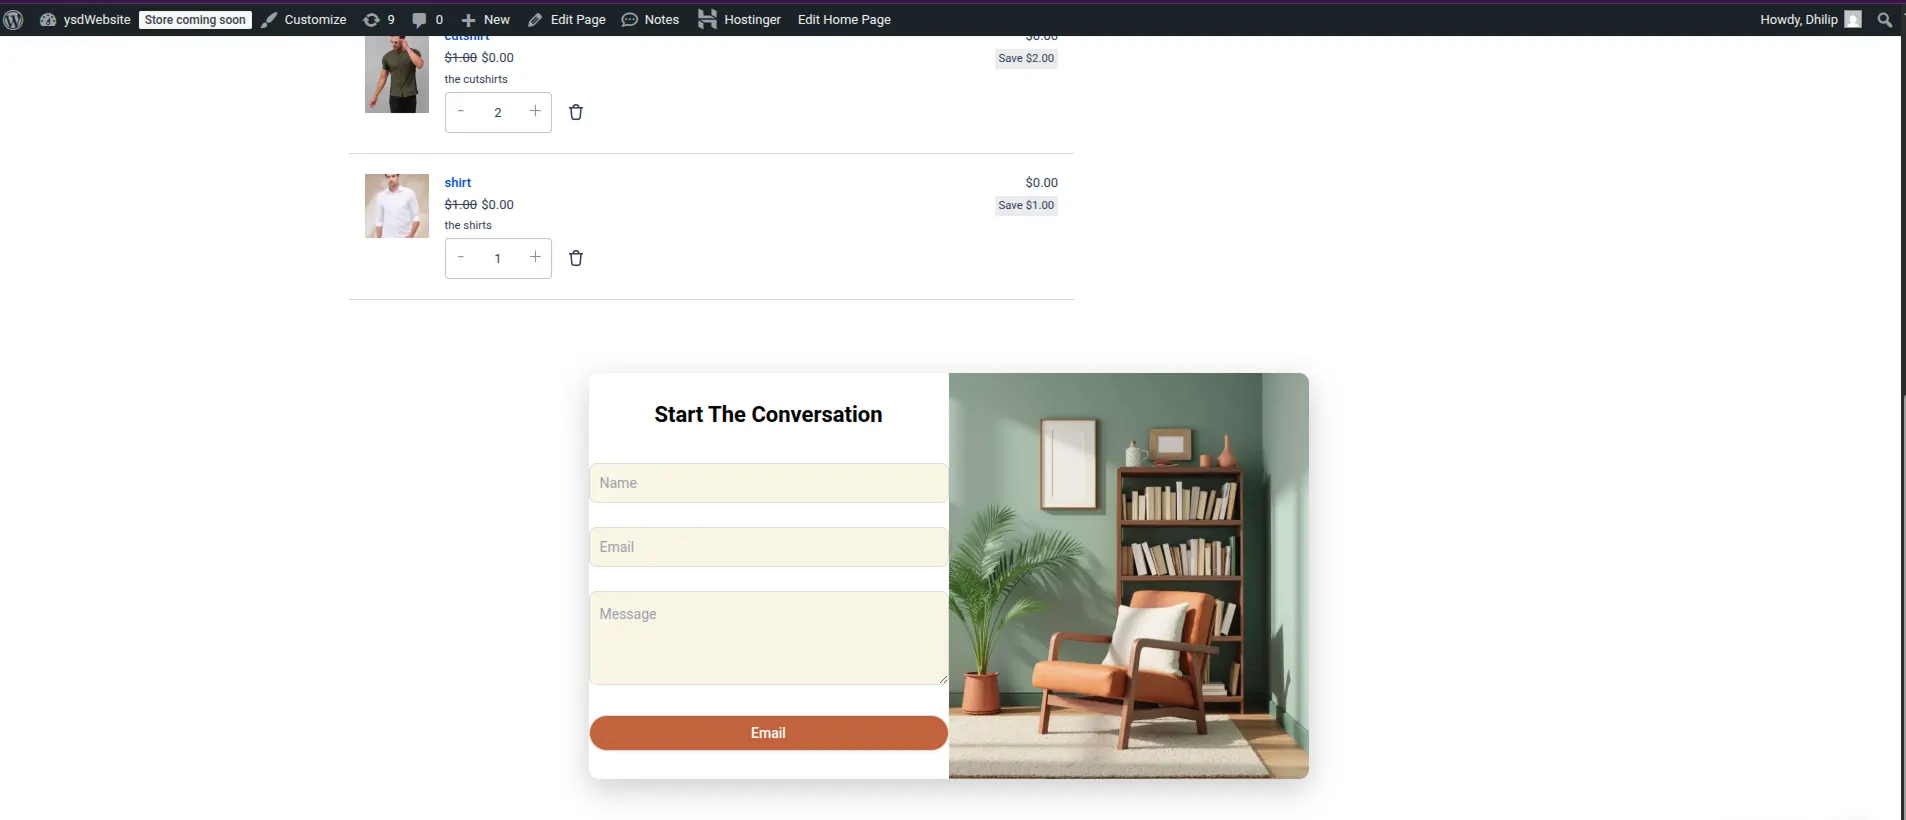
After updating the page, visit it from the front end of your website to make sure everything appears correctly.
Screenshot: Embedding Shortcode in WordPress
Don’t Skip Testing
One of the biggest mistakes beginners make is assuming the form works because it looks correct.
Appearance is only part of the process.
Always test your form after publishing.
Submit it yourself.
Then check:
- Did you receive the notification email?
- Were all fields submitted correctly?
- Does the success message appear?
- Are links and buttons working?
- Does the form behave properly on mobile devices?
It’s much better to discover a problem yourself than to have a potential customer encounter it first.
Whenever you make significant changes to a form, repeat this testing process.
It only takes a few minutes and gives you confidence that everything is working as expected.
Common Mistakes Beginners Make
Even experienced website owners occasionally make mistakes when creating forms.
Fortunately, most of them are easy to avoid.
Asking for Too Much Information
Long forms often discourage visitors from completing them.
Start with only the information you genuinely need.
Using Generic Button Text
Buttons labeled Submit don’t communicate much.
Replace them with action-oriented text that tells visitors exactly what will happen next.
Forgetting Mobile Users
Always preview your form on a smartphone.
A form that’s difficult to complete on mobile devices can quietly reduce your conversion rate.
Ignoring Confirmation Messages
After someone submits your form, let them know it worked.
A simple confirmation message reassures visitors that their information has been received.
Publishing Without Testing
Never assume.
Always submit a test entry before announcing a new form or campaign.
Simple Tips to Increase Form Conversions
Once your form is live, your next goal is encouraging more visitors to complete it.
You don’t always need a complete redesign.
Often, small improvements produce the biggest results.
For example:
- Keep forms as short as possible.
- Write clear, benefit-driven headings.
- Use descriptive button text.
- Build trust with a short privacy statement.
- Place forms close to relevant content or calls to action.
- Remove distractions around important forms.
Remember, every additional step or unnecessary question creates friction.
The easier you make the process, the more likely visitors are to complete it.
Final Thoughts
Creating a form in WordPress is no longer a technical challenge.
With the right tools, you can build professional, responsive forms without writing code, then publish them anywhere on your website in just a few minutes.
More importantly, remember that a form isn’t just another page element.
It’s often the point where a visitor decides to become a lead, ask a question, request a quotation, or begin a conversation with your business.
Taking a little extra time to simplify your form, write clear copy, and test the experience can have a meaningful impact on how many inquiries your website receives.
As your website grows, you’ll likely create more than one form—for customer support, newsletter subscriptions, quote requests, registrations, feedback, and lead generation campaigns.
The good news is that once you’ve created your first form with YS LeadGen, building additional forms becomes much faster.
We hope this guide has helped you understand not only how to create a form in WordPress, but also how to create one that people actually want to complete.
If you’re ready, open your WordPress dashboard and build your first form. In just a few minutes, you’ll have a professional form ready to start collecting inquiries from your website visitors.
Frequently Asked Questions
Can I use the same form on multiple pages?
Absolutely.
Simply reuse the same shortcode wherever you want the form to appear.
Does YS LeadGen work with page builders?
Yes.
You can embed your form using the shortcode in the default WordPress editor or popular page builders such as Elementor.
Where are form submissions stored?
Depending on your configuration, submissions can be stored within YS LeadGen and/or sent to your email address. Always test your notification settings before launching an important campaign.
Can I create different forms for different marketing campaigns?
Yes.
This is one of the advantages of organizing forms as campaigns. You can create dedicated forms for Google Ads, social media promotions, newsletter campaigns, landing pages, or seasonal offers while managing everything from one dashboard.
About the author

YSLeadGen Pro - Lifetime Deal
Access to unlimited popups, advanced targeting, event triggers, and premium templates.
14-Days Risk Free Money Back Guarantee