There’s a specific kind of popup almost everyone’s run into: you land on a page, and before you’ve even finished reading the headline, something covers the screen asking you to subscribe. Most people close it without a second thought, and some leave the site entirely, irritated before they’ve even seen what the page was about. The offer inside that popup might have been genuinely good — but nobody ever found out, because it showed up before they had any reason to care.
A time delay popup exists to fix exactly that problem. Instead of firing the moment a page loads, it waits — five seconds, ten seconds, sometimes longer — giving the visitor a chance to actually read something first. By the time the popup appears, the person looking at it has already decided your content is worth their attention, which makes them a very different audience than someone who just clicked a link two seconds ago.
This matters more than it might sound like on paper. Whether you’re running a WordPress blog, a WooCommerce store, a SaaS product, or a lead generation site, the timing of a popup has a direct effect on whether people engage with it or reflexively close it. Showing the same offer to someone the instant they arrive versus someone who’s been reading for fifteen seconds can produce very different results, even though the offer itself hasn’t changed at all.
This guide covers what a time delay popup actually is, why the timing matters as much as it does, and exactly how to build one in WordPress using YS LeadGen — no code required, from install to publish, along with the delay settings and targeting choices that tend to make the biggest difference.
What Is a Time Delay Popup?
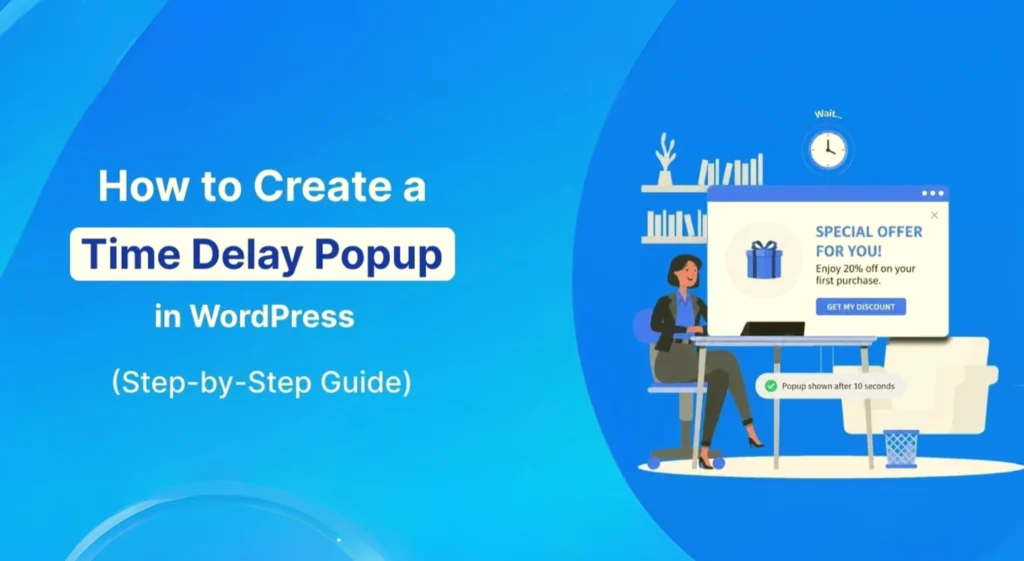
A time delay popup is a popup that only appears after a visitor has spent a set amount of time on a page — rather than showing up the instant the page finishes loading.
That delay might be short, like five seconds, or considerably longer, like thirty seconds, depending on the page and the kind of content on it. The idea is simple: give someone enough time to start engaging with what they came for before asking anything of them.

A few typical delay settings you’ll see in practice:
- 5 seconds, on pages designed for a quick decision
- 10 seconds, for a standard blog post or product page
- 15 to 30 seconds, on longer or more detailed content
This trigger is common across WordPress blogs, WooCommerce stores, SaaS sites, and landing pages, mainly because it tends to produce better engagement than an immediate popup without requiring any extra work from the site owner beyond picking the right number.
How Does a Time Delay Popup Actually Work?
Under the hood, it’s fairly simple. The moment a visitor lands on a page, a timer starts running in the background. Once that timer hits the delay you’ve set, the popup appears automatically — no extra action needed from the visitor.
What’s inside the popup can be almost anything: a newsletter signup, a discount code, a lead capture form, a free resource, a limited-time announcement, or a free trial invite. The content isn’t what makes this trigger different — the timing is.
Because the popup only shows up after someone’s had a chance to actually engage with the page, it tends to feel a lot less like an ambush than a popup that fires immediately. That difference in how it feels translates directly into how people respond to it.
Why Do Businesses Use Time Delay Popups?

Popups that appear the second a page loads are one of the more reliable ways to frustrate a visitor. Someone who’s shown a popup before they’ve read a single line of content will often:
- Close it immediately without reading what it says
- Leave the site out of irritation
- Walk away with a slightly worse impression of the brand than they had a second earlier
A time delay popup avoids all of that by waiting until a visitor has already shown some genuine interest — simply by staying on the page. That means:
- The visitor has had a chance to engage with the content before being asked for anything
- The popup only reaches people who’ve demonstrated they’re actually reading, not just landing and bouncing
- The message lands with a warmer, more receptive audience than it would at second zero
In practice, this translates to real benefits:
- Email signups tend to be higher quality, since they come from people who were already interested
- Offers land better when they’re shown to visitors who’ve stuck around instead of ones who just arrived
- Lead generation tends to improve, since people who trigger the delay have shown real intent
- Fewer people reflexively close the popup without reading it
- The overall visitor experience improves, even while conversions go up
A few real examples of how this plays out:
- A blog shows a newsletter popup after 10 seconds to readers who are actively reading an article
- A WooCommerce store shows a discount popup after 15 seconds to shoppers browsing product pages
- A SaaS site shows a free trial popup after 20 seconds to visitors exploring the features page
- A landing page shows a lead form after 8 seconds, once a visitor has had a moment to warm up to the offer
Common Types of Time Delay Popups
Different businesses use this trigger for different goals. The most common types are:
- Email newsletter popups — subscription offers shown after some reading time
- Discount and coupon popups — promotional codes shown once a shopper’s browsing shows intent
- Lead generation forms — contact or demo requests, usually on service or pricing pages
- Free resource popups — ebooks, guides, or checklists offered in exchange for an email
- Free trial popups — common on SaaS feature and pricing pages
- Webinar registration popups — event signups shown to engaged visitors
- Announcement popups — general updates or promotions
All of these benefit from the same underlying logic: wait until someone’s actually engaged before asking them for anything.
Why Time Delay Popups Are Worth Using
If you run a WordPress blog, WooCommerce store, SaaS platform, agency site, or landing page, here’s what a well-timed popup can actually do for you.

1. It Reaches People at the Right Moment
Someone who’s stayed on a page for ten or fifteen seconds has already decided your content is worth a bit of their time. By the time a time delay popup appears, that visitor:
- Has read enough to understand what your site actually offers
- Is more likely to be open to a relevant offer
- Is far less likely to close it out of reflex
That’s a genuinely different audience than someone who just clicked through and hasn’t had a chance to form any opinion yet — and it shows up in how people respond.
2. It’s a Better Experience Than an Immediate Popup
One of the biggest complaints people have about popups in general is that they interrupt before there’s even been a chance to see what the page is about. A time delay popup sidesteps that entirely by letting visitors read first and only asking something of them once they’ve had a real chance to engage. It’s a small shift, but it changes how the whole interaction feels — less like being ambushed, more like being offered something relevant partway through.
3. It Produces Better Email Signups
People who subscribe after seeing a delayed newsletter popup tend to actually want what they signed up for. They’ve read something, decided they liked it, and then chose to hear more — rather than clicking through a popup on reflex within the first second on the page. That tends to mean higher open rates, more genuine engagement, and fewer people unsubscribing shortly after signing up.
4. Fewer People Close It Without Reading
Immediate popups get closed reflexively, often before anyone’s even processed what they say. A time delay popup avoids a lot of that, simply because the visitor’s already invested a bit of attention in the page by the time it shows up — which makes them more likely to actually read the offer instead of dismissing it on autopilot.
5. It Captures Better Leads
For agencies, SaaS companies, and service businesses, a visitor who stays on a pricing or features page long enough to trigger the popup has already shown real interest — they’re not just passing through. Those leads tend to be:
- More familiar with what you’re offering
- Further along in deciding whether it’s right for them
- More likely to actually want a demo, consultation, or trial when it’s offered
6. It Matches the Offer to the Visitor’s Actual Interest
Not everyone is ready to act the second they land on a page — some people need a bit of time to understand what you’re offering and decide whether they trust it. A time delay popup ensures that promotional offers only reach people who’ve already put in that time, which makes the offer land as more relevant and less like a random interruption.
7. It’s Genuinely Simple to Set Up
You don’t need any coding experience for this. With a plugin like YS LeadGen, you can:
- Pick a ready-made template
- Customize the design and message
- Set an exact delay in seconds
- Configure who sees it, and where
- Publish it in a matter of minutes
How to Create a Time Delay Popup in WordPress
Here’s the full process using YS LeadGen. Most of these steps carry over to other WordPress popup plugins too.
Step 1: Install a Popup Plugin That Supports Time Delay Triggers
- Log in to your WordPress dashboard.
- Go to Plugins → Add New Plugin.
- Search for YS LeadGen.
- Click Install Now, then Activate.
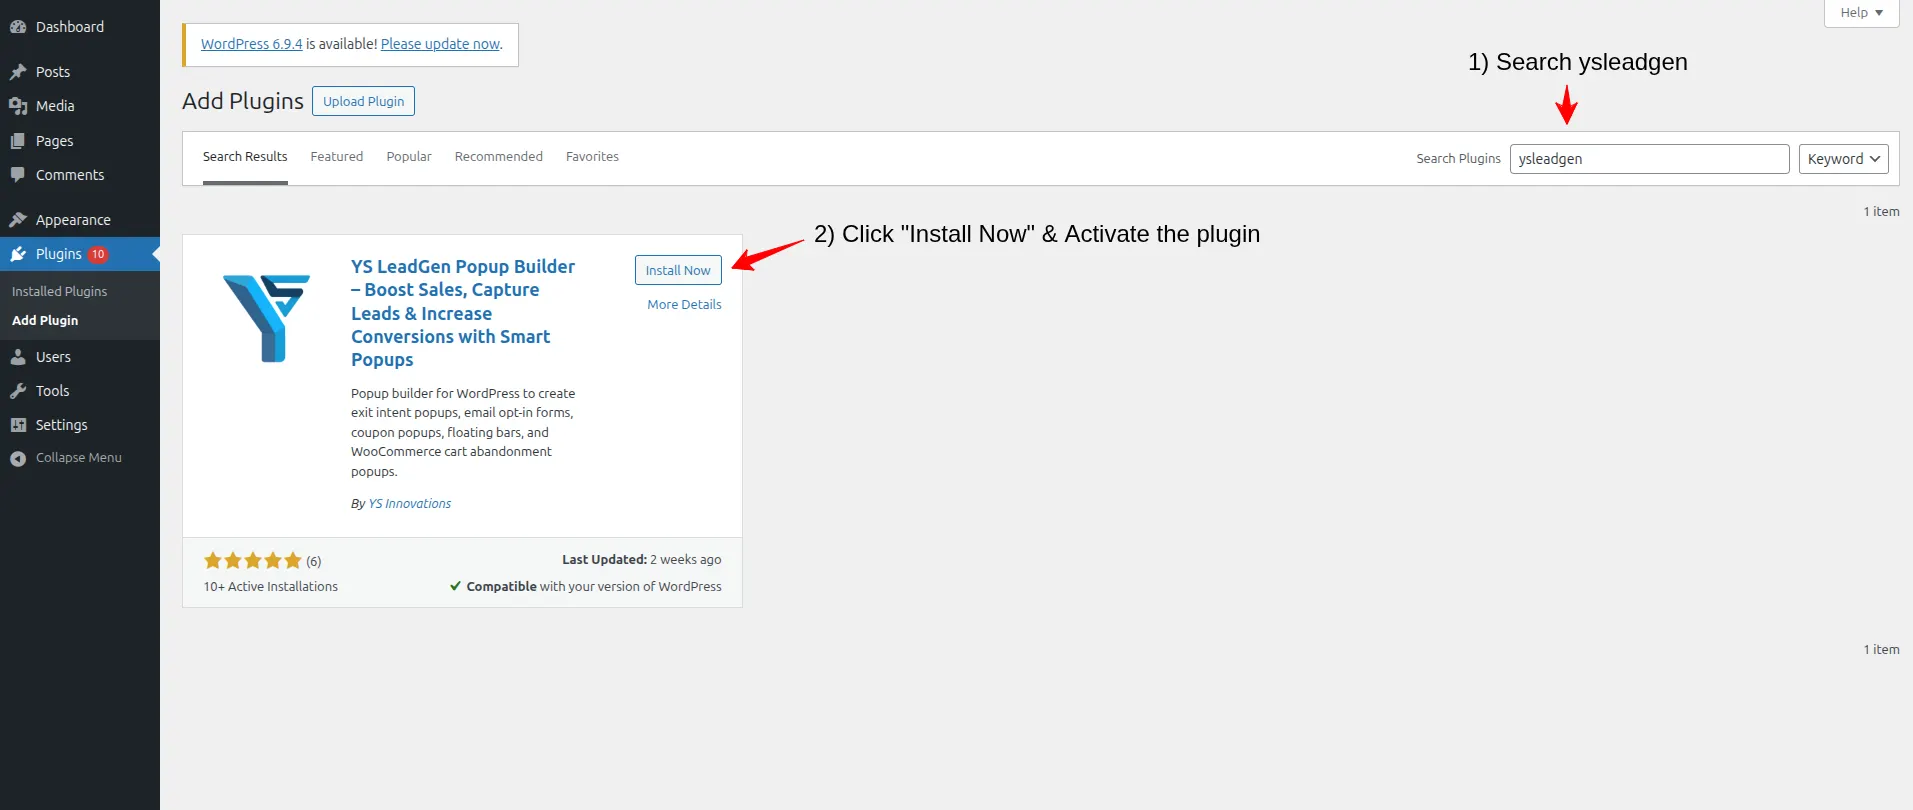
Once it’s active, you’ll see a new YS LeadGen menu in your dashboard.
Why the right plugin matters: not every popup plugin lets you set a precise delay down to the second. Look for one that offers exact time delay configuration, responsive design, smart targeting, conversion-focused templates, and support for more than one trigger type — that flexibility matters once you’re running more than one campaign at a time.
Step 2: Create a New Popup Campaign
Go to YS LeadGen → New Campaign, then click Create a Popup. You’ll be asked to name it before moving on.
Use something descriptive so you can find it easily later:
- Time Delay Newsletter Signup Popup
- 10-Second Discount Offer Popup
- Engaged Visitor Lead Generation Popup
- Blog Reader Subscription Popup
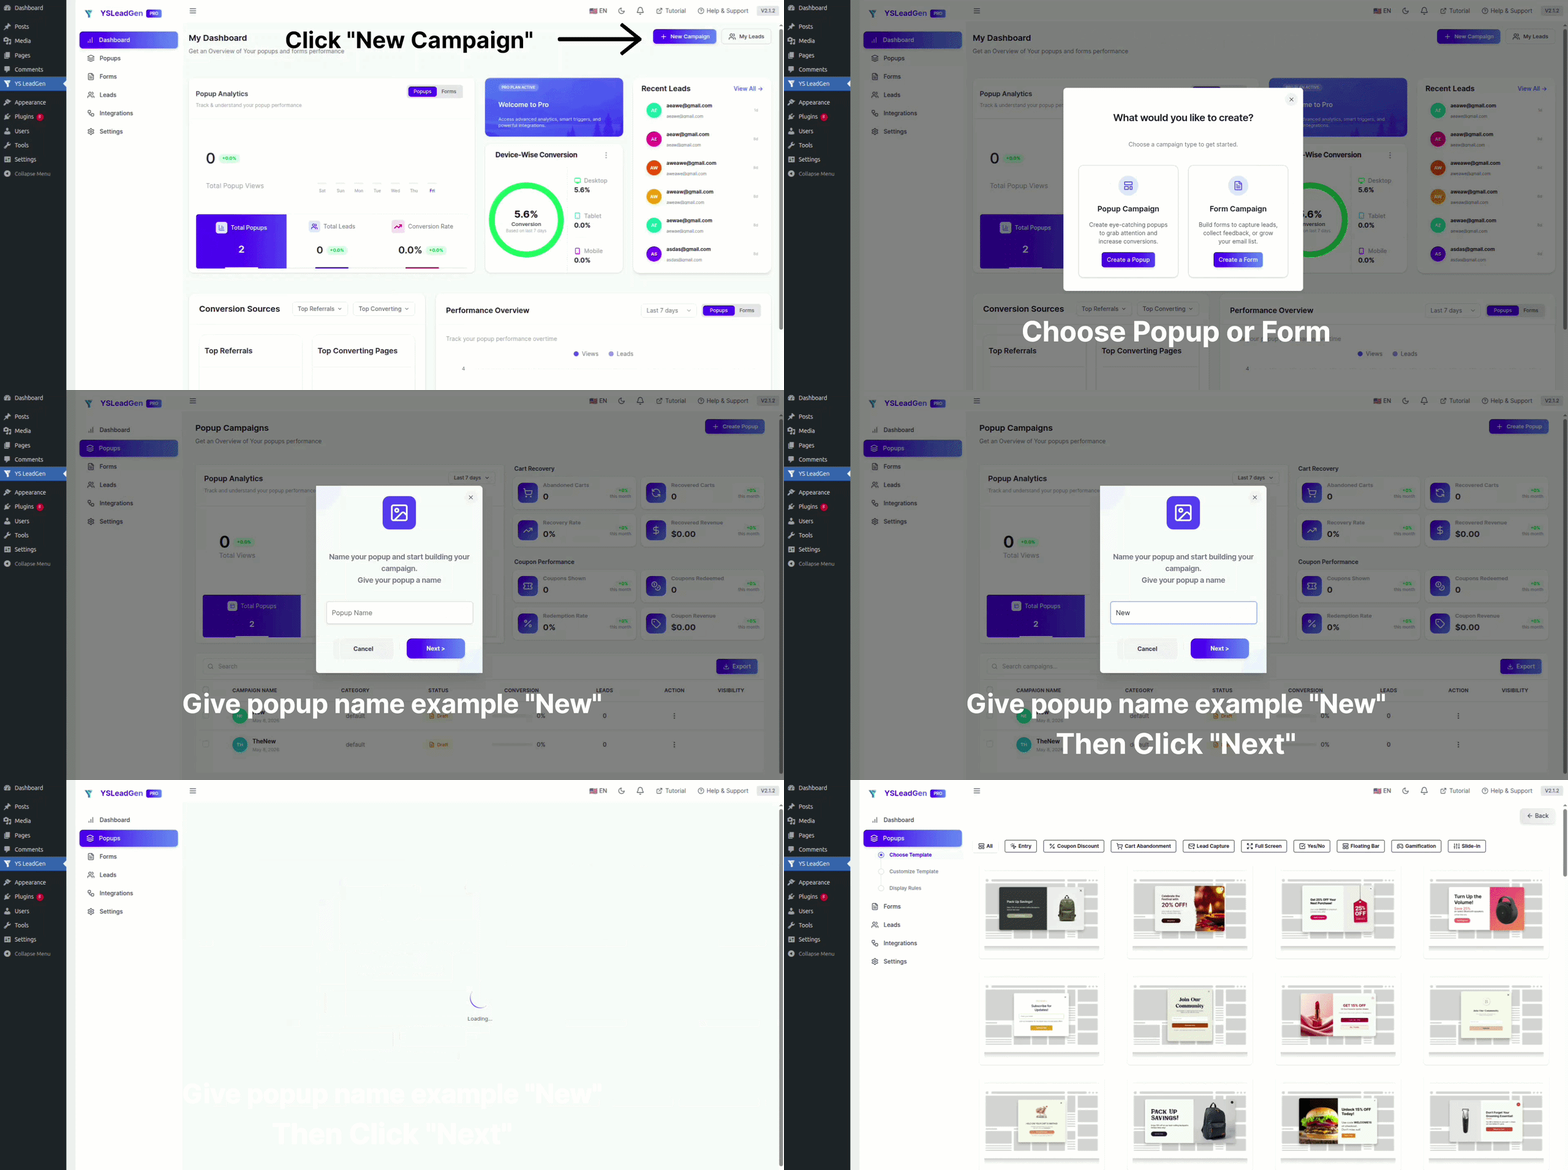
If you’re running several time-delayed campaigns at once — different delays on different page types, for example — clear names save you from having to guess which is which later.
Step 3: Choose a Popup Template
Pick a template built for your goal. YS LeadGen includes options for:
- Email newsletter subscriptions
- Discount and coupon promotions
- Lead generation forms
- Free resource downloads
- Free trial offers
- Webinar registrations
- General announcements
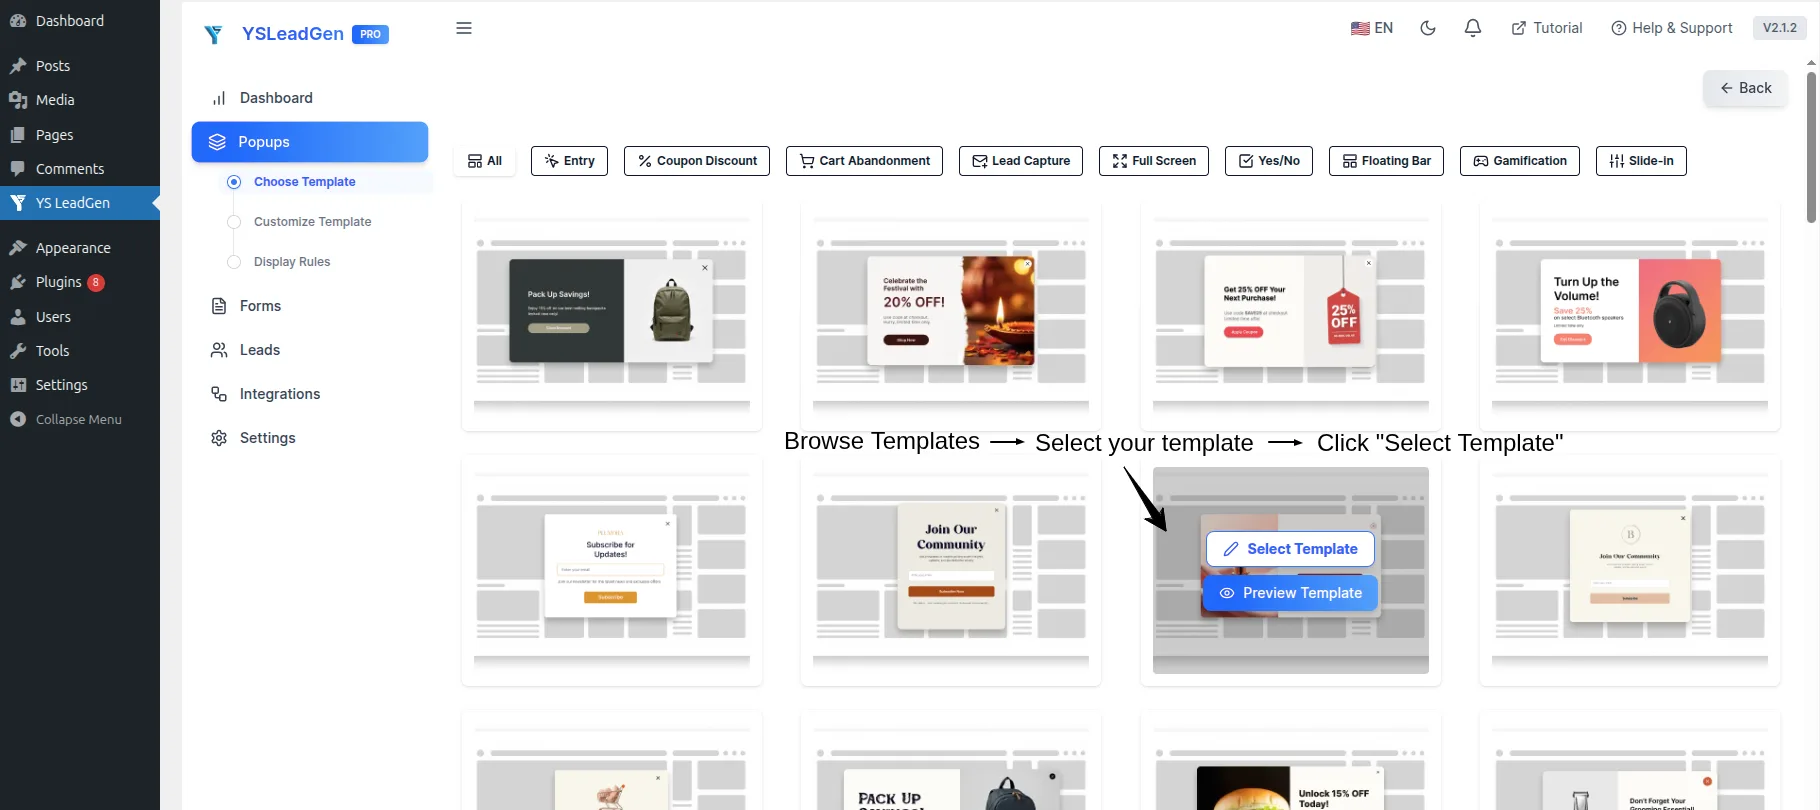
A few tips for picking well:
- Go with a clean, uncluttered design rather than something busy
- Pick a layout that puts the offer and CTA front and center
- Match the tone of the template to the page it’ll appear on — a calm, minimal design fits a blog post better than something loud and flashy that breaks the reading experience
A newsletter template suits blog content, a discount template fits WooCommerce product pages, a minimal lead form works well on SaaS pricing pages, and a resource-download template makes sense on educational content.
Step 4: Customize the Popup
Open the popup editor and customize:
- Headline and subheadline
- Description and offer details
- Form fields
- CTA button
- Background color and images
- Typography
- Branding
A few headline examples to work from:
- “Enjoying This Article? Subscribe for More Every Week”
- “Before You Go — Here’s 15% OFF Your First Order”
- “Get Our FREE Resource Guide — Enter Your Email Below”
- “Liked What You’ve Read? Join 5,000+ Subscribers Today”
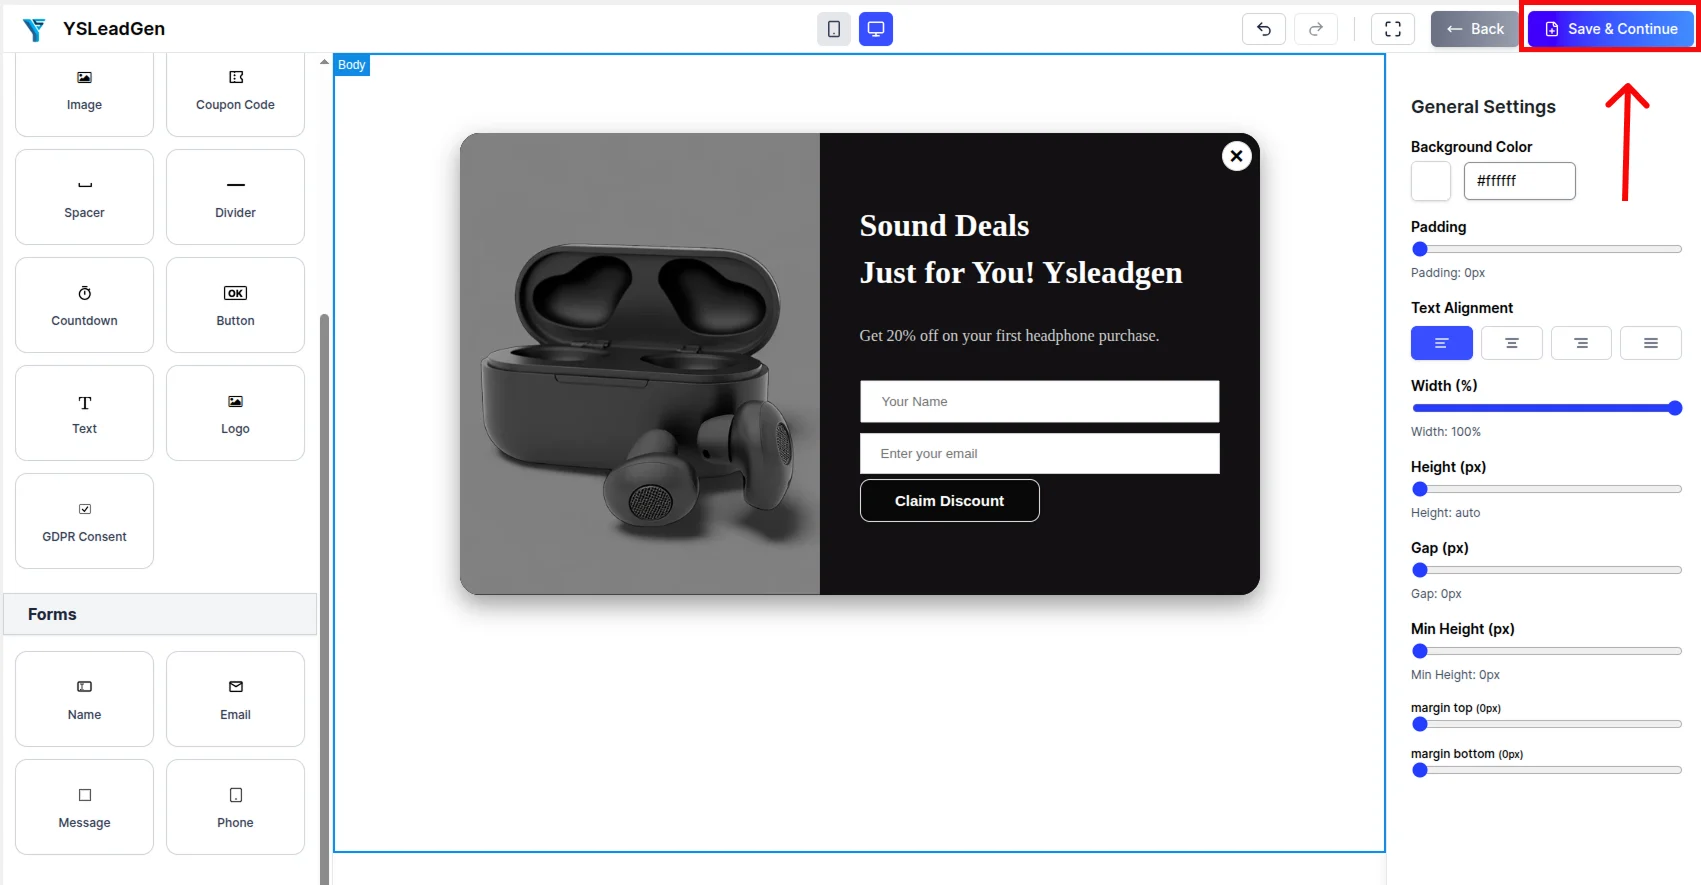
Whatever headline you write, it should make three things clear right away: what the offer is, why it’s worth acting on now, and what the visitor actually gets in return.
On tone: since this popup is reaching people who’ve been calmly reading your content, it should feel like a natural next step rather than a sales pitch dropped into the middle of their session. Keep it conversational, keep the form short, and stick to one clear CTA rather than several competing options.
If you’re collecting leads or emails, keep the form as short as you can. For a newsletter popup specifically, asking for just an email address tends to get the highest opt-in rate — every extra field you add is one more reason for someone to abandon the form.
Step 5: Set the Trigger to Time Delay
This is the step that actually makes it a time delay popup. Go to Set Display Rules → Display Trigger, and select Time Delay Trigger.
Once selected, you’ll be able to set an exact delay in seconds. A few starting points:
- 5 seconds — for high-intent pages where visitors tend to make quick decisions
- 10 seconds — for typical blog posts and product pages
- 15 seconds — for longer-form content that takes more time to read
- 20 to 30 seconds — for pricing, comparison, or feature pages, where people usually take longer to evaluate before deciding anything
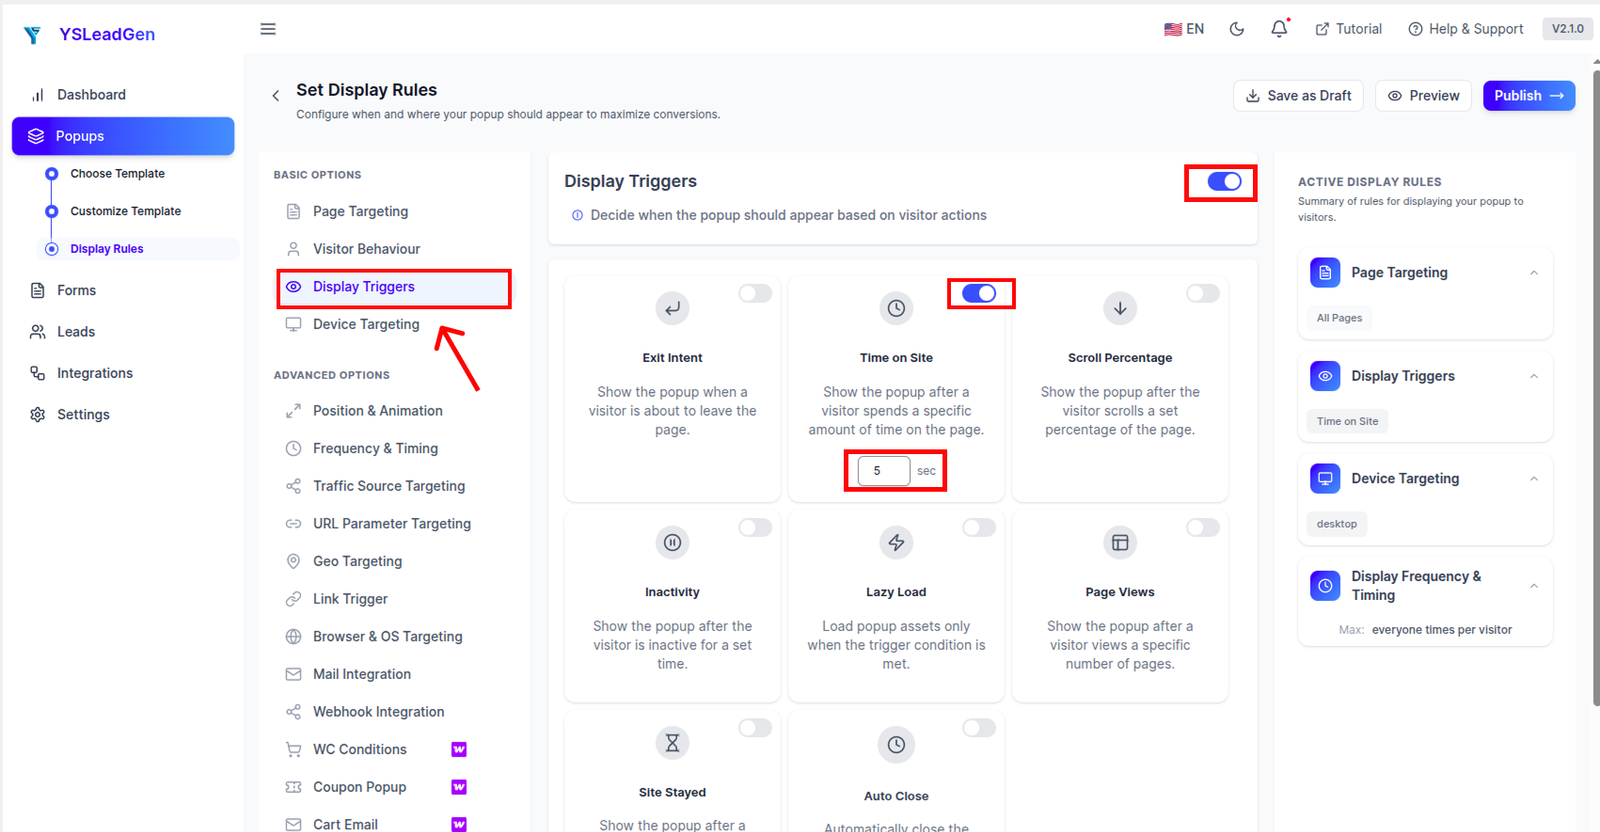
Once it’s live, the popup will show up automatically once a visitor has been on the page for however many seconds you set.
How to Pick the Right Delay
Getting the delay right matters more than almost anything else in this setup. A few general guidelines:
- Under 3 seconds behaves almost exactly like an immediate popup — visitors haven’t had time to engage, and the whole point of using a delay gets lost.
- 5 to 10 seconds works well for most standard pages — enough time to start reading without waiting so long that visitors have already left.
- 10 to 20 seconds suits longer content where people are reading in more depth.
- 20 to 30 seconds fits high-consideration pages like pricing or comparisons, where visitors typically take their time before deciding anything.
The right number for your specific site depends on how long visitors typically stay on that page, so treat your first choice as a starting point rather than a final answer — testing a couple of different delays is the most reliable way to land on the one that actually performs best.
Step 6: Configure Where the Popup Appears
Now decide which pages should show this specific popup. You can display it on:
- The entire site
- Homepage only
- Specific blog posts or categories
- WooCommerce product pages
- Pricing or service pages
- Landing pages
- Specific URLs
A few examples of how this comes together:
- A newsletter popup after 10 seconds on blog posts
- A discount popup after 15 seconds on WooCommerce product pages
- A lead form after 20 seconds on pricing or service pages
- A free trial popup after 15 seconds on a SaaS features page
- A free resource popup after 10 seconds on educational content
Matching both the offer and the delay to the specific page tends to feel far more natural than running one generic popup across the entire site.
Device targeting is also available — desktop, mobile, tablet, or all three. Mobile sessions tend to be shorter than desktop ones, so it’s worth considering a slightly shorter delay for mobile visitors specifically, rather than assuming the same number works everywhere.
Frequency settings matter too. Reasonable defaults:
- Show once per session
- Hide permanently once someone converts or subscribes
- Suppress it for returning visitors for a few days before it can show again
This keeps the popup from becoming something visitors see over and over, which tends to wear out its welcome fast.
Step 7: Publish the Popup
Once everything’s set, click Publish. The popup is now live, and it’ll appear for visitors once they’ve spent the configured time on whichever pages you’ve selected.
Test It Before You Trust It
After publishing, check it yourself:
- Does it look right?
- Does it actually appear at the delay you configured?
- Does it look and behave correctly on mobile?
- Does the CTA button work?
- Does the form submit properly?
- Is it only showing on the pages you intended?
To test the delay specifically: visit the page, wait for the configured number of seconds, and confirm the popup appears right on schedule. Testing on both desktop and mobile is worth the extra few minutes — a delay that feels right on a laptop can behave differently on a phone.
Best Practices for a Time Delay Popup That Converts
Setting one up is the easy part. Getting one that consistently converts takes a bit more care.

1. Match the Delay to How People Actually Read the Page
This is the single most important variable in the whole setup. Too short, and you’ve basically built an immediate popup with extra steps. Too long, and a lot of visitors will have already left before it ever shows up.
A rough guide:
- Short-form pages (previews, landing pages): 5 to 8 seconds
- Medium-form pages (standard blog posts, product pages): 10 to 15 seconds
- Long-form content (guides, tutorials, detailed articles): 15 to 25 seconds
- High-consideration pages (pricing, comparisons, features): 20 to 30 seconds
If you have any sense of how long visitors typically spend on a given page, use that as your starting point, and aim to show the popup a bit before most people would naturally leave — but after they’ve had a real chance to engage.
2. Make the Offer Actually Relevant to the Page
A time delay popup works best when it feels like a natural continuation of whatever someone’s already reading. A free email marketing guide offered on a blog post about email marketing makes sense. The same guide offered on a page about return policies doesn’t.
A few examples of good matches:
- A discount tied to the specific product category someone’s browsing
- A free trial offered on a features page, right where someone’s actively evaluating the product
- A relevant guide or resource offered on the content it directly relates to
Generic, one-size-fits-all offers running across the whole site tend to underperform compared to something targeted to the specific page.
3. Keep the Tone Conversational
Since this popup is reaching someone who’s been quietly reading, not someone browsing with urgency, aggressive or pushy language tends to feel out of place. Skip anything like “ACT NOW OR MISS OUT FOREVER” and lean toward something calmer instead:
- “Enjoying This Article? We Have a Lot More Where That Came From.”
- “Looks Like You’re Interested — Here’s Something That Might Help.”
A tone that matches the visitor’s actual state of mind performs noticeably better than one that assumes urgency where there isn’t any.
4. Offer Something That Actually Earns the Interruption
Someone who’s stayed on your page long enough to trigger the delay has already shown genuine interest — that’s worth honoring with a real offer, not a token one. A few solid options:
- Exclusive content or a newsletter digest
- A discount code
- A free ebook, guide, or checklist
- A free trial or demo
- Early access to something new
Example: “You’re Reading Our Best Content — Get More Delivered to Your Inbox Every Week.”
5. Keep It Simple
A time delay popup shouldn’t overwhelm anyone. Stick to a short headline, a brief description, one form field or CTA, and a clearly visible close button. Skip multiple competing offers, long paragraphs, or several buttons — a simple, focused design consistently outperforms a busy one.
6. Don’t Show It Over and Over
Seeing the same popup on every single visit gets old fast, and it can turn something genuinely useful into a source of annoyance. Set it to show once per session, hide it permanently once someone converts, and suppress it for returning visitors for a set number of days before it reappears.
7. Pair It with an Exit Intent Popup for Full Coverage

A time delay popup and an exit intent popup cover two different moments. The time delay catches people actively engaged mid-session; exit intent catches people who are already on their way out. Running both as separate campaigns means you’re covering a much wider range of visitor behavior than either one on its own.
8. Don’t Skip Mobile
Mobile sessions tend to be shorter than desktop ones, so the same delay that works well on a laptop might mean the popup never even gets a chance to appear before a mobile visitor leaves. Consider a slightly shorter delay for mobile, and make sure text is properly scaled, buttons are easy to tap, forms are short, and the close button is easy to find. Test on an actual phone before publishing.
9. Write a CTA That Communicates the Actual Benefit
Weak: Submit, OK, Continue Better: Send Me the Free Guide, Yes, I Want the Discount, Start My Free Trial Now
A CTA that spells out what someone gets, rather than just telling them what to click, reduces hesitation — which matters more here, since you’re asking someone to pause a session they were already engaged in.
10. Test and Keep Adjusting
Small changes — a different delay, a new headline, a different CTA, a different offer entirely — can shift results more than you’d expect. Testing one variable at a time and tracking what actually moves the numbers is what separates a popup that works once from one that keeps improving over time.
Common Mistakes That Hurt Time Delay Popup Performance

A handful of mistakes come up repeatedly:
- Setting the delay too short. A one or two-second delay barely differs from an immediate popup — it defeats the entire point of using this trigger.
- Running one generic offer across the whole site. A cooking newsletter popup on a technology blog makes no sense to anyone who sees it.
- Using pushy, urgent language. A popup that interrupts calm reading with aggressive sales copy feels jarring and out of place.
- Showing the same popup every single session. Without frequency limits, a helpful reminder turns into a recurring annoyance fast.
- Ignoring mobile session length. A long delay tuned for desktop can mean the popup never fires before a mobile visitor’s already gone.
- Never testing or revisiting the setup. A popup published once and left untouched for months is a missed opportunity sitting in plain sight.
Avoiding these keeps a time delay popup doing exactly what it’s meant to — reaching people at the right moment, without wearing out its welcome.
Frequently Asked Questions
It’s a popup that appears only after a visitor has spent a set amount of time on a page, rather than the instant the page loads. Waiting gives visitors a chance to engage with the content first, which tends to make them more receptive to whatever the popup offers.
It depends on the page. A general starting point is 5 to 10 seconds for most pages, 10 to 15 seconds for blog content, and 15 to 30 seconds for longer or higher-consideration pages like pricing. Testing a couple of options is the most reliable way to find what actually works for your audience.
In most cases, yes. They tend to reach visitors who’ve already shown genuine interest by staying on the page, which usually means fewer people close them without reading and more people actually engage.
Yes. Since it reaches people who are already engaged with your content, subscribers tend to be more genuinely interested — which usually means better open rates and fewer unsubscribes down the line compared to signups captured through an immediate popup.
Generally not negatively. Delaying a popup rather than firing it immediately on page load is actually considered a more SEO-friendly approach, since it reduces the chances of the popup being treated as an intrusive interstitial.
A time delay popup shows up after a set number of seconds, targeting visitors who are actively engaged mid-session. An exit intent popup shows up when someone looks like they’re about to leave. The two work well together, since they cover different moments in a visitor’s session.
Yes. With display rules in a plugin like YS LeadGen, you can run separate campaigns with different delay times for different pages — a shorter delay on a landing page, a longer one on a pricing page, for example.
No. A plugin like YS LeadGen handles the whole process visually — pick a template, customize it, set your delay, configure your targeting, and publish.
Newsletter subscriptions with a real incentive, discount codes, free guides or checklists, free trial invites, webinar registrations, and free consultation offers all tend to perform well with this trigger.
YS LeadGen supports time delay popups, exit intent popups, and full-screen overlays, with precise delay configuration, smart targeting, and ready-made templates, all without needing any code.
Final Thoughts
A time delay popup solves a problem most immediate popups create on their own: asking for something before the visitor has any reason to care. By waiting until someone’s actually engaged with the page, you’re reaching a warmer, more receptive audience — and that difference shows up in how many people actually respond instead of closing it without a second thought.
If you run a WordPress blog, WooCommerce store, SaaS product, or landing page, a well-timed popup can help you:
- Grow your email list with subscribers who are genuinely interested
- Cut down on how often people dismiss a popup without reading it
- Capture leads from visitors who’ve already shown real intent
- Promote offers to people who are actually receptive to them
- Improve conversions without making the site feel pushy
Setting one up takes about ten to fifteen minutes with a plugin like YS LeadGen — no code, no developer, just a template, a delay that matches how people actually read your page, and an offer worth the wait. Get the timing right, and a time delay popup becomes one of the more reliable, low-friction ways to turn engaged readers into subscribers, leads, and customers.