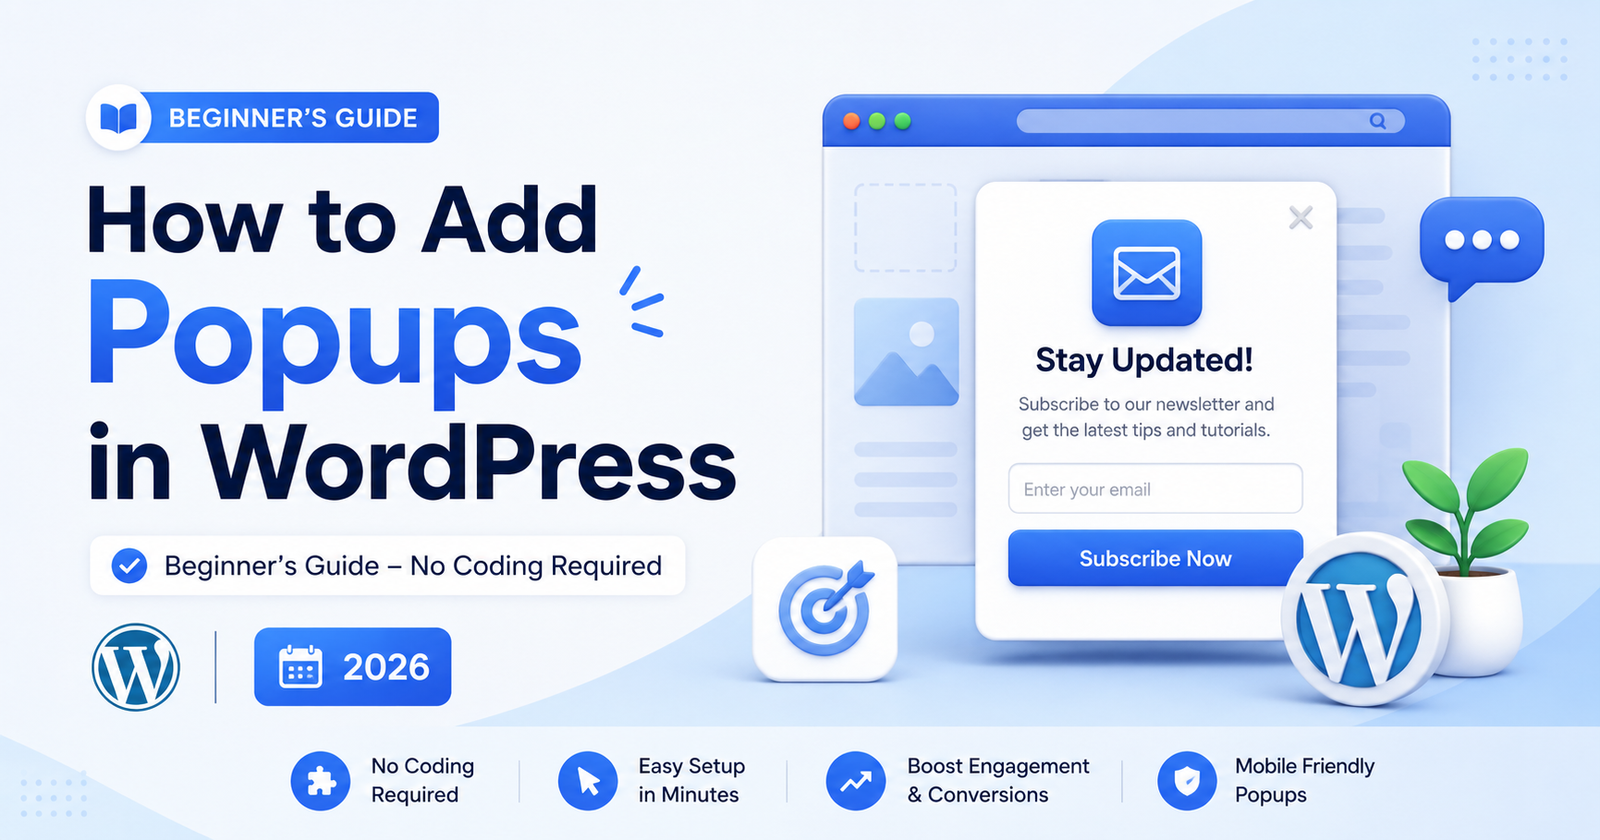
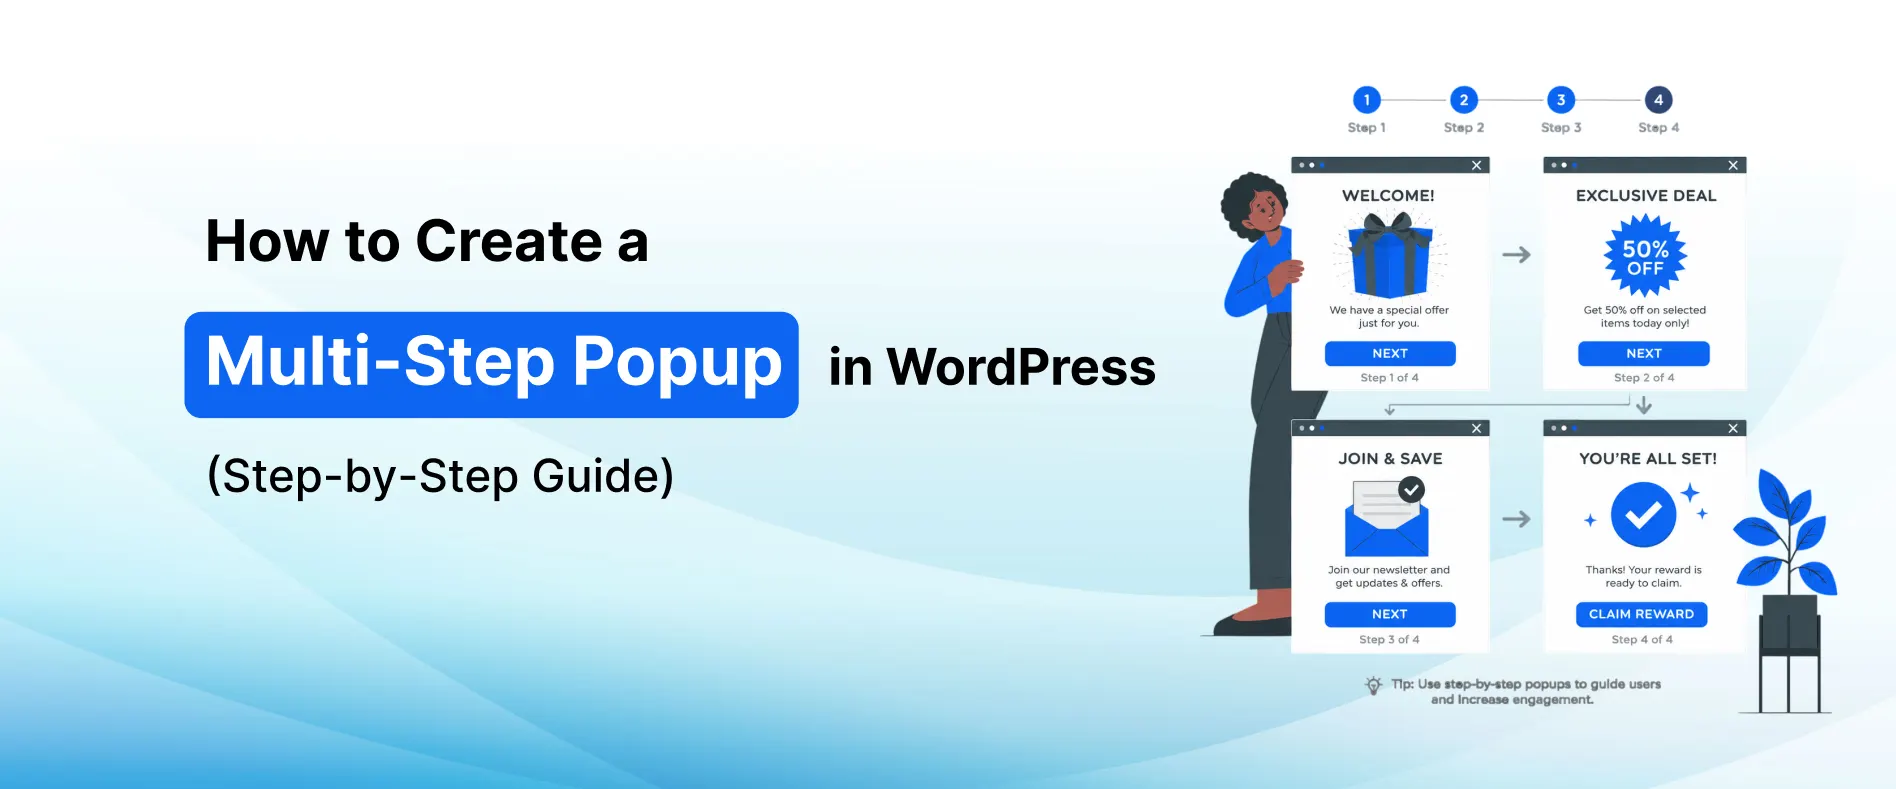
How to Create a Multi-Step Popup in WordPress (Step-by-Step Guide)
Most visitors leave a website without subscribing, purchasing, or taking any action. Whether you run a WooCommerce store, SaaS platform, business website, blog, or landing page, losing potential customers and leads can directly impact your conversions and revenue.
This is why many WordPress website owners use Multi-Step Popups to guide visitors through a simple, engaging interaction before asking for their information.
A Multi-Step Popup is a smart popup that breaks the conversion process into multiple small steps instead of asking for everything at once. By starting with a simple yes/no question or a low-commitment action, it gradually leads visitors toward the final goal — whether that’s submitting an email, completing a signup, or claiming an offer.
This strategy is known as the “Yes Ladder” or micro-commitment technique — and it works because once a visitor takes the first small step, they are much more likely to complete the entire flow.
Multi-Step Popups are commonly used to collect:
- Email addresses
- Contact details
- Lead qualification responses
- Survey answers
- Quiz results
Today, Multi-Step Popups are widely used to:
- Increase email subscribers
- Improve lead generation
- Qualify leads with questions
- Reduce form abandonment
- Boost website conversion rates
The best part is that you can create a Multi-Step Popup in WordPress without coding knowledge.
Using popup builder plugins like YS LeadGen, you can easily create professional multi-step popups with ready-made templates, step-by-step flows, smart display rules, and advanced triggers.
Whether your goal is to:
- Grow your email list
- Increase WooCommerce sales
- Generate and qualify more leads
- Improve customer engagement
- Promote special offers
Multi-Step Popups can become one of the most powerful conversion optimization tools for your WordPress website.
In this step-by-step beginner guide, you’ll learn:
- What a Multi-Step Popup is
- Why Multi-Step Popups are important
- How to create a Multi-Step Popup in WordPress
- Best practices for higher popup conversions
- Common mistakes to avoid
By the end of this tutorial, you’ll be able to create high-converting Multi-Step Popups that help turn casual visitors into subscribers, qualified leads, and customers.
What is a Multi-Step Popup?
A Multi-Step Popup is a website popup that presents visitors with a sequence of steps instead of a single form or message.
Rather than showing one large form that asks for multiple fields at once, a multi-step popup breaks the interaction into smaller, manageable steps. Each step feels easy and low-commitment, which encourages visitors to keep going until they reach the final conversion action.
For example, a Multi-Step Popup flow might look like this:
- Step 1: “Would you like 15% OFF your first order?” → Yes / No
- Step 2: “Great! Enter your email to claim your discount.”
- Step 3: “Thank you! Check your inbox for your coupon code.”
This approach is widely used by WordPress websites, WooCommerce stores, SaaS businesses, blogs, and online businesses to improve lead quality and conversion rates.
How Multi-Step Popups Work
Multi-Step Popups guide visitors through a predefined sequence of screens or steps.
When a visitor interacts with the first step — typically by clicking a button or answering a question — the popup automatically advances to the next step.
Each step may include:
- Yes/No buttons
- Multiple choice questions
- Email or contact forms
- Confirmation messages
- Discount reveal screens
- Thank you pages
Because the popup starts with a simple, low-effort interaction, visitors are psychologically more inclined to complete the rest of the steps. This is the power of the micro-commitment principle.
This improves both:
- Lead quality
- Overall conversion rates
Why Businesses Use Multi-Step Popups
Most website visitors leave without:
- Purchasing a product
- Subscribing to updates
- Filling out forms
- Contacting the business
A single-step form with multiple fields can feel overwhelming and cause visitors to abandon the popup entirely.
Businesses use Multi-Step Popups to:
- Reduce form abandonment
- Collect emails and contact details more effectively
- Qualify leads with targeted questions
- Improve WooCommerce sales through discount flows
- Boost website conversion rates with engaging interactions
For example:
- An eCommerce website may use a 3-step popup to offer a discount, collect an email, and confirm the coupon
- A SaaS website may use a multi-step popup to qualify leads before showing a demo request form
- A service business may ask a few quick questions to personalize the follow-up offer
Guiding visitors step by step dramatically increases the chances of conversion.
Common Types of Multi-Step Popups
Different businesses use different multi-step popup strategies depending on their goals.
Popular Multi-Step Popup types include:
- Discount Claim Popups (Yes → Email → Thank You)
- Lead Qualification Popups (Question → Form → Confirmation)
- Quiz or Survey Popups
- Newsletter Signup Popups with welcome steps
- Cart Recovery Popups with progressive offers
- Free Trial or Demo Request Flows
Each popup type is designed to engage visitors progressively and move them toward a specific conversion goal.
Benefits of Multi-Step Popups
Multi-Step Popups have become one of the most effective conversion optimization tools for modern WordPress websites.
Instead of overwhelming visitors with a large form, multi-step popups guide users through a simple, engaging interaction — making conversion feel effortless and natural.
Whether you run a WooCommerce store, SaaS platform, business website, agency site, or blog, Multi-Step Popups can help improve your overall website conversion strategy.
Here are some of the biggest benefits of using Multi-Step Popups on your WordPress website.
1. Increase Email Subscribers
Building an email list is important for long-term business growth.
However, many visitors abandon popup forms that ask for too much information at once. Multi-Step Popups solve this by starting with a simple yes/no question and collecting the email only after the visitor has already committed to the first step.
Example multi-step flow:
- Step 1: “Want exclusive deals sent to your inbox?” → Yes / No Thanks
- Step 2: “Enter your email to get started.”
- Step 3: “You’re in! Your first deal is on its way.”
This approach significantly improves email subscription rates compared to single-step forms.
2. Reduce Form Abandonment
One of the biggest challenges with traditional popup forms is form abandonment.
When visitors see a form with multiple fields, they often feel overwhelmed and close the popup without filling it in.
Multi-Step Popups reduce abandonment by:
- Starting with a single, low-commitment action
- Gradually introducing form fields
- Making each step feel quick and easy
Once a visitor has completed Step 1, they are far more likely to complete the remaining steps — reducing overall form abandonment rates.
3. Qualify Leads More Effectively
Not all leads are created equal. For businesses like agencies, SaaS companies, and service providers, lead quality matters as much as lead quantity.
Multi-Step Popups allow businesses to ask qualifying questions before collecting contact information. This helps:
- Identify high-intent visitors
- Segment leads based on answers
- Personalize follow-up communication
- Improve sales efficiency
Example qualifying flow:
- Step 1: “What best describes you?” → Small Business / Agency / Enterprise
- Step 2: “What are you looking for?” → More Leads / Better Automation / Custom Solutions
- Step 3: “Enter your email and we’ll send you a tailored solution.”
This creates a better experience for both the visitor and the business.
4. Improve Website Conversion Rates
Driving traffic to a website is expensive and time-consuming.
Instead of focusing only on getting more traffic, businesses should also focus on converting existing visitors into:
- Customers
- Subscribers
- Leads
Multi-Step Popups improve website conversion rates by making the conversion process feel simple, engaging, and low-pressure.
Even a small increase in conversions can generate significant business growth over time.
5. Generate More Leads
Lead generation is essential for businesses like:
- Agencies
- SaaS companies
- Service providers
- Consultants
Multi-Step Popups can help collect:
- Email addresses
- Contact inquiries
- Demo requests
- Consultation bookings
- Survey responses
Because the multi-step format feels more like a conversation than a form, visitors are more willing to share their information — generating more leads with less friction.
6. Create a Better User Experience
Multi-Step Popups feel more natural and engaging compared to traditional forms.
Instead of presenting visitors with a wall of form fields, the step-by-step format:
- Feels conversational
- Reduces cognitive load
- Keeps users engaged
- Creates a positive interaction
A better user experience leads to higher engagement and improved conversion rates.
7. Easy to Create in WordPress
One of the biggest advantages of modern WordPress popup plugins is simplicity.
Using tools like YS LeadGen, website owners can create professional Multi-Step Popups without coding knowledge.
You can:
- Choose multi-step popup templates
- Design each step of the popup flow
- Add forms, buttons, and confirmation messages
- Enable smart triggers
- Configure display rules
- Publish popups within minutes
This makes Multi-Step Popup marketing accessible even for beginners.
How to Create a Multi-Step Popup in WordPress
Creating a Multi-Step Popup in WordPress is much easier than most beginners think.
With the help of modern WordPress popup builder plugins, you can create professional and high-converting Multi-Step Popups without coding knowledge or technical experience.
In this tutorial, we’ll use YS LeadGen to create a Multi-Step Popup step-by-step.
Whether your goal is to:
- Increase email subscribers
- Qualify and generate more leads
- Reduce form abandonment
- Promote discounts through a step-by-step flow
- Recover abandoning visitors
This guide will help you set up your popup in just a few minutes.
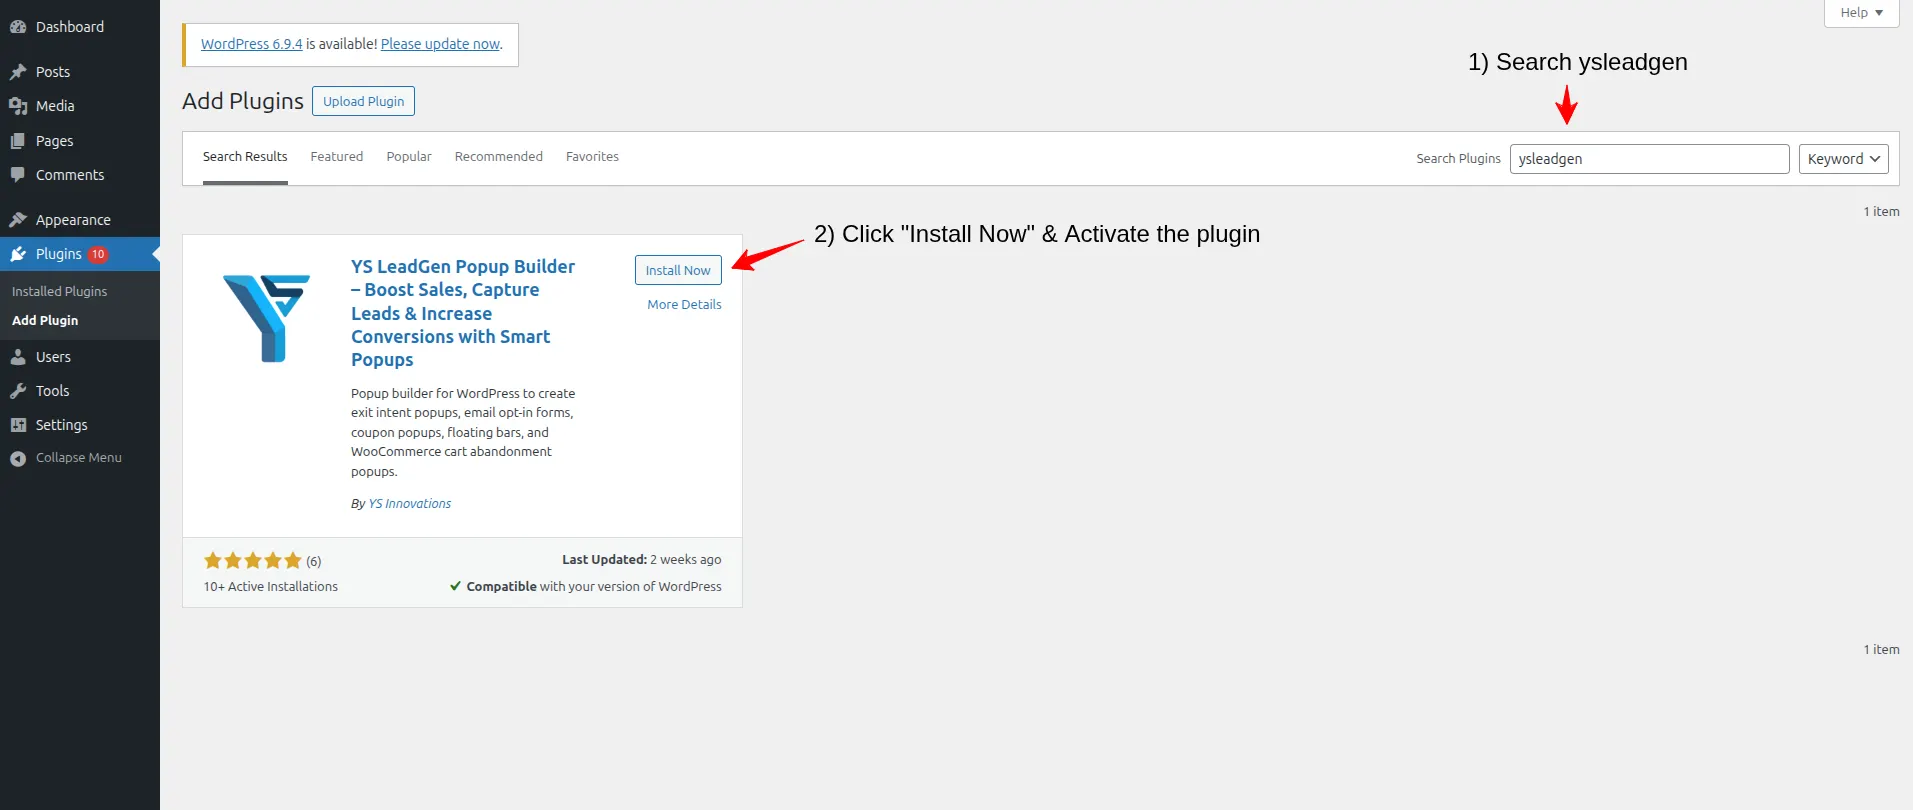
Step 1 – Install the Multi-Step Popup Plugin
The first step is installing a WordPress popup plugin that supports Multi-Step Popup functionality.
- Login to your WordPress dashboard.
- From the left sidebar, navigate to: Plugins → Add New Plugin
- In the search bar, search for: YS LeadGen
- Click Install Now, Click Activate
After activating the plugin, you’ll see the YS LeadGen menu added to your WordPress dashboard.
Using a beginner-friendly popup plugin simplifies the entire popup creation process and helps you launch campaigns faster.
Why Installing the Right Popup Plugin Matters
Not all popup plugins offer advanced Multi-Step Popup functionality.
A good popup builder should provide:
- Multi-step popup flow support
- Step-by-step screen design tools
- Button and form block options
- Responsive popup designs
- Smart display rules
- Conversion-focused templates
- Easy customization options
YS LeadGen is designed specifically to help WordPress website owners create professional lead generation and Multi-Step Popups easily.
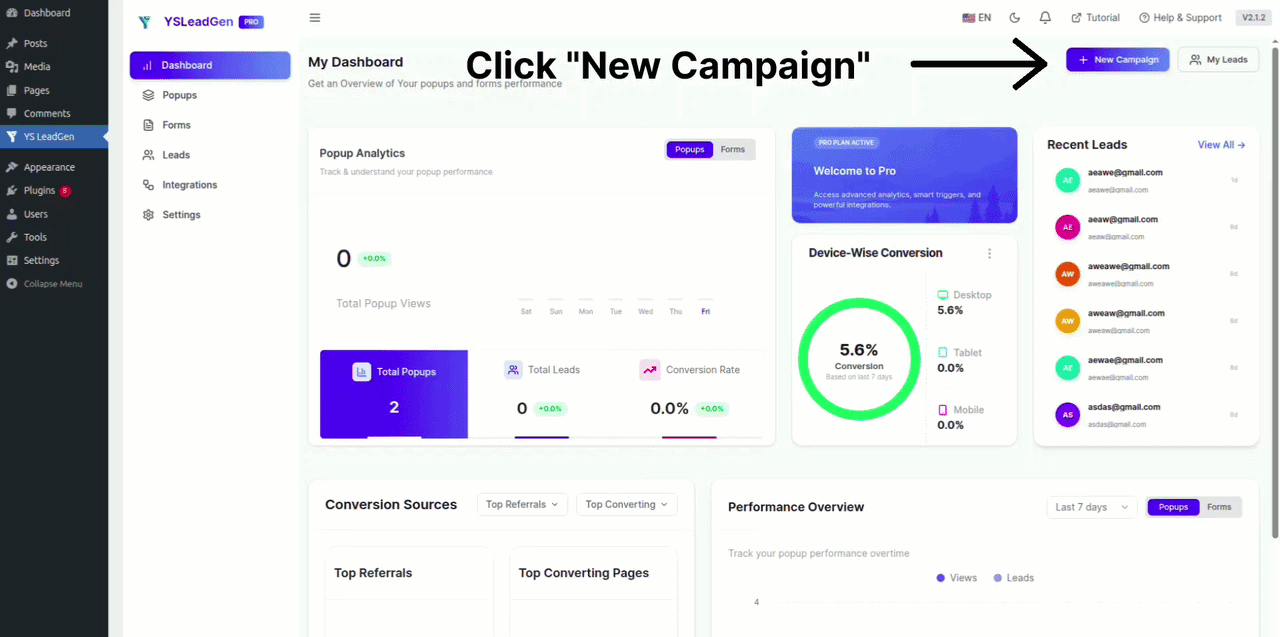
Step 2 – Create a New Popup Campaign
After installing the plugin, the next step is creating your popup campaign.
- Go to: YS LeadGen → New Campaign
- Click: Create a Popup
- Now enter a name for your campaign.
Example campaign names:
- Multi-Step Discount Popup
- Lead Qualification Popup
- Newsletter Multi-Step Signup
- Free Trial Request Flow
Using clear campaign names helps organize and manage multiple popup campaigns more efficiently in the future.
Why Campaign Structure is Important
Many businesses run multiple popup campaigns simultaneously for:
- Homepage promotions
- Blog lead generation
- WooCommerce discounts
- Seasonal offers
- Email subscriptions
Creating separate popup campaigns helps improve targeting and conversion optimization.
Step 3 – Choose a Popup Template
Now it’s time to choose a popup template.
YS LeadGen provides ready-made popup templates optimized for different marketing goals, including multi-step popup flows.
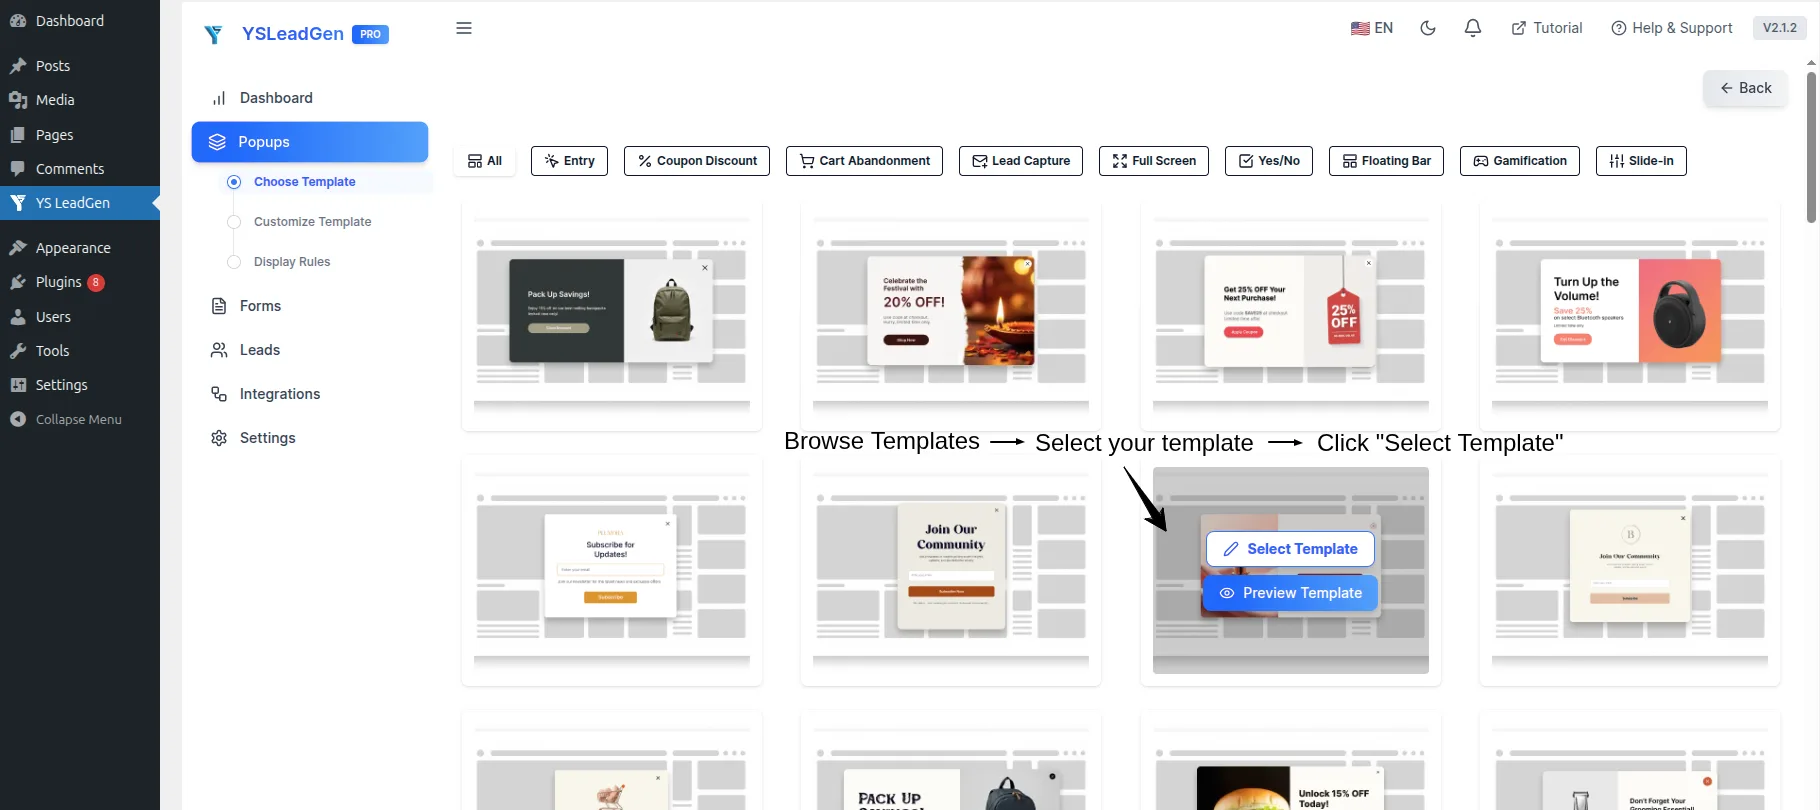
You can choose templates for:
- Lead generation flows
- Newsletter subscription with welcome step
- Discount claim popups (Yes → Email → Thank You)
- WooCommerce cart recovery steps
- Free consultation request flows
- Quiz and survey popups
Selecting the right popup template helps improve:
- User engagement
- Click-through rates
- Conversion performance
Choose a popup design that matches:
- Your website branding
- Campaign objective
- User intent
Tips for Choosing the Best Multi-Step Popup Template
For better conversion results:
- Use clean popup designs for each step
- Keep each step focused on a single action
- Avoid cluttered layouts
- Use consistent branding across all steps
For example:
- Use a Yes/No first step for discount popups on product pages
- Use a question-based first step for lead qualification on service pages
- Use a simple email step for newsletter popups on blog articles
Relevant and well-structured multi-step popups improve visitor engagement significantly.
Step 4 – Design Each Step of the Popup
After selecting the template, you can customize each step of the popup flow using the popup editor.
A typical Multi-Step Popup consists of 2 to 4 steps. Here is how to set up each step:
Step 1 – The Hook (Yes/No or Question Screen)
This is the first screen visitors see. Its only goal is to get the visitor to take a small, low-commitment action.
You can add:
- A compelling headline
- A brief description
- Two CTA buttons (e.g., “Yes, I Want This!” and “No Thanks”)
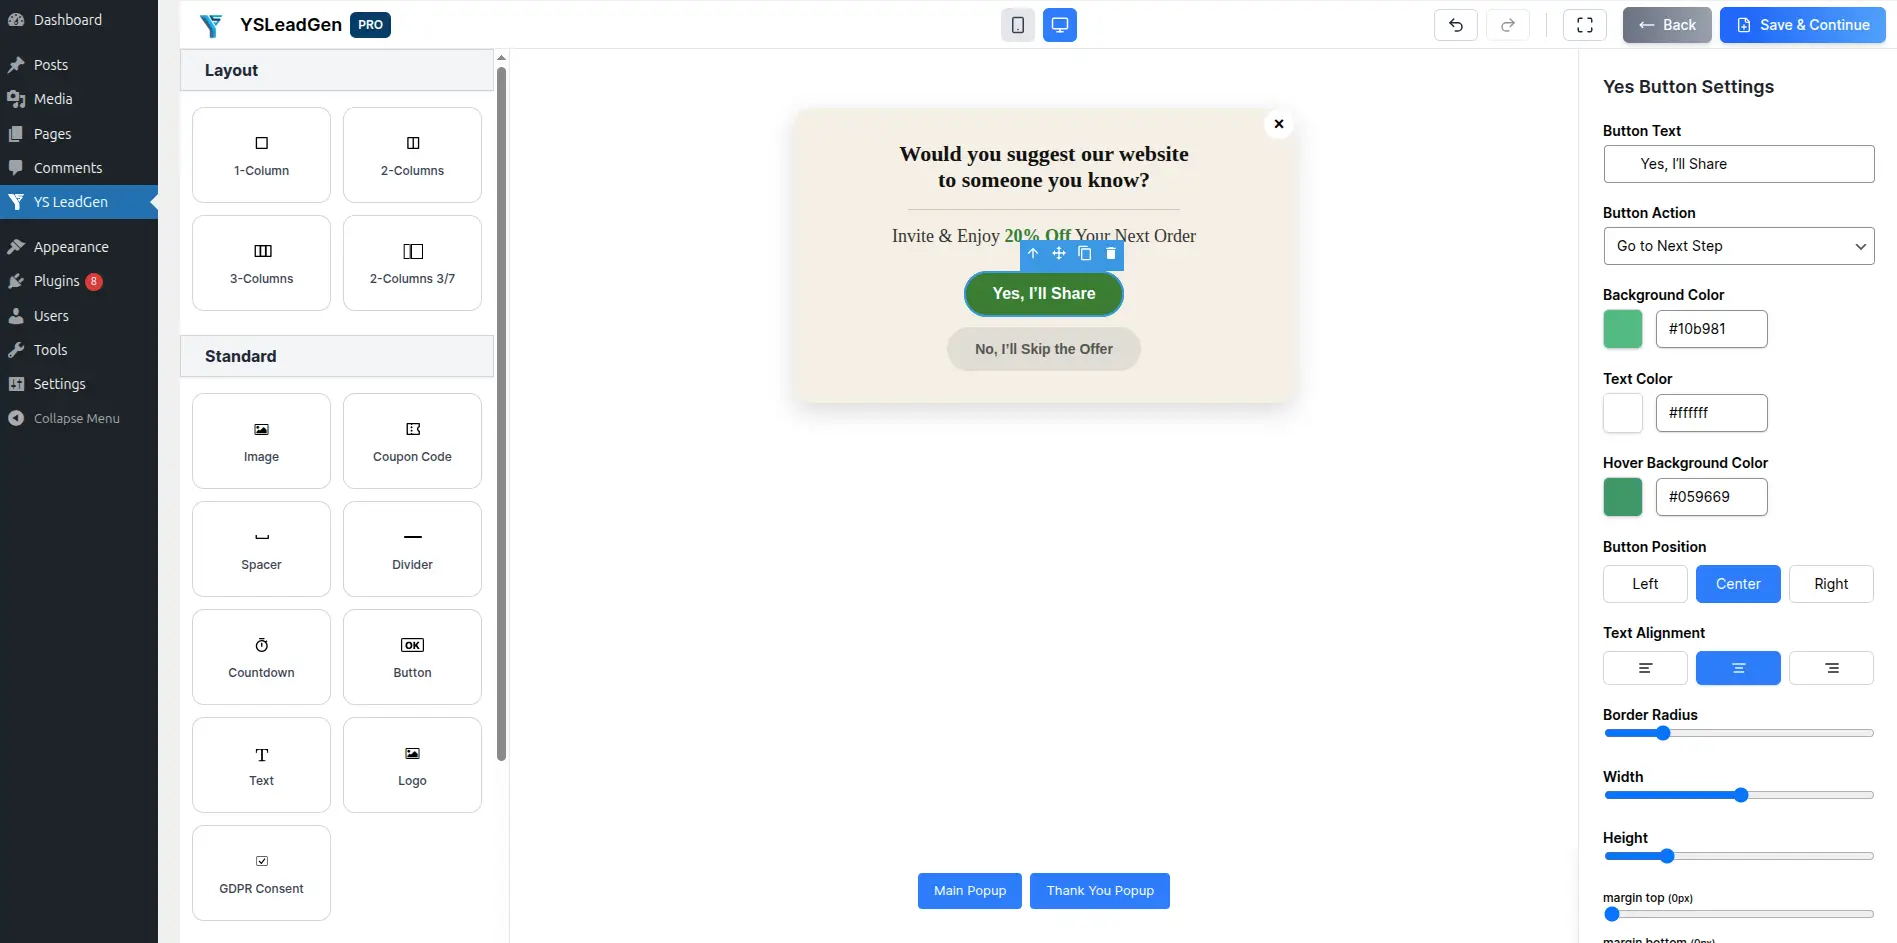
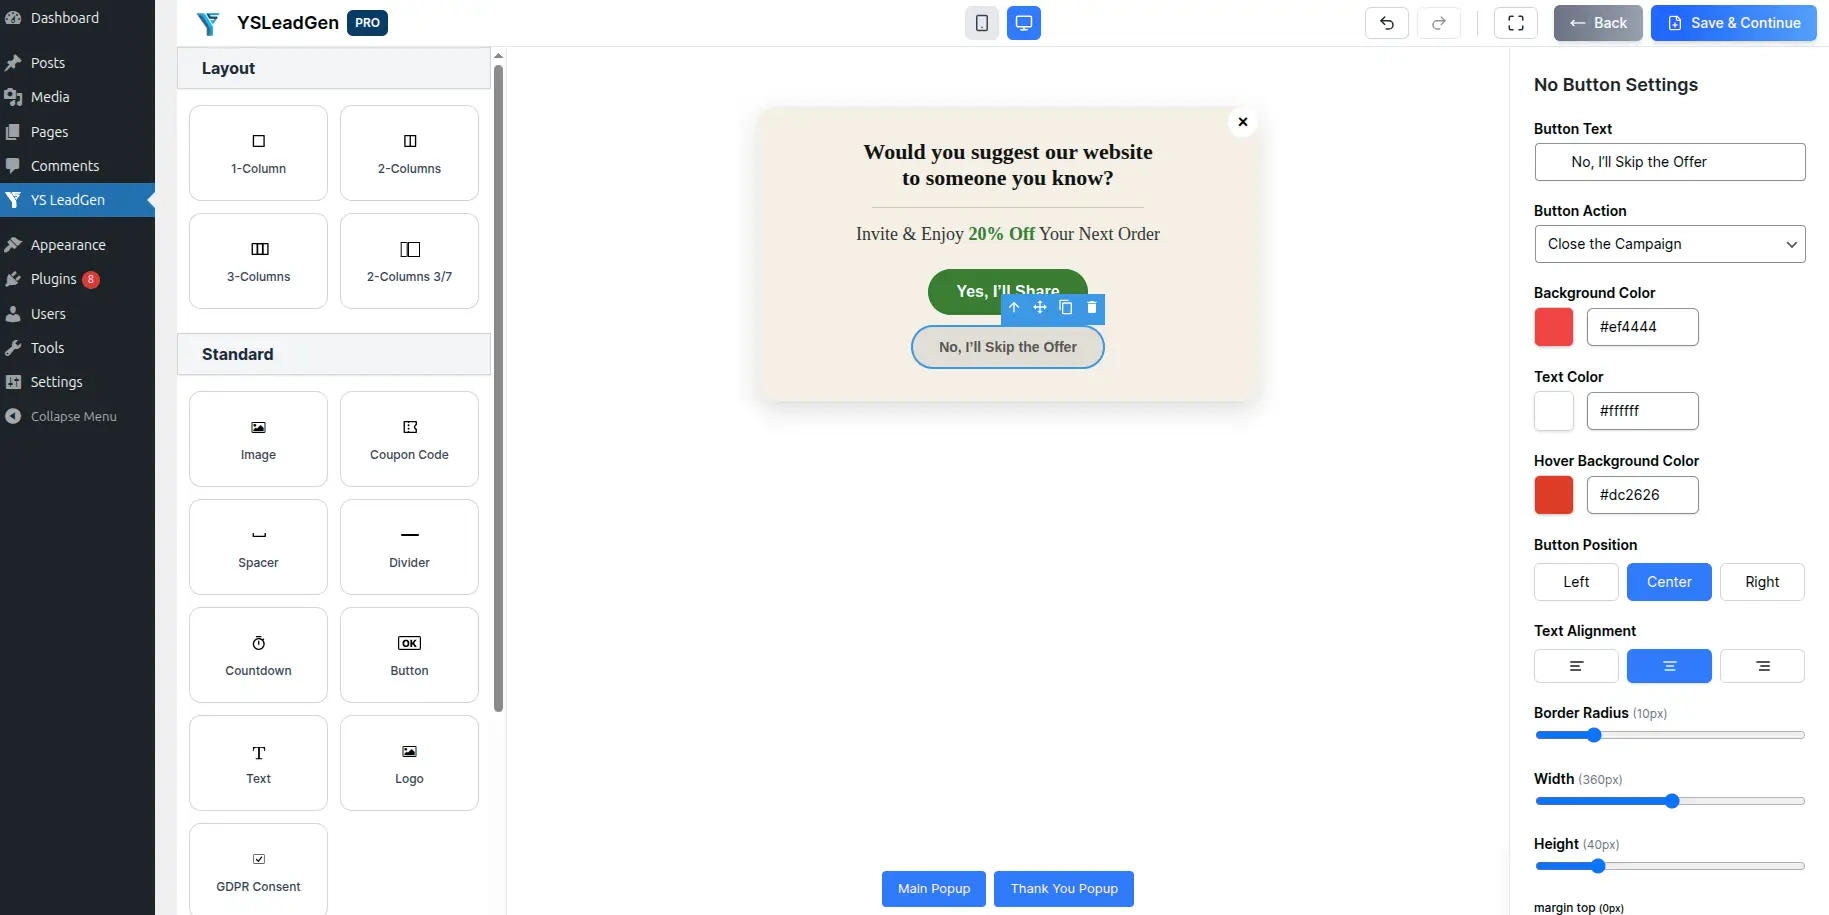
Example:
Headline: “Want 15% OFF Your Next Order?” Button 1: “Yes! Give Me My Discount” Button 2: “No Thanks, I’ll Pay Full Price”
Keep this step simple. The goal is just to get a “Yes.”
Step 2 – The Form (Email or Contact Capture)
Once the visitor clicks the positive button on Step 1, they are moved to Step 2 — the form screen.
Now that they have already committed to the first step, they are much more likely to fill in their details.
You can add:
- A short headline confirming the offer
- An email input field (or additional fields as needed)
- A submit CTA button
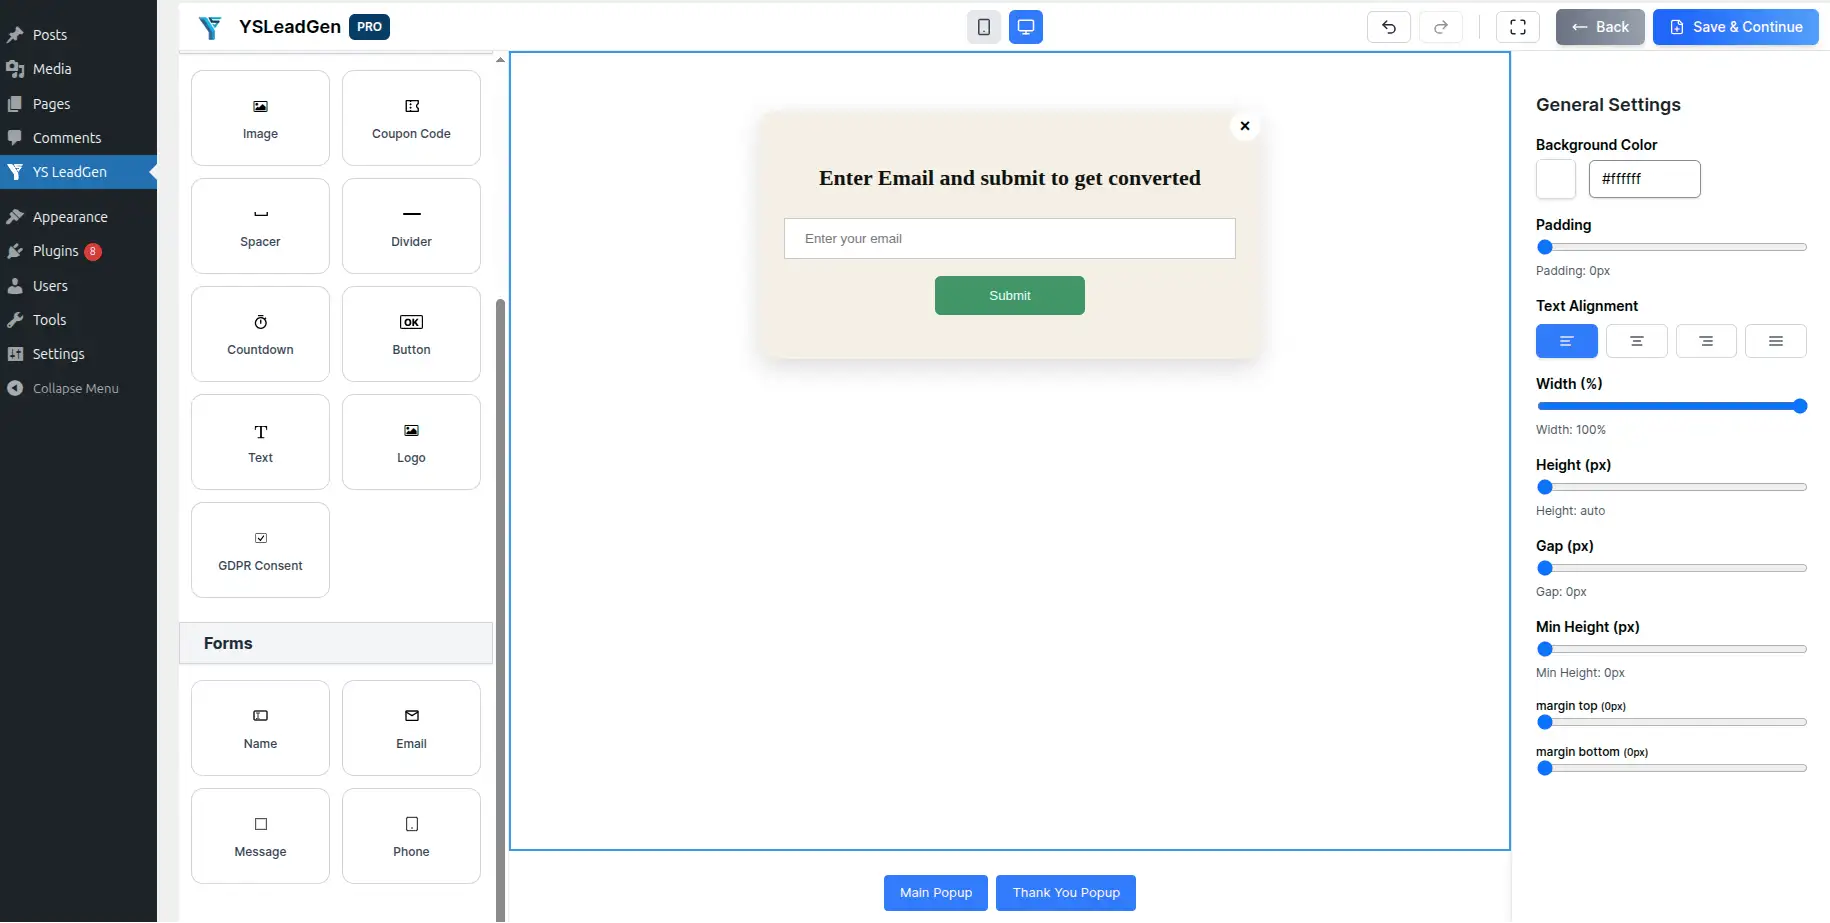
Example:
Headline: “Great Choice! Enter Your Email to Get Your Discount.” [Email Input Field] Button: “Send Me My Discount”
Keep the form as short as possible. Asking only for an email address at this stage maximizes completions.
Step 3 – The Confirmation (Thank You Screen)
After the visitor submits their email, show a confirmation screen to complete the experience.
You can add:
- A thank you message
- Details on what happens next
- A secondary CTA (optional — e.g., “Shop Now” or “Explore Our Deals”)
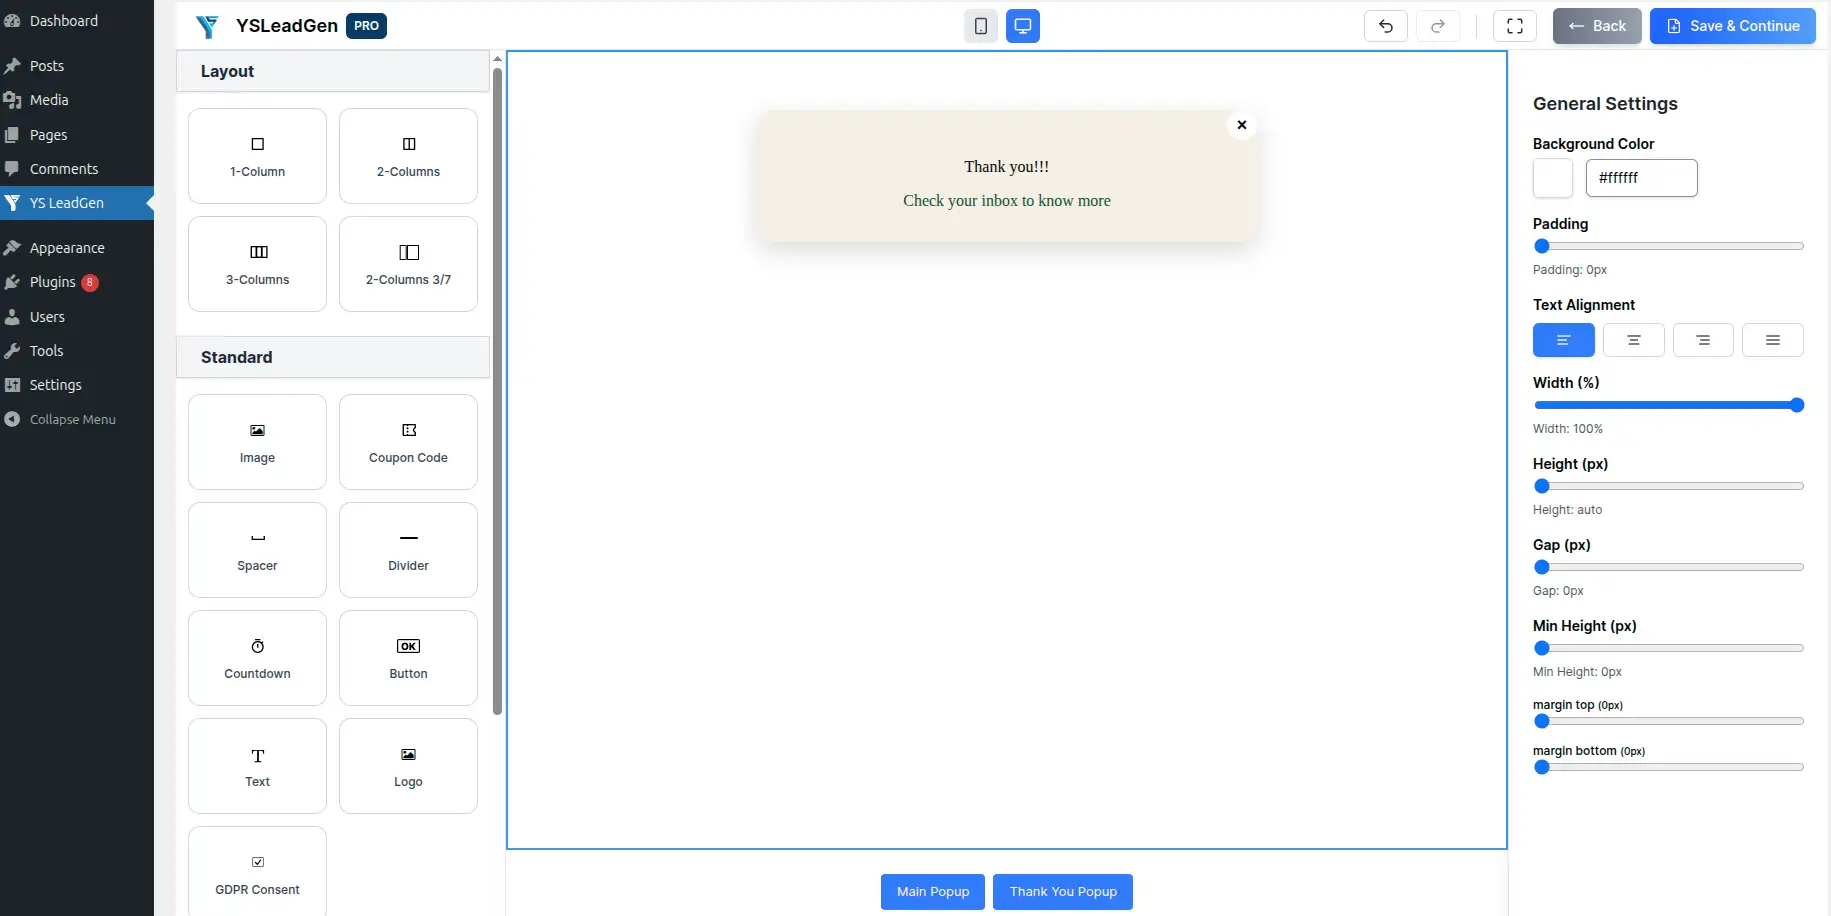
Example:
Headline: “You’re All Set! 🎉” Description: “Your 15% OFF coupon code has been sent to your inbox. Check your email and start saving!” Button (optional): “Shop Now”
A well-designed confirmation step improves user satisfaction and can also drive immediate action.
Best Practices for Multi-Step Popup Design
A high-converting Multi-Step Popup should:
- Use a consistent visual style across all steps
- Keep each step focused on one action
- Use progress indicators if using 3+ steps
- Match your website branding
- Avoid excessive animations between steps
Simple and consistent designs across all steps perform better than complicated layouts.
Step 5 – Configure Popup Triggers
This step controls when your Multi-Step Popup appears to visitors.
Go to: Set Display Rules → Display Trigger
YS LeadGen supports multiple trigger options:
- Exit Intent Trigger – Popup appears when the visitor is about to leave the page
- Scroll Trigger – Popup appears after the visitor scrolls a defined percentage of the page
- Time Delay Trigger – Popup appears after the visitor spends a set amount of time on the page
- Click Trigger – Popup appears when a visitor clicks a specific button or link
For Multi-Step Popups, the most commonly used triggers are:
- Exit Intent (e.g., show popup when visitor is about to leave)
- Time Delay (e.g., show popup after 15 seconds on page)
- Scroll Trigger (e.g., show popup after 50% scroll depth)
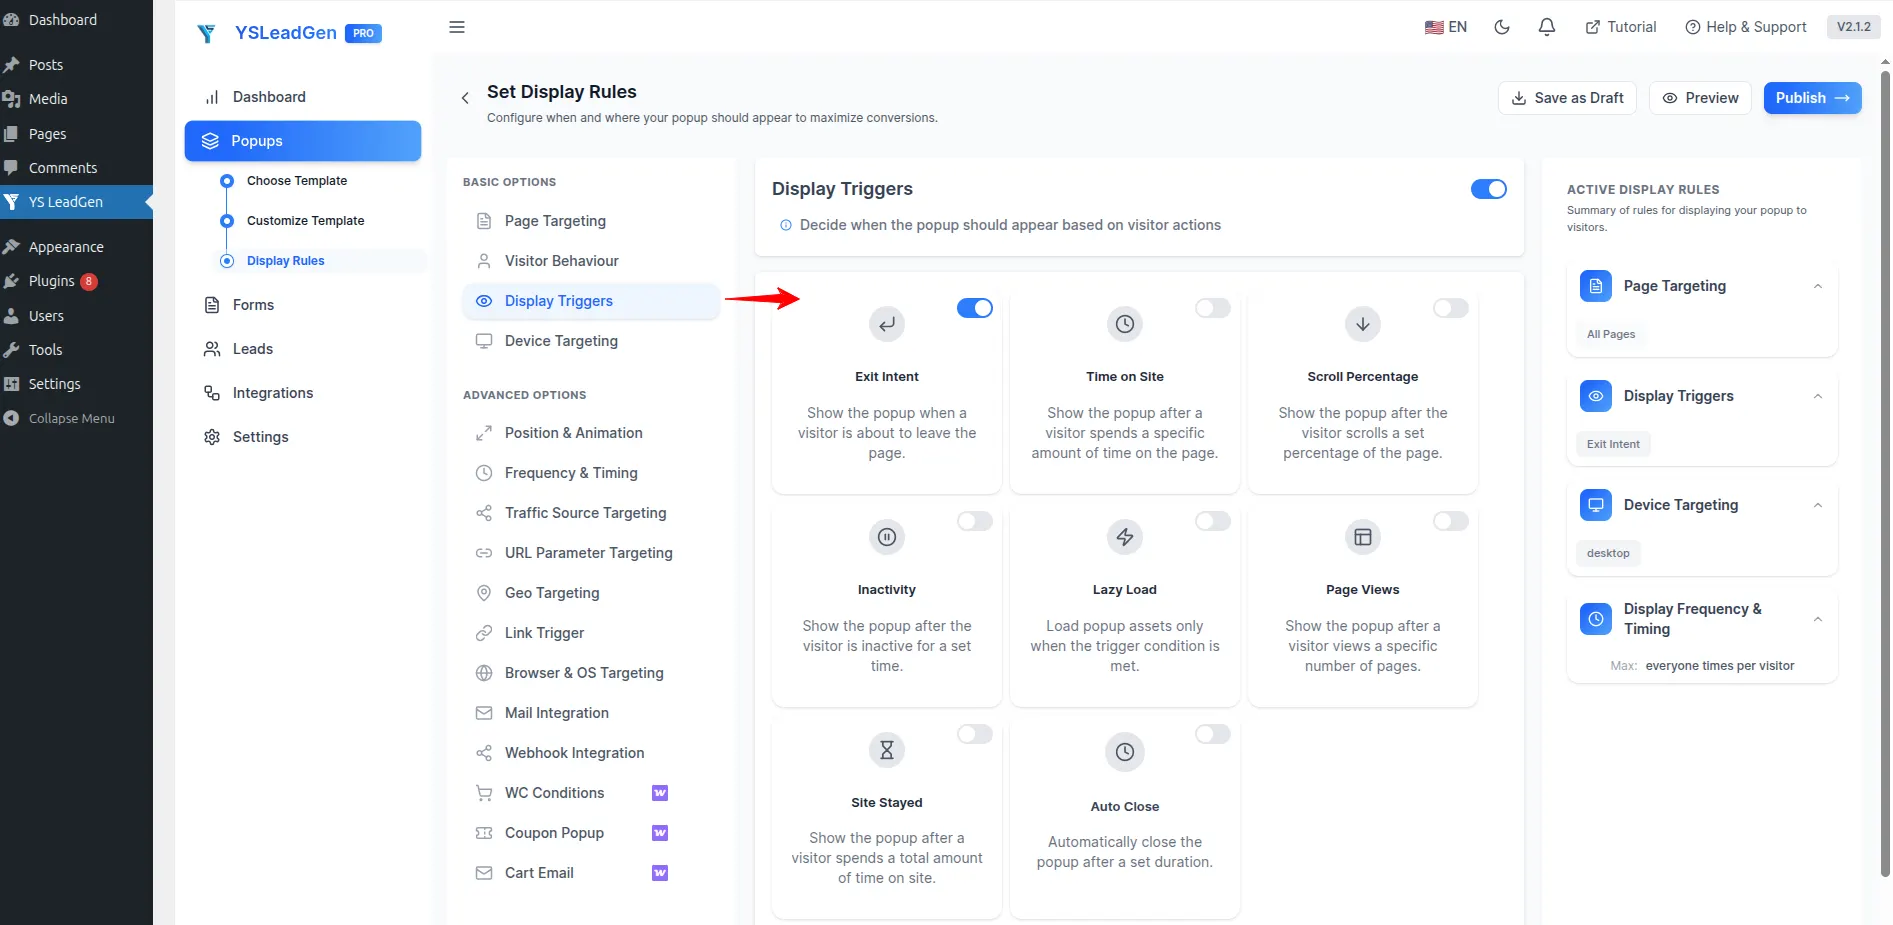
Choose the trigger that best matches your campaign goal and visitor behavior.
Why Smart Triggers Matter
Traditional popups often appear immediately after page load and can negatively affect user experience.
Smart triggers improve popup performance because they display the popup:
- Only when visitors are already engaged with your content
- At the right moment in the browsing journey
- Without disrupting early page exploration
This makes the Multi-Step Popup:
- Less intrusive
- More relevant
- More conversion-focused
As a result, Multi-Step Popups with smart triggers often generate significantly better conversion rates compared to immediate-load popups.
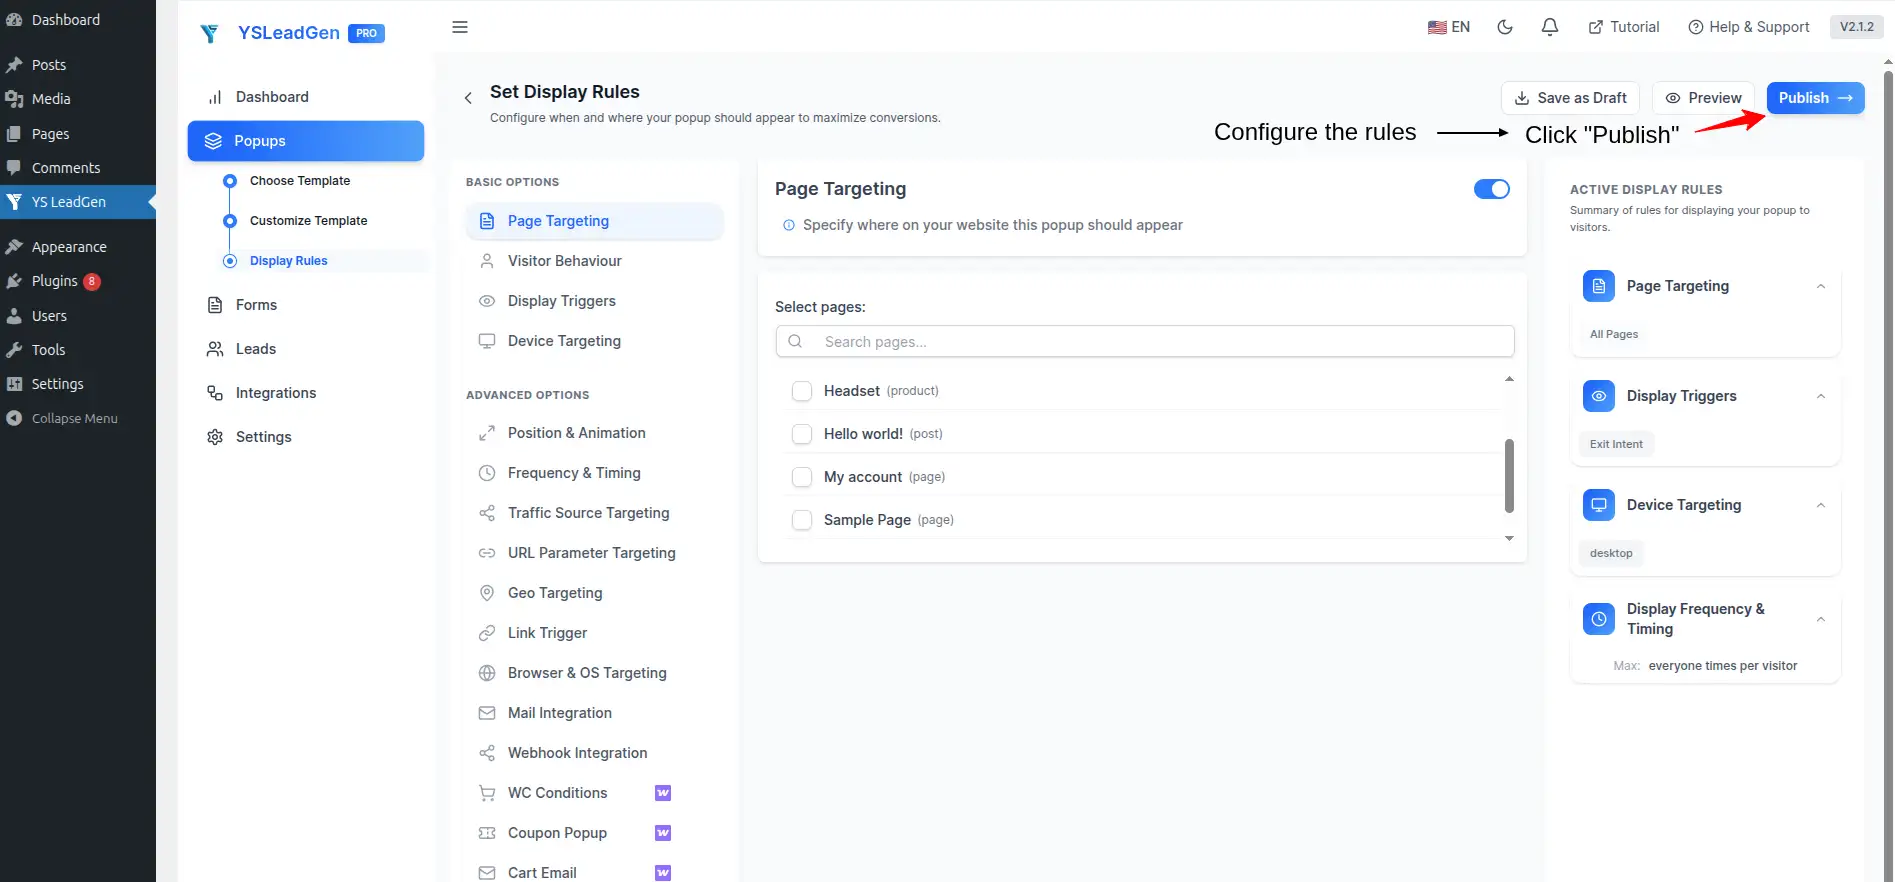
Step 6 – Configure Display Rules
Now it’s time to configure where and when the popup should appear.
Display rules help you show targeted popups based on visitor behavior and page conditions.
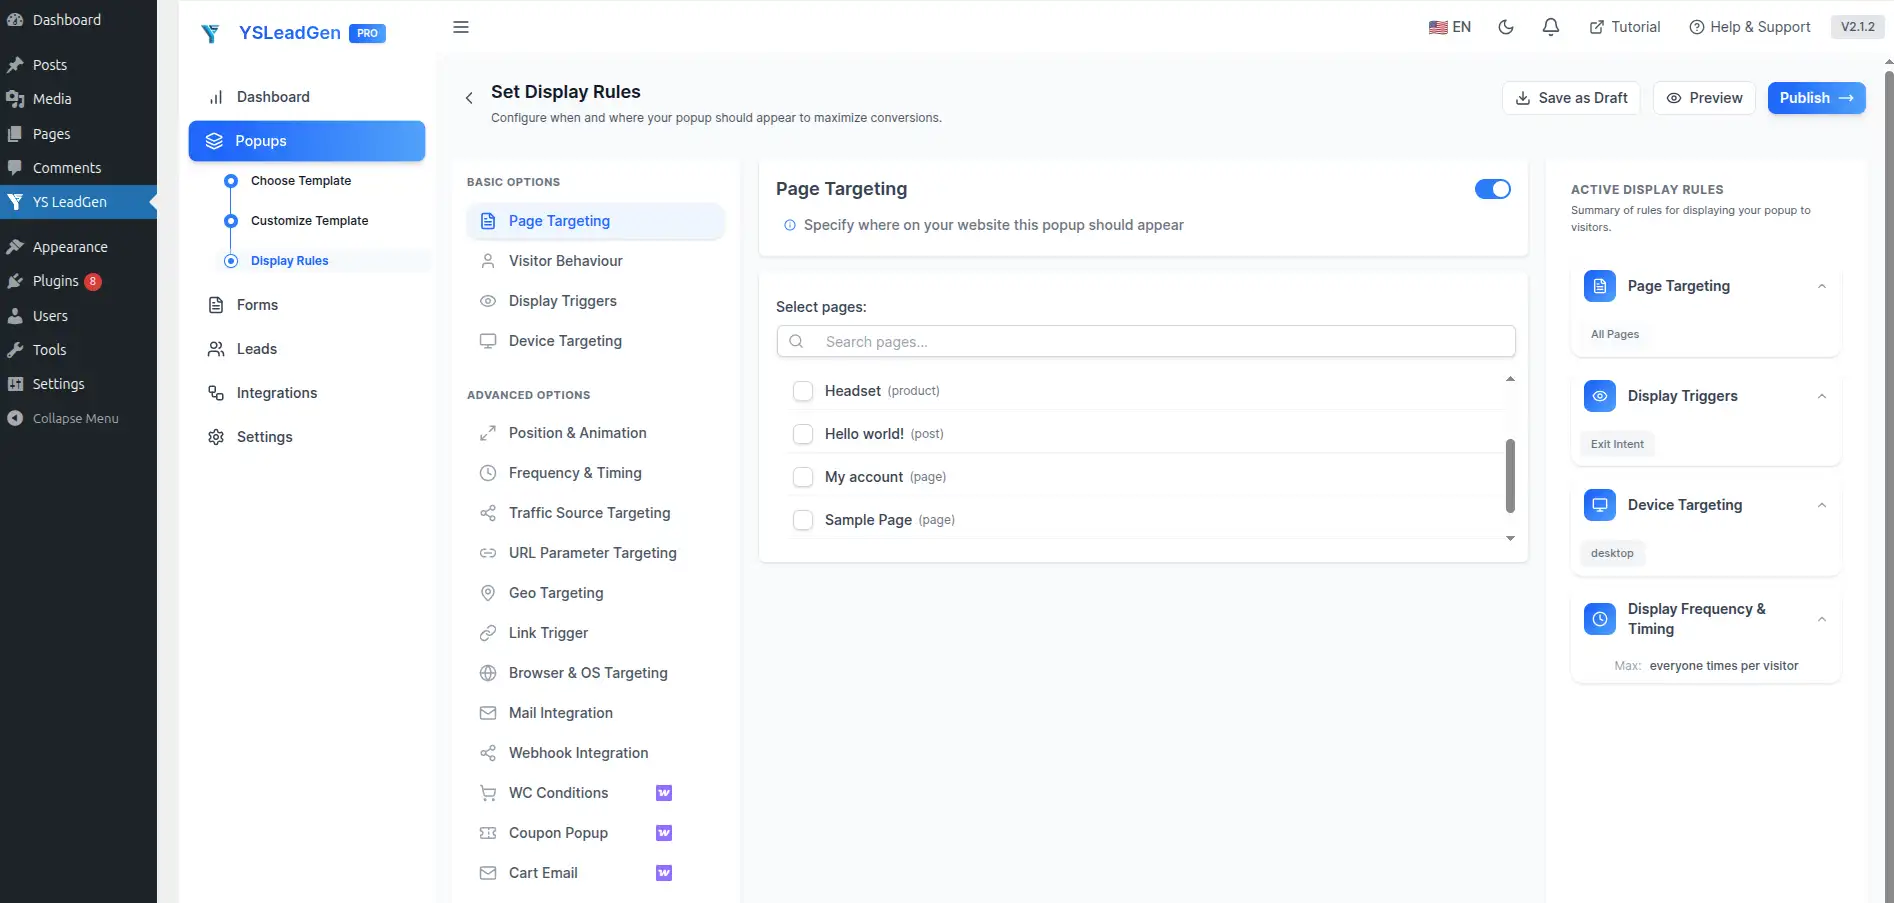
You can display the popup on:
- Entire website
- Homepage only
- Product pages
- Checkout pages
- Blog posts
- Landing pages
- Specific categories
Advanced targeting improves popup relevance and conversion opportunities.
Examples of Smart Popup Targeting
Different pages may require different multi-step popup strategies.
For example:
- Show a Yes/No discount multi-step popup on WooCommerce product pages
- Show a lead qualification popup on service or pricing pages
- Show a newsletter multi-step signup popup on blog articles
- Show a free trial request popup on SaaS landing pages
Personalized popups generally perform much better than generic site-wide popups.
Configure Device Targeting
You can also choose where the popup appears based on device type.
Display popup on:
- Desktop devices
- Mobile devices
- Tablets
Responsive popup optimization is important because a large percentage of website traffic comes from mobile users.
Configure Popup Frequency
Avoid showing popups repeatedly to the same visitors.
Good popup frequency settings include:
- Show once per session
- Hide after signup
- Delay repeat display
This creates a better browsing experience and prevents popup fatigue.
Step 7 – Publish the Popup
Once everything is configured, it’s time to publish your Multi-Step Popup.
Click: Publish
Your popup is now live on your WordPress website.Visitors will automatically see the Multi-Step Popup based on the trigger and display rules you configured.
Test Your Multi-Step Popup
After publishing, test the popup manually to ensure everything works correctly.
Check:
- All steps display correctly in sequence
- Buttons correctly advance to the next step
- Form submissions work properly
- Confirmation step appears after form submission
- Mobile responsiveness across all steps
- Trigger behavior
To test the full multi-step flow:
- Visit the page where the popup is configured
- Trigger the popup using your configured trigger (scroll, time delay, or exit intent)
- Click through each step of the popup
- Submit the form and verify the confirmation step appears
- Check that submitted data is captured correctly
Testing helps avoid user experience issues after launch.
Tips to Improve Multi-Step Popup Conversions
To maximize popup performance:
- Make Step 1 as easy as possible to interact with
- Confirm the offer at every step
- Keep forms short — ask only for what you need
- Use clear and action-oriented CTA buttons
- Optimize all popup steps for mobile users
Examples of strong CTA buttons:
- Yes, I Want This!
- Claim My Discount
- Send Me the Code
- Get Started Free
- Book My Free Call
Small improvements can significantly increase popup conversion rates.
Best Practices for High-Converting Multi-Step Popups
Creating a Multi-Step Popup is easy, but creating one that actually converts visitors into subscribers, leads, and customers requires the right strategy.
Many website owners make common mistakes like:
- Starting with a form on Step 1 instead of a yes/no question
- Using too many steps
- Losing consistency in design between steps
- Asking for too much information too soon
- Ignoring mobile optimization
As a result, visitors drop off before completing the popup flow.
To improve popup conversion rates, your Multi-Step Popup should be:
- Simple at every step
- Consistent in design
- Progressive in commitment
- Value-driven at each stage
- User-focused throughout
Below are the most important best practices for creating high-converting Multi-Step Popups on your WordPress website.
1. Start with a Low-Commitment First Step
The most important rule of multi-step popups is to never lead with a form.
The first step should be a simple, low-commitment interaction — typically a yes/no button or a single question.
Why this works:
Once a visitor clicks “Yes” or answers a question, they have made a small psychological commitment. This makes them far more likely to complete the following steps, including the form.
Example first step:
“Would you like FREE shipping on your next order?” → Yes / No Thanks
This principle is known as the foot-in-the-door technique and is one of the most well-proven strategies in conversion optimization.
2. Keep Each Step Focused on One Action
Multi-step popups work best when each step asks for only one thing.
- Step 1: One question or button click
- Step 2: One form (email only is ideal)
- Step 3: One confirmation message
Avoid adding multiple questions or form fields to a single step. The simpler each step feels, the higher the completion rate.
3. Offer Something Valuable
Visitors need a reason to interact with your popup.
If your popup does not provide value, users are likely to ignore or close it.
Instead of generic messages like:
“Subscribe to Our Newsletter”
Offer something useful such as:
- Discount coupons
- Free shipping
- Free ebooks
- Exclusive deals
- Free consultations
- Early access offers
Example:
“Get 20% OFF your first purchase — just enter your email.”
The stronger the offer, the higher the chances of a visitor completing all steps.
4. Use a Strong and Clear Headline at Every Step
Your popup headline is the first thing visitors read at each step.
Effective popup headlines should:
- Grab attention quickly
- Reinforce the offer or next action
- Build momentum from the previous step
Step 1 headline example:
“Want an Exclusive Deal Before You Go?”
Step 2 headline example:
“Almost There! Enter Your Email to Claim Your Offer.”
Step 3 headline example:
“Your Discount Is on Its Way!”
Clear and benefit-focused headlines improve completion rates at every stage of the popup flow.
5. Keep the Popup Design Consistent Across All Steps
Inconsistent design between popup steps can confuse visitors and reduce trust.
Ensure all steps share:
- The same color scheme
- The same font styles
- The same general layout structure
- Consistent branding elements
A cohesive visual experience across all steps builds confidence and encourages visitors to continue through the flow.
6. Use Strong Call-to-Action (CTA) Buttons
Your CTA buttons should be specific, benefit-focused, and action-oriented.
Weak CTA examples:
- Submit
- Next
- Continue
Better CTA examples:
- Yes, I Want This!
- Claim My 15% OFF
- Send Me the Discount
- Get My Free Resource
Strong CTAs create clarity and motivate visitors to advance through each step.
7. Limit the Number of Steps
While multi-step popups are effective, adding too many steps can cause drop-off.
For most campaigns, 2 to 3 steps is the ideal range:
- 2 steps: Hook → Form
- 3 steps: Hook → Form → Confirmation
- 4 steps: Hook → Qualification → Form → Confirmation (for lead qualification flows)
Avoid creating 5+ step popup flows unless you have a very specific, well-tested reason. More steps generally mean more drop-off points.
8. Optimize for Mobile Devices
A large percentage of website traffic now comes from mobile users.
Your Multi-Step Popup should be fully responsive on:
- Smartphones
- Tablets
- Desktop devices
Mobile-friendly popups should:
- Load quickly
- Fit smaller screens properly
- Use readable fonts
- Have large, easy-to-tap buttons
Poor mobile optimization can negatively affect user experience, SEO performance, and conversion rates.
Always test your popup on different devices before publishing.
9. Use Targeted Display Rules
Not every visitor should see the same popup.
Smart popup targeting helps display more relevant offers based on:
- Pages visited
- User behavior
- Device type
- Cart activity
- Traffic source
Examples:
- Show discount multi-step popups on product pages
- Show lead qualification popups on service pages
- Show newsletter popups on blog posts
Targeted popups usually generate better engagement and higher conversion rates than generic site-wide popups.
10. Test and Optimize Each Step
Even small improvements at each step can dramatically increase overall completion rates.
Test different:
- Step 1 headlines and button text
- Form field count
- CTA button copy
- Popup designs
- Offers and incentives
- Trigger timing
A/B testing helps identify which popup version performs best for your audience.
Continuous optimization is important for improving long-term popup performance.
Common Mistakes to Avoid
Multi-Step Popups can significantly improve lead generation, email subscriptions, and WooCommerce sales when implemented correctly. However, many website owners make mistakes that reduce popup performance and negatively affect user experience.
One of the most common mistakes is starting with a form on Step 1. Asking for an email address immediately — without first getting a simple yes or low-effort interaction — feels like too much, too fast. Always start with a question or yes/no button to warm up the visitor before presenting the form.
Another major mistake is using too many steps. While a multi-step flow is effective, too many steps create unnecessary friction. Most campaigns perform best with 2 to 3 steps. More than 4 steps should only be used for well-tested lead qualification flows.
Inconsistent design across steps is another issue that reduces trust. If Step 1 looks drastically different from Step 2, visitors may think they have been redirected to a different popup or website. Keep all steps visually consistent.
Many businesses also ask for too much information too soon. The form step should be as short as possible — ideally just an email address. You can collect additional information later through email follow-ups or onboarding flows.
Another mistake is ignoring mobile optimization. Since a large percentage of traffic comes from smartphones, your popup — and every step within it — should be fully responsive and easy to interact with on mobile devices. Pay special attention to button sizes and font readability on smaller screens.
Finally, many website owners fail to test the complete multi-step flow end-to-end. Always test the popup yourself from Step 1 through to the confirmation screen before publishing. Broken button links, missing confirmation steps, or form submission errors can silently kill your conversion rates without you realizing it.
Avoiding these mistakes can help you create more effective Multi-Step Popups that improve user engagement and increase conversions.
Conclusion
Multi-Step Popups are one of the most powerful ways to convert passive visitors into engaged subscribers, qualified leads, and paying customers.
By breaking the conversion process into small, manageable steps, multi-step popups reduce friction, lower form abandonment, and guide visitors naturally toward taking action.
Instead of losing potential customers to a single overwhelming form, businesses can use Multi-Step Popups to create engaging, conversational flows with:
- Yes/No engagement steps
- Lead capture forms
- Discount reveal screens
- Qualification questions
- Confirmation and thank you messages
Whether you run a WooCommerce store, SaaS website, business site, or blog, Multi-Step Popups can help:
- Increase email subscribers
- Generate and qualify more leads
- Reduce form abandonment
- Improve customer engagement
- Boost website conversion rates
The best part is that creating a Multi-Step Popup in WordPress is simple and beginner-friendly.
Using popup builder plugins like YS LeadGen, you can quickly create professional Multi-Step Popups with ready-made templates, step-by-step flow editors, smart display rules, and advanced popup triggers — without any coding knowledge.
By following the strategies and best practices shared in this guide, you can create high-converting Multi-Step Popups that turn casual visitors into subscribers, leads, and paying customers.
Frequently Asked Questions (FAQs)
What is a Multi-Step Popup?
A Multi-Step Popup is a website popup that guides visitors through a sequence of steps instead of presenting a single form. It uses a low-commitment first step — like a yes/no question — to encourage engagement before asking for an email or other contact details.
Why are Multi-Step Popups more effective than single-step popups?
Multi-Step Popups leverage the micro-commitment principle. Once a visitor takes the first small action (like clicking "Yes"), they are psychologically more likely to complete the remaining steps — including filling out a form. This reduces abandonment and improves conversion rates.
How many steps should a Multi-Step Popup have?
For most campaigns, 2 to 3 steps is ideal. A typical flow includes a hook step (Yes/No), a form step (email capture), and a confirmation step (thank you message). Lead qualification flows may use up to 4 steps.
Can I create a Multi-Step Popup without coding?
Yes. Using WordPress popup builder plugins like YS LeadGen, you can create professional Multi-Step Popups without any coding knowledge. The popup editor allows you to design each step visually and configure the flow easily.
Do Multi-Step Popups work on mobile devices?
Yes. Modern WordPress popup plugins support fully responsive popup designs that work across mobile, tablet, and desktop devices. Always test your popup on different screen sizes before publishing.
Can Multi-Step Popups increase WooCommerce sales?
Yes. A well-designed multi-step popup can show a discount offer, collect an email, and deliver a coupon code — all within a few steps. This approach is very effective for reducing cart abandonment and encouraging first-time purchases on WooCommerce stores.
What is the best first step for a Multi-Step Popup?
The best first step is always a low-commitment action — such as a yes/no button or a single question. This gets the visitor engaged before asking for their contact information. Avoid starting with a form.
What is the best WordPress Multi-Step Popup plugin?
YS LeadGen is a beginner-friendly WordPress popup plugin that helps create Multi-Step Popups, lead generation flows, newsletter signups, and WooCommerce promotional popups easily.
What triggers work best for Multi-Step Popups?
Exit Intent, Time Delay, and Scroll triggers all work well for Multi-Step Popups. Exit Intent is especially effective for discount and cart recovery flows, while Scroll and Time Delay triggers work well for lead generation and newsletter signups.
What types of offers work best in Multi-Step Popups?
High-converting offers include:
- Discount coupons (delivered after email capture)
- Free shipping deals
- Free ebooks or lead magnets
- Free consultations or demos
- Exclusive membership access
- Limited-time promotional offers
About the author
YSLeadGen Pro - Lifetime Deal
Access to unlimited popups, advanced targeting, event triggers, and premium templates.
14-Days Risk Free Money Back Guarantee